
Release Notes
- For the latest features, fixes, and updates, see the Release Notes
Onboarding
Prerequisite
The org should have a custom domain, and My Domain should be enabled and deployed to users.
If you don’t have a custom domain set up in your Salesforce org, please click here and follow the steps to configure it.
Package Availability:
This package is available for installation in Enterprise, Unlimited, and Professional editions with minimum API access.
Installing App
Go to the Package URL below or click here.
Package URL: https://login.salesforce.com/packaging/installPackage.apexp?p0=04tf6000000GcR7
If you’re not already logged into Salesforce, it will ask you to log in. Log in into Salesforce.
After logging into the org
Step 1: The screen will redirect to the App installation page.
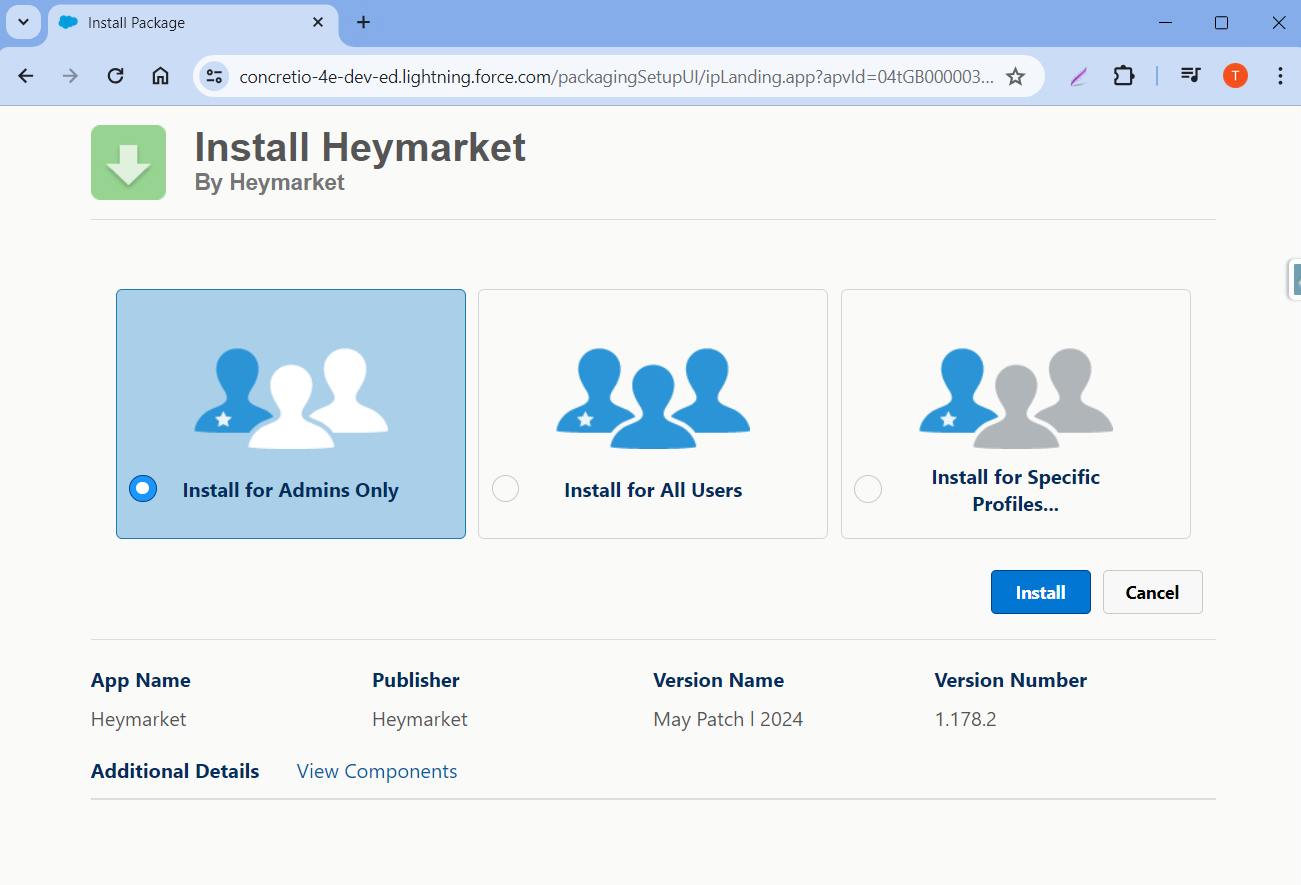
Step 2: Select Install for Admins Only and click Install. You can give the correct permissions for non-admin users through the Setup screen later.
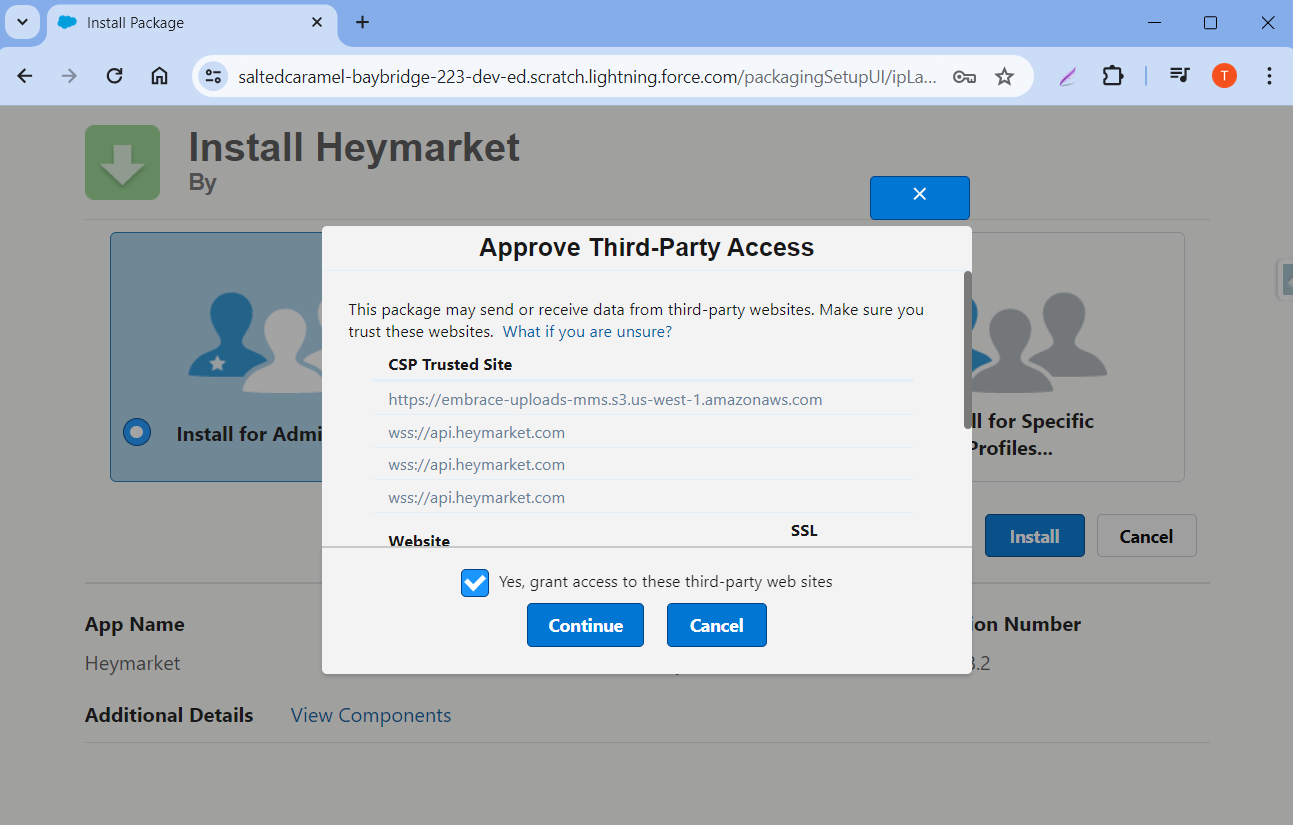
Step 3: Check the box to grant third-party access and click Continue. It will take a few minutes to install the app. Once installed, it will appear in the App Launcher.
Designated Administrator
A designated administrator is a Salesforce user, usually the system admin of the Salesforce org, responsible for managing the Heymarket app and other installed apps from AppExchange. The designated administrator for the Heymarket app will be able to perform critical setup functions such as:
- Managing the integration between Salesforce and Heymarket, with required access to Heymarket API Secrets and admin functions.
- Mapping Salesforce Users (Sales/Service and other personas) to Heymarket users.
- Creating/inviting new Users in Heymarket as needed.
- Deciding which phone field is the default for communication in Account, Contact, and Lead objects.
- Mapping which fields in Heymarket will be synced with fields on Salesforce objects like Contact and Lead.
- Creating new fields in Heymarket based on matching Salesforce fields.
- Setting up and triggering a bi-directional sync behavior and a scheduled job which will keep Heymarket Contacts in sync with Salesforce object records.
- Monitoring the status of syncs and various logs.
Designated administrators should assign a permission set named Heymarket Admin to themselves
Assigning yourself the Heymarket Admin permission set:
Step 1: Go to Setup.
Step 2: Search for Permission Sets in the quick find, and click on the Permission Sets menu item under Users.
Step 3: In the next screen, click the Heymarket Admin Permission set.
Step 4: On the Heymarket Admin permission set view, hit the Manage Assignments button.
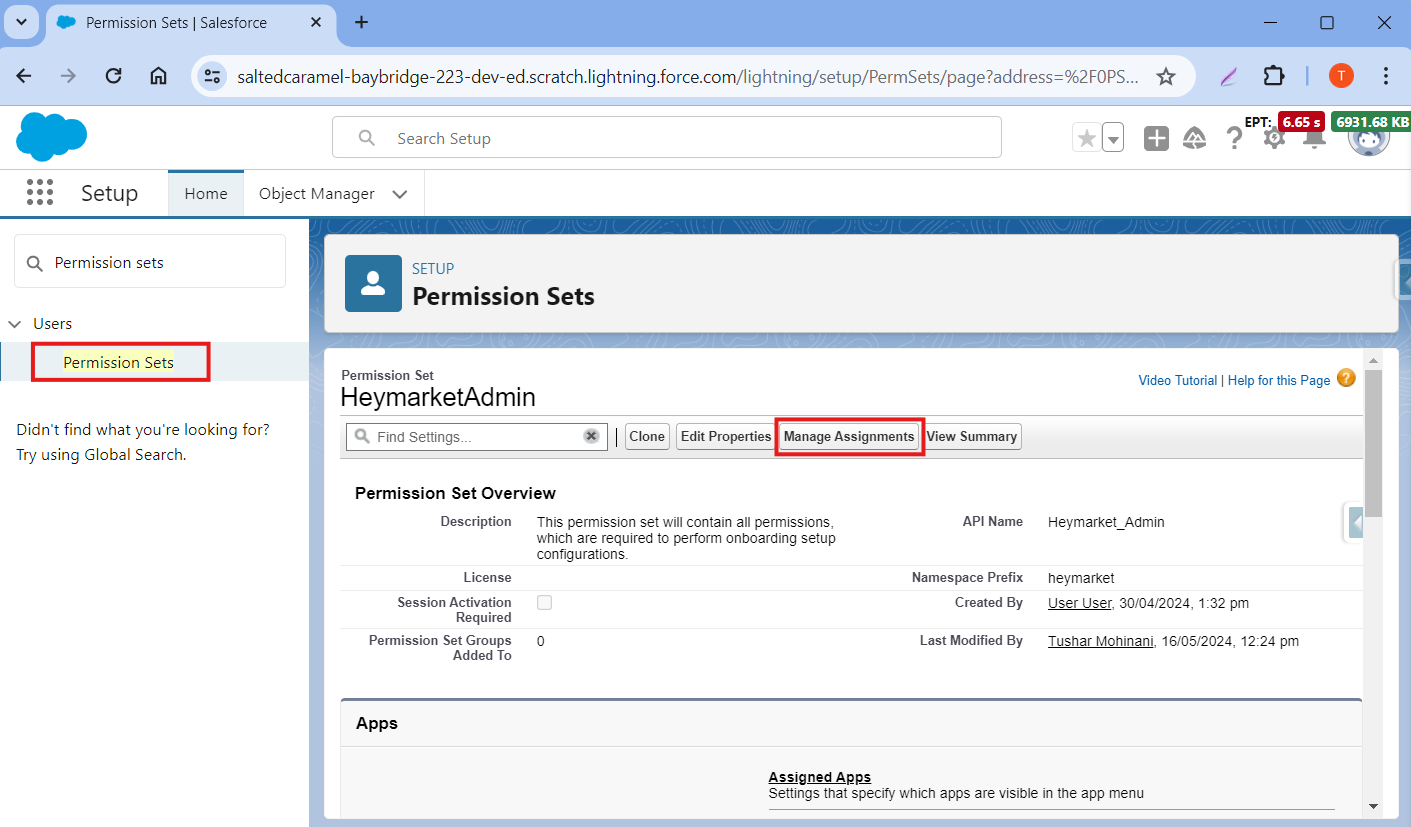
Step 5: On the next screen, hit the Add Assignments button to assign the required users Heymarket Administrator permissions.
Alternatively, you can go to a single Salesforce admin user and assign them the Heymarket Admin permission set as described in this Salesforce Help Article: https://help.salesforce.com/articleView?id=perm_sets_assigning.htm&type=5
Integration API-Only Users permission set
If you plan to send messages through automations using an Integration (API-Only) user, assign the dedicated Heymarket permission set built for Integration API-Only Users to that user. Standard Heymarket permission sets cannot be assigned to users on the "Integration API Only" profile. With this dedicated permission set assigned, the Integration API-Only user can send messages via automations without restrictions.
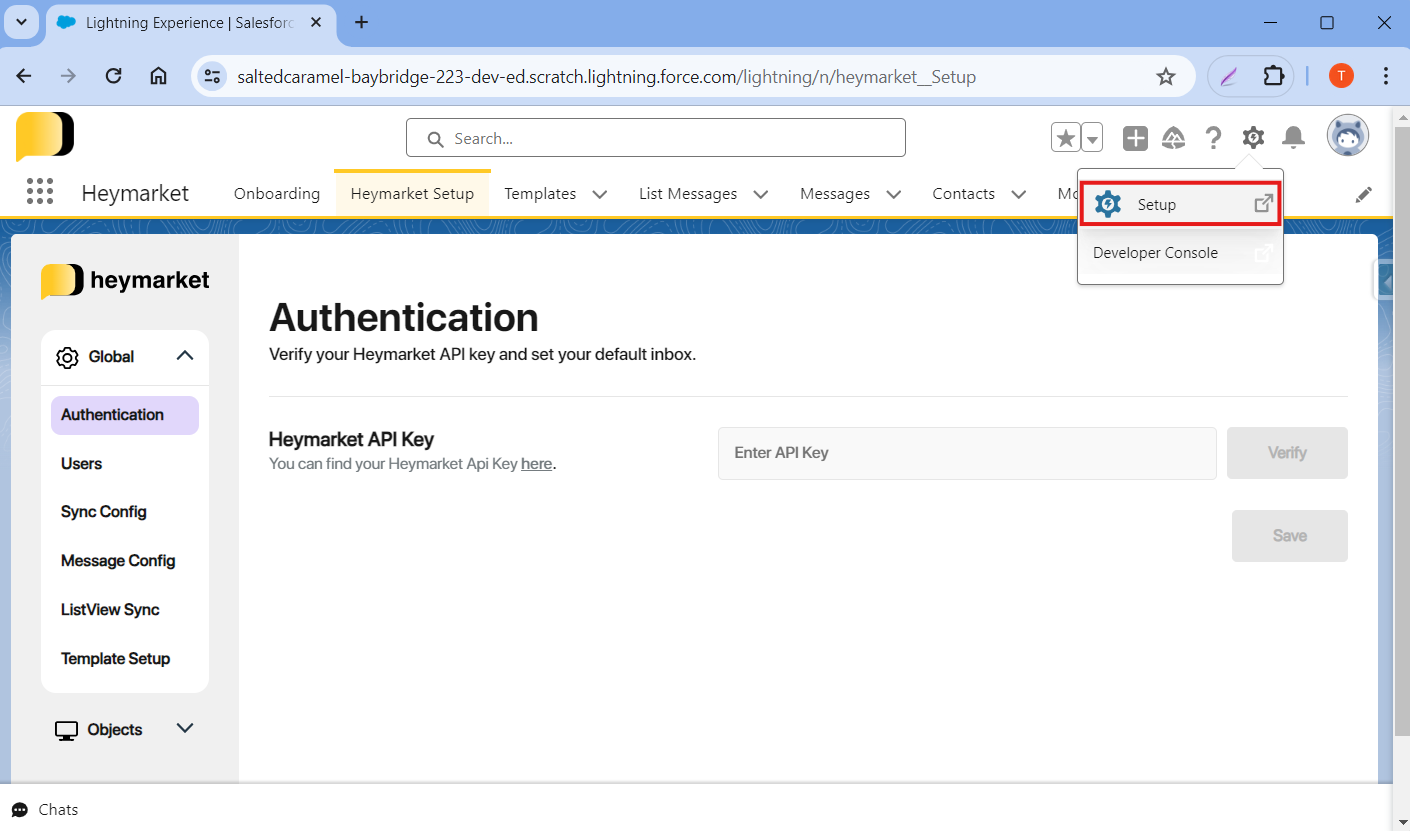
Heymarket API Secrets
To use Heymarket's messaging features in Salesforce, you'll need your Heymarket API secrets. Secrets securely connects Salesforce with Heymarket. Setting it up lets you send and receive SMS messages directly in Salesforce.
Getting the Heymarket API Secrets:
Step 1: Log in to Heymarket and navigate to Admin > Integrations > Manage on app.heymarket.com
Step 2: Click on Generate Secret and copy new secrets to your clipboard by clicking on the Copy button.
Navigating the onboarding widget:
Onboarding widget will only appear if you haven't completed the onboarding process or haven't set up the necessary features yet.
Step 1: Log in to Salesforce and launch the Heymarket app via the App Launcher.
Step 2: Go to the Administration tab, paste the copied API Secrets, and click the Verify button.
Step 3: Choose the inbox you want to use as the default for chats, and click on Save & Next.
Step 4: User Mapping
This step allows you to map specific Salesforce users with their corresponding Heymarket users. It also sets default inboxes and enables permissions for using Heymarket features for each mapped user.
-
Mapping Users:
- Under Salesforce Users, select the Salesforce user you want to map.
- Under Heymarket Users, select the corresponding Heymarket user or invite/create a new Heymarket user directly from Salesforce.
- Default Inbox: The default inbox selection becomes available after choosing a Heymarket user.. You can also choose the Org Default Inbox for users.
- Permissions: All required app permissions are automatically assigned to the mapped Salesforce users.
Step 5: Object Configuration
This step allows you to specify which Salesforce objects will be used with Heymarket.
- Select the Salesforce object you want to use with Heymarket (e.g., Account, Contact, Lead).
- Choose the default phone field associated with the selected object. This will be the field Heymarket uses to send and receive messages.
Step 6: Message Configuration
This step allows you to control which Heymarket message inboxes are synced with Salesforce.
- Select the specific Heymarket inboxes you want to sync with Salesforce or select All Inboxes to sync everything.
Note: After saving this configuration, message syncing will start. Messages will then be synced every minute. To cancel syncing later, go to the "Sync Messages" tab under "Sync & Status" and click "Cancel Sync."
After completing the above steps, your Heymarket and Salesforce integration will be set up. The confirmation screen should look like this:
Configurations
Global
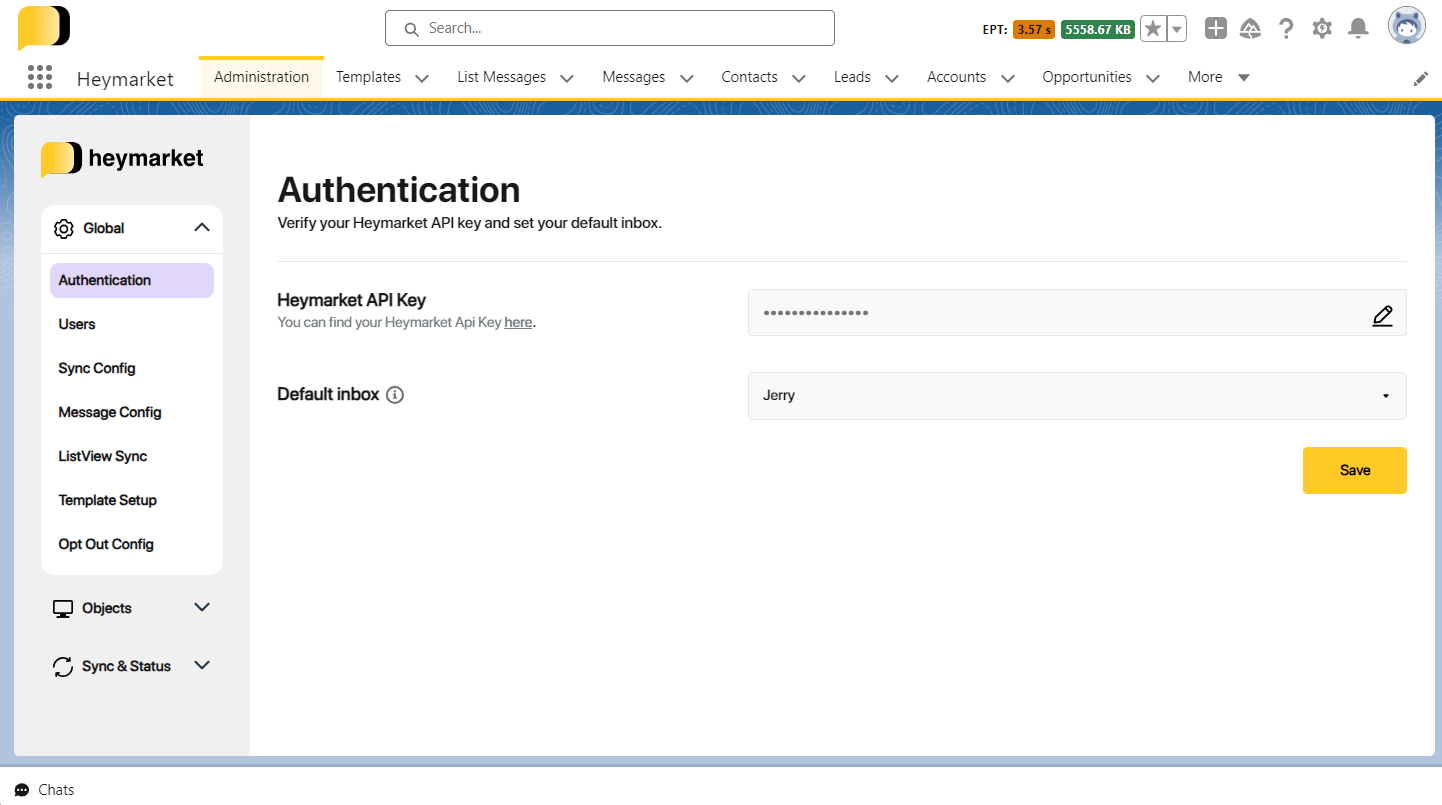
Adding the Heymarket API Secrets to Salesforce
Step 1: Log in to Salesforce, and launch the Heymarket app from the App Launcher.
Step 2: Navigate to the Administration tab, and paste your copied Heymarket API Secrets into the designated field. Click the Verify button to verify the API Secrets.
Note: If your org is still using the legacy API Key method, Heymarket shows an "Old Authentication Detected" prompt with a Migrate Now button on the Authentication screen. Click Migrate Now and enter the required Secret ID and Secret Key to switch to API Secrets. Enter only the API Secrets of the existing configured team to avoid data loss.
Default Inbox Selection
Choose the inbox you want to use as the default for chats. This will be the default inbox when you open the Chat Widget.
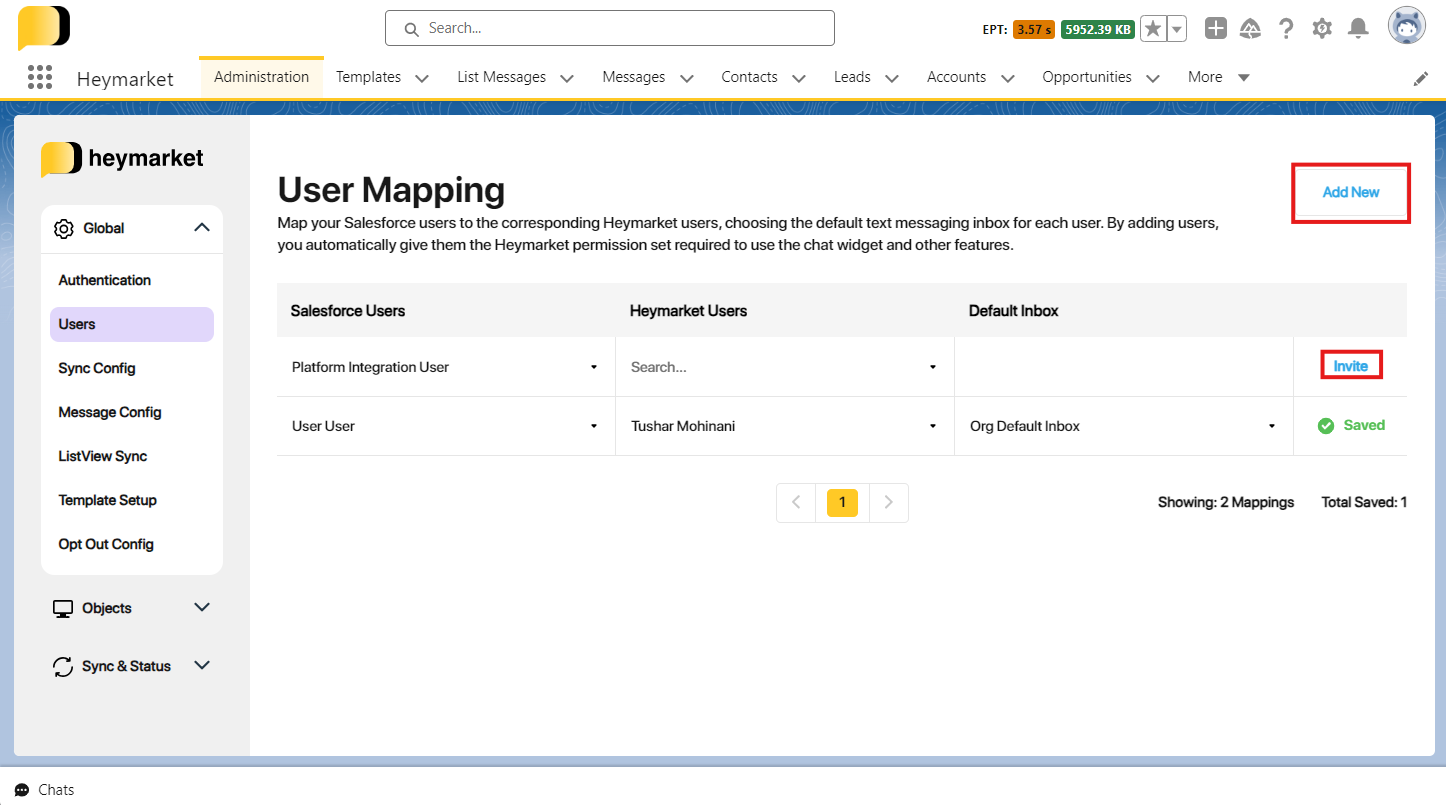
User Mapping
This section allows you to map specific Salesforce users with their corresponding Heymarket users. It also sets default inboxes and enables permissions for using Heymarket features for each mapped user.
-
Mapping Users:
- Under Salesforce Users, select the Salesforce user you want to map.
- Under Heymarket Users, select the corresponding Heymarket user or invite/create a new Heymarket user directly from Salesforce.
- Default Inbox: The default inbox selection becomes available after choosing a Heymarket user.. You can also choose the Org Default Inbox for users.
- Permissions: All required app permissions are automatically assigned to the mapped Salesforce users.
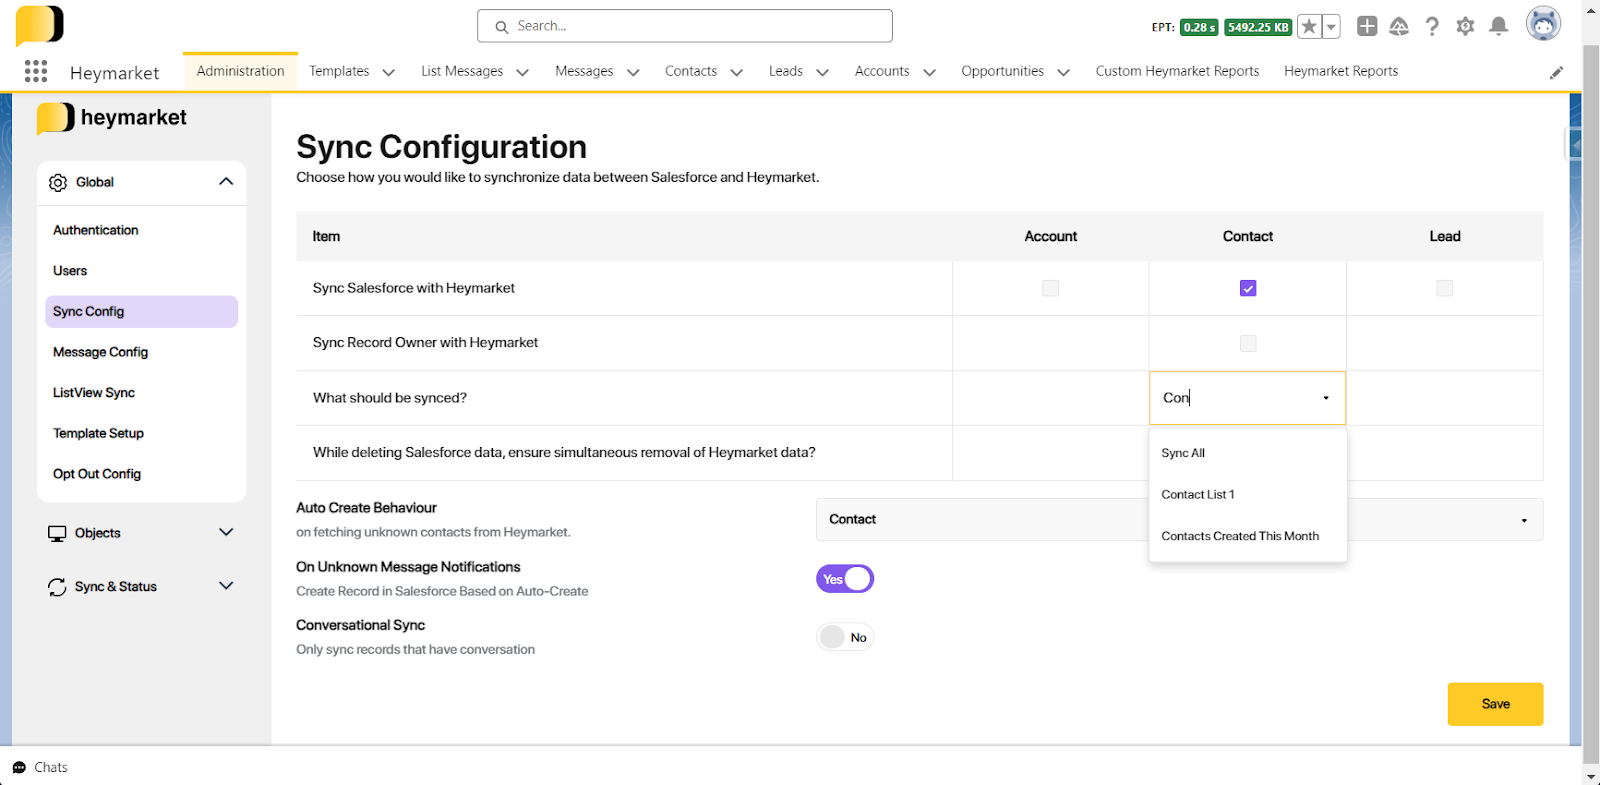
Sync Configuration
In this screen, you need to set up the details to enable sync between Salesforce and Heymarket.
-
Sync Salesforce with Heymarket:
- Enable/disable syncing specific object records (Contacts, Leads, Accounts) between Salesforce and Heymarket.
-
Sync Record Owner with Heymarket:
- By enabling this feature, you can sync record ownership along with the records themselves.
-
What should be synced?
- Choose between:
- Sync All: Synchronize all records of the selected object.
- A Listview: Sync only records matching a specific Salesforce list view filter.
- Choose between:
-
While deleting Salesforce data, ensure simultaneous removal of Heymarket data.
- Select this checkbox to automatically delete corresponding Heymarket records whenever a record is deleted from Salesforce during a sync.
-
Auto Create Behaviour:
- Define how Heymarket contacts are handled in Salesforce:
- Choose to automatically create Accounts, Contacts, Leads, or None when a new contact is created on Heymarket.
- Define how Heymarket contacts are handled in Salesforce:
-
On Unknown Message Notifications:
- Enable this feature to create Salesforce records (based on Auto-create settings) for messages received from unknown numbers. When this feature is enabled, any incoming message from a number not recognized by Salesforce will trigger the creation of a new record. You can specify the type of record to be created (e.g., Account, Contact, Lead) in the Auto-Create Behaviour. This ensures that no communication is missed and allows for better tracking and follow-up.
-
Conversational Sync:
- Enabling this option syncs only those Salesforce records that have associated conversations or are already synced with Heymarket. This feature helps prevent unnecessary data from being synced.
- Note: Conversational Sync requires message sync to be enabled. Additionally, if message sync is configured for specific inboxes, only records with phone numbers associated with conversations in those inboxes will be synced.
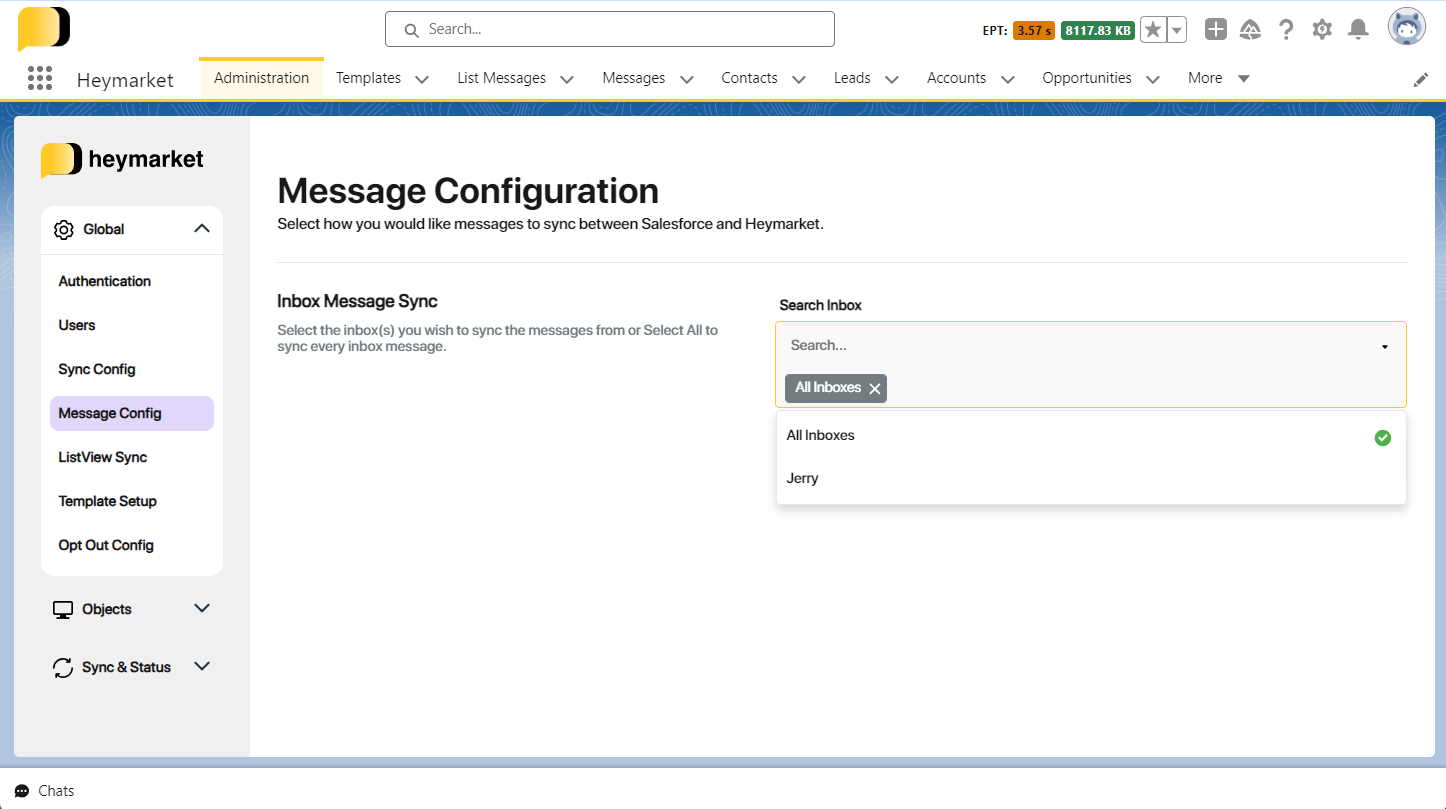
Message Configuration
This setting enables you to ensure that only messages from designated inboxes are synchronized with Salesforce.
Select the specific Heymarket inboxes you want to sync with Salesforce. You can choose individual inboxes or select All Inboxes to sync messages from every inbox.
Listview Sync
This section allows you to synchronize specific Salesforce list views with Heymarket contact lists. However, Listview Sync is only available for Sync Enabled objects.
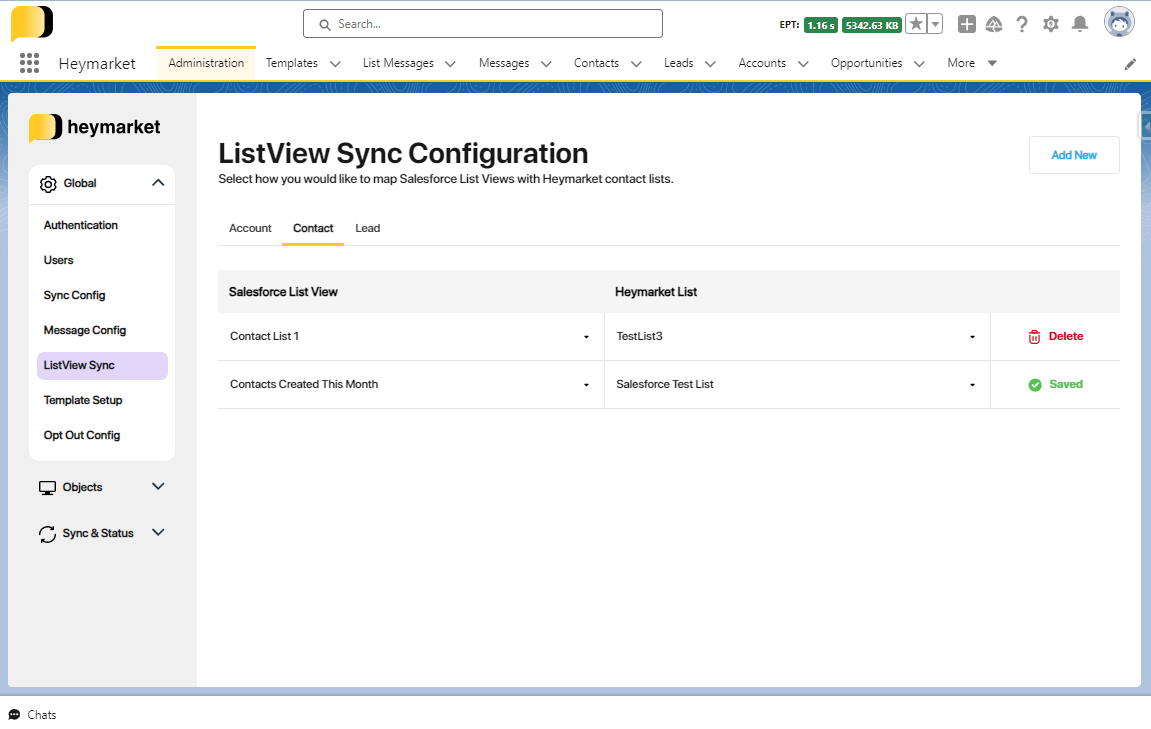
These mappings will add List View's records to the mapped Heymarket Contact Lists during the sync process.
If you want to delete any mapping, hover over the Saved button and a Delete button will display.
If there is no List View present for a particular object, you might see this message at the bottom of the screen: “Currently this object does not have any List Views. You can create a new List View with required filters.” When you click Create New List View, it will redirect you to the object page, where you can create and manage List Views.
Template Setup
-
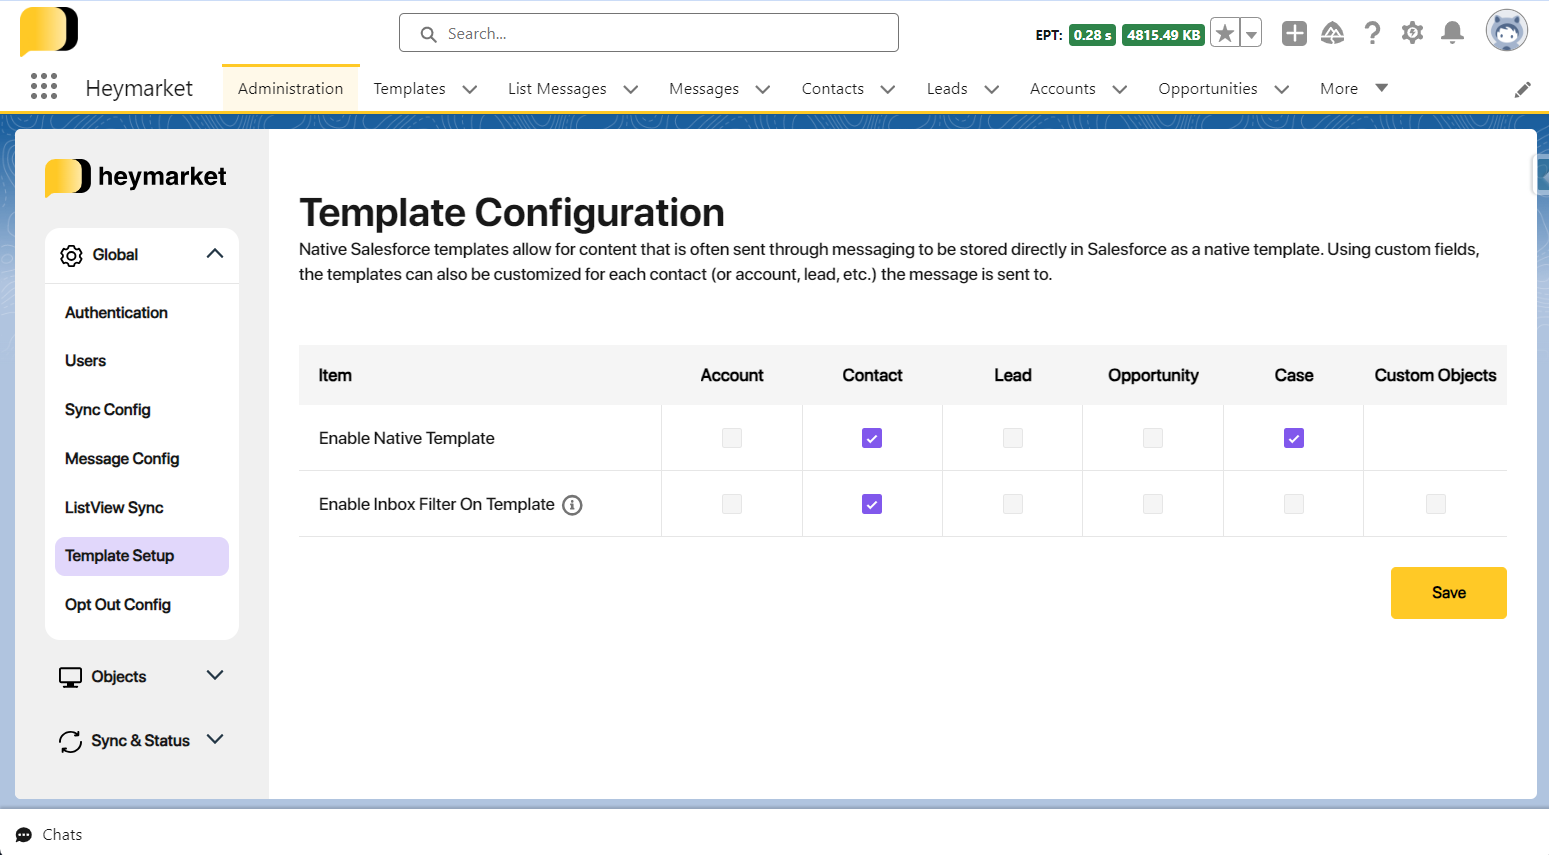
Enable Native Template:
- You can enable Salesforce native templates in the chat by marking the checkbox for the relevant object. These are predefined message templates provided by Salesforce, including common responses and greetings. Enabling native templates lets you quickly use these messages in your chats, saving time and ensuring consistent communication.
- Additionally, you can personalize native templates by including merge fields that automatically populate with data from related Salesforce objects. This allows you to personalize messages with dynamic content, such as the recipient's name or company.
-
Enable Inbox Filter on Template:
- When this option is checked, templates will be filtered based on the inbox selected when composing a message. This means that only templates associated with the selected inbox will be available for selection.
- For example, if you have multiple inboxes set up for different departments or purposes, enabling this option will ensure that only templates relevant to the selected inbox are displayed, making it easier to find the right template for your message.
- If this option is unchecked, all templates will be available regardless of the inbox selected. This can be useful if you have templates that are applicable across all inboxes or if you prefer to have all templates available regardless of the message's origin.
Creating a new Salesforce Native Template
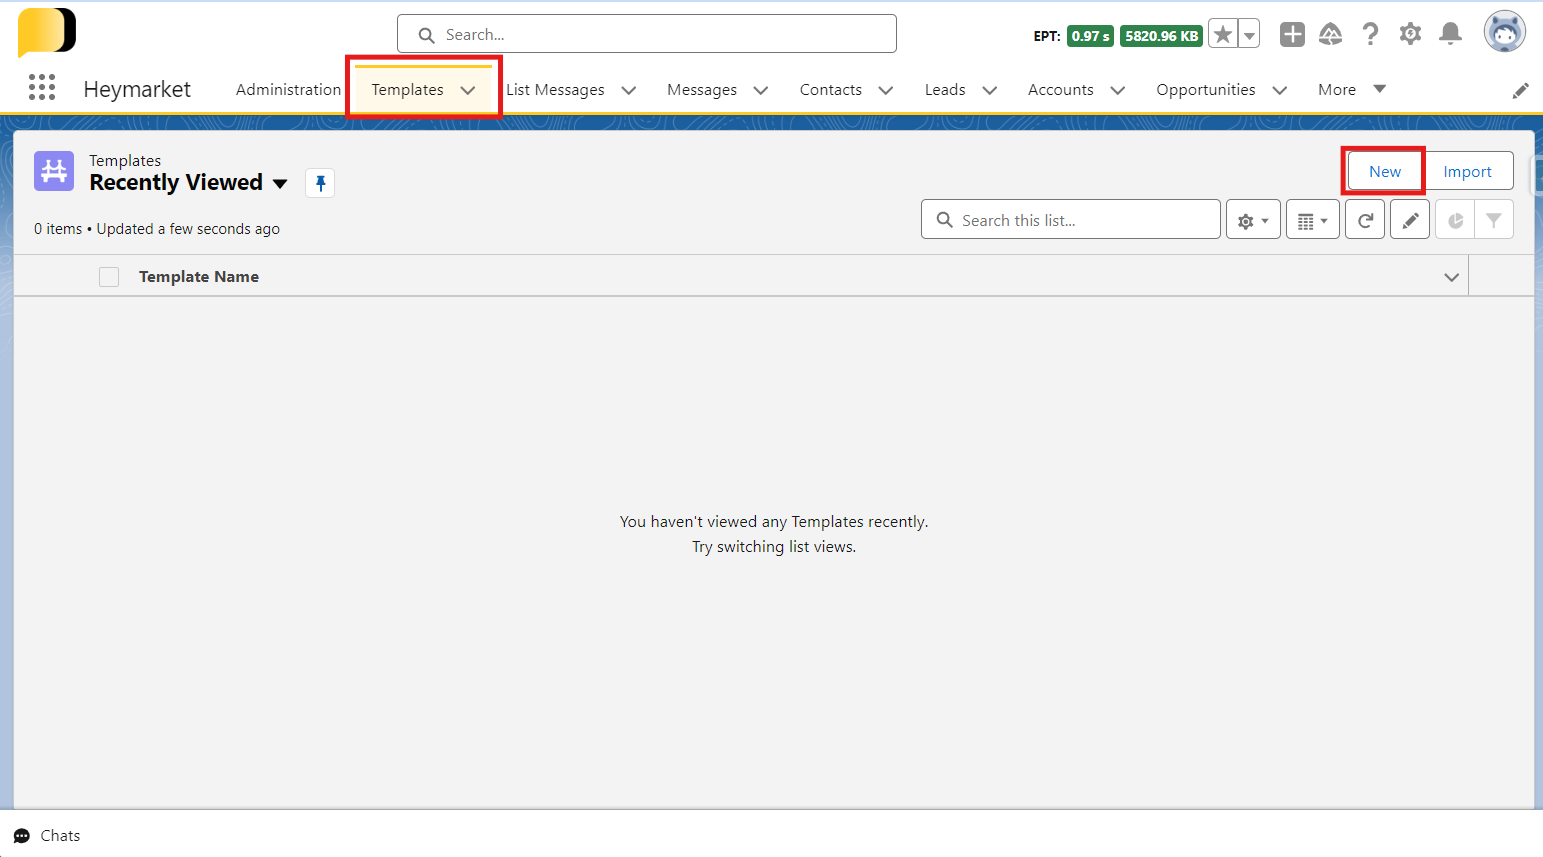
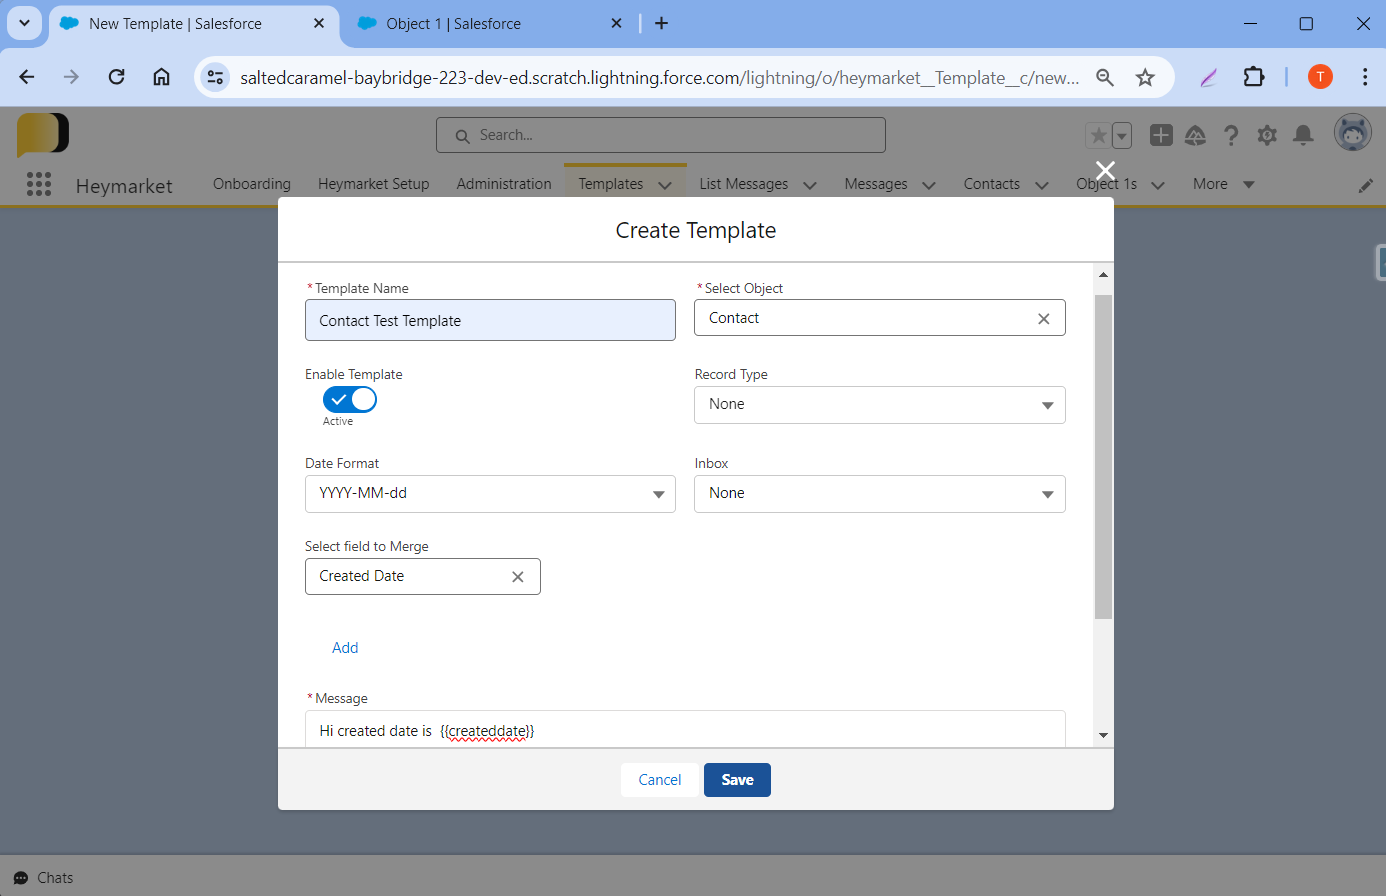
Step 1: Go to the Templates tab. Click the New button.
Step 2: Fill in the details to create the template. To merge the object fields in the template text, search the field in Select field to merge and click Add. You can include attachments and emojis as needed.
Record Type: Here, you can choose a record type that is available on an Object (for which the template is created). If you choose a record type, then this particular template will be available only for records that are associated with the same record type.
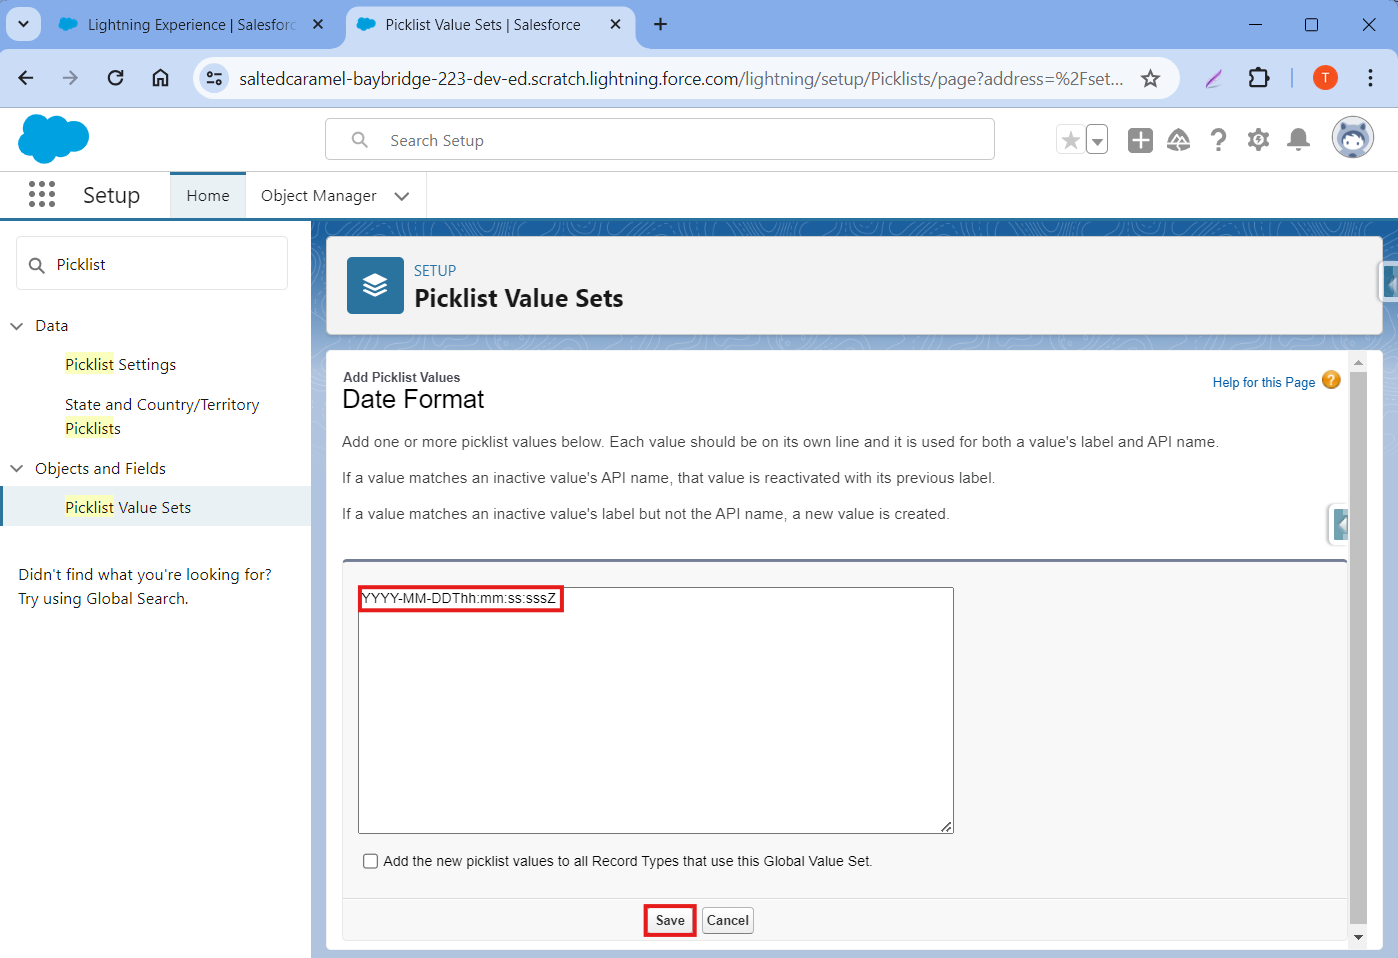
Date Format: If you choose Date format, then all the date fields will convert in that format.
Adding values in the Date Format Picklist
Step 1: Navigate to Setup > Home > Picklist Value Sets.
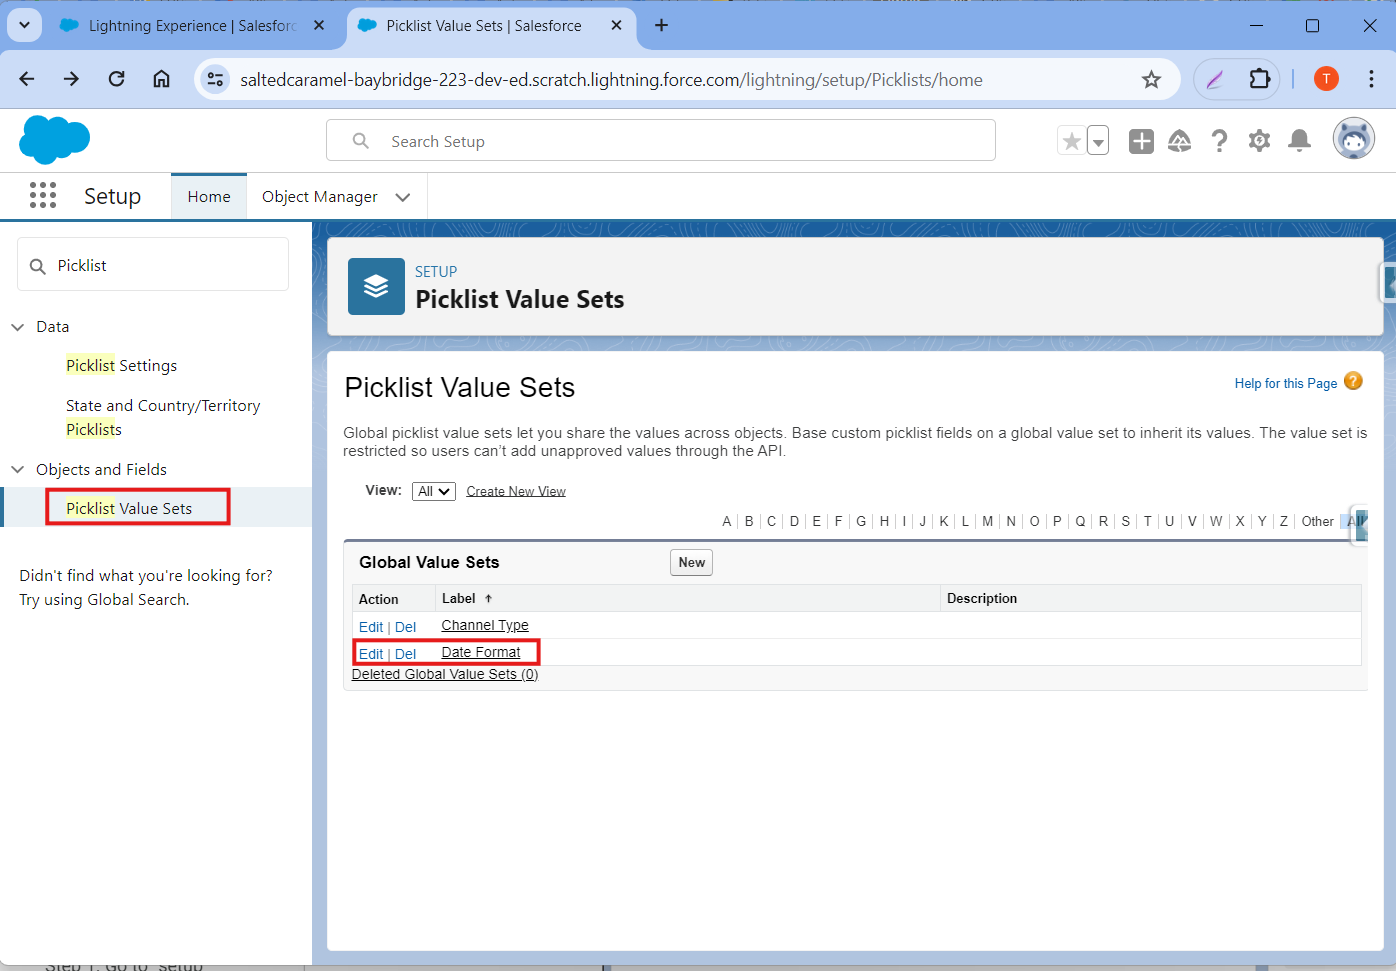
Step 2: Click on Date Format.
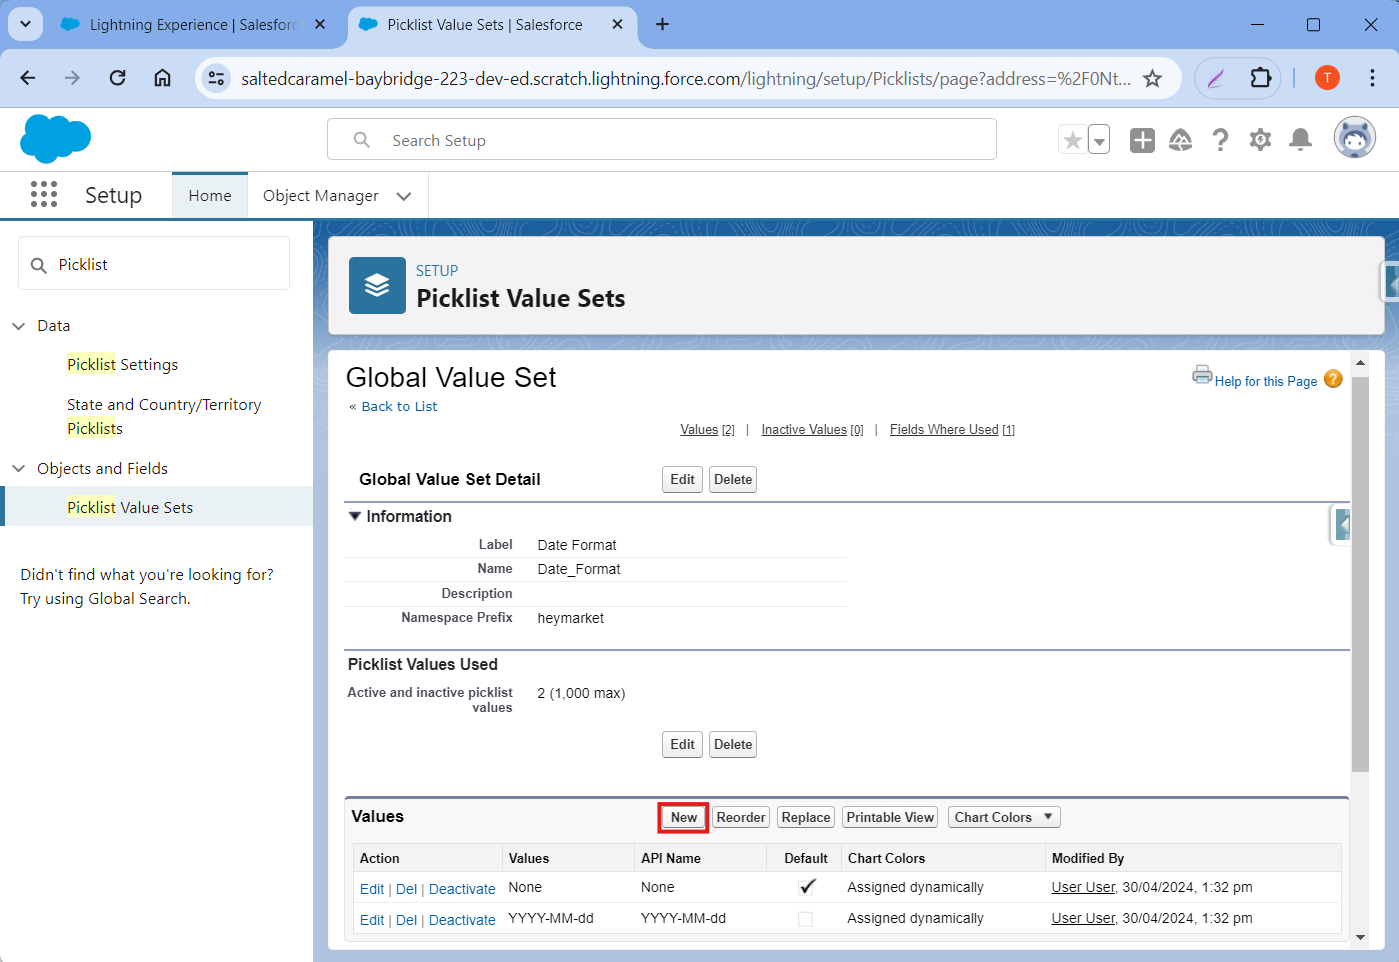
Step 3: Add a new Date Format and click the Save button.
Opt Out Configuration
-
Enable SMS Opt Out On:
- Check this box to automatically update the SMS Opt Out field (heymarket__Opt_Out__c) for the associated Object record when a contact opts out in Heymarket.
- Add the SMS Opt Out field to your page layout for visibility.
-
Note: To use the Opt Out functionality for Custom Objects, create an "Opt_Out__c" field on all Custom Objects configured with Heymarket.
-
Enable Email Opt Out On:
- Check this box to automatically update the Email Opt Out field (heymarket__Email_Opt_Out__c) for the associated Object record when a recipient unsubscribes in Heymarket.
- Add the Email Opt Out field to your page layout for visibility.
- This is currently available for Standard objects only (Person Account, Contact, Lead).
Objects
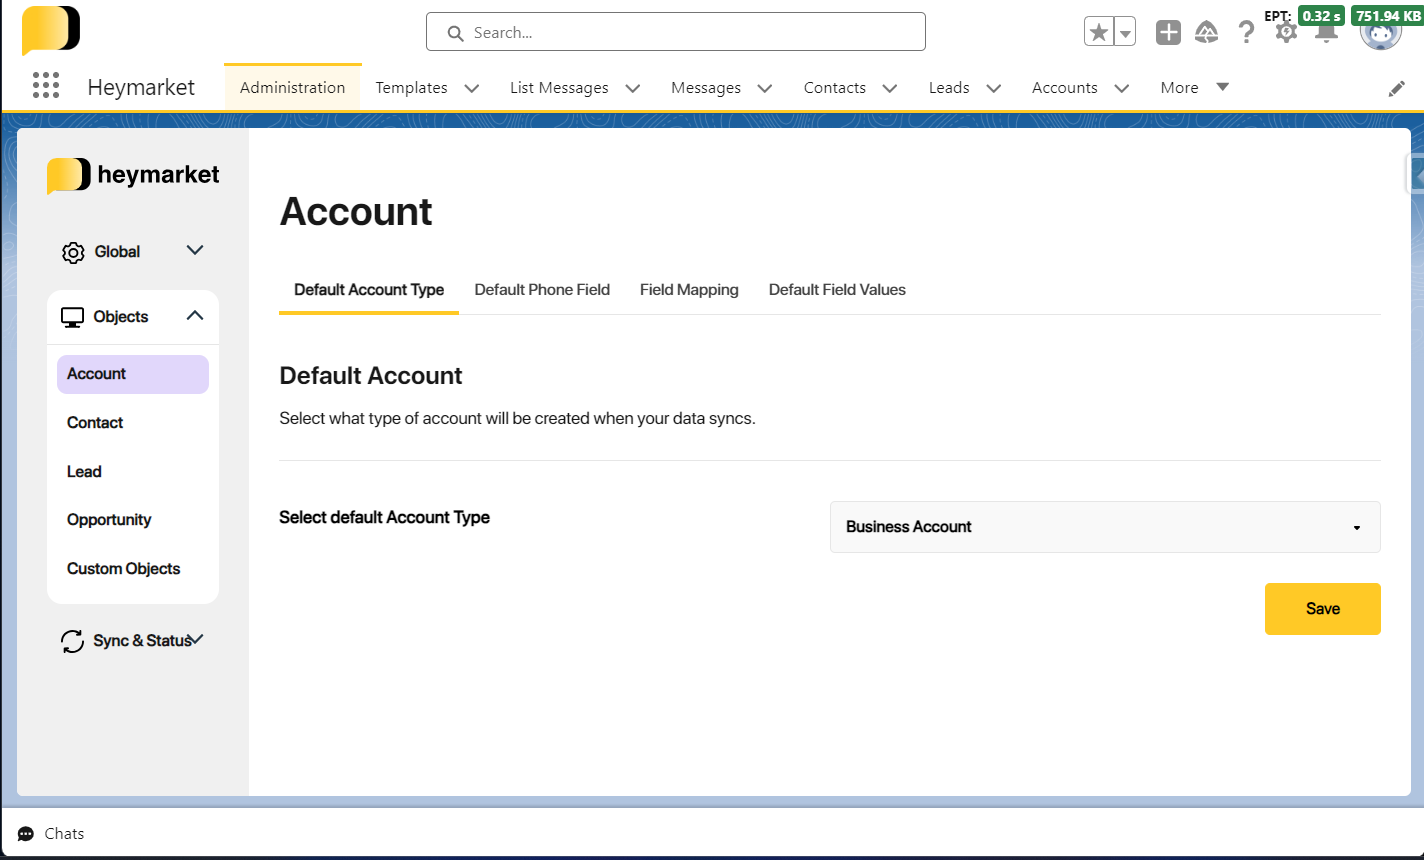
Default Account Type
In this section, you can choose the default account type created when Heymarket-Salesforce syncing is enabled for Accounts.
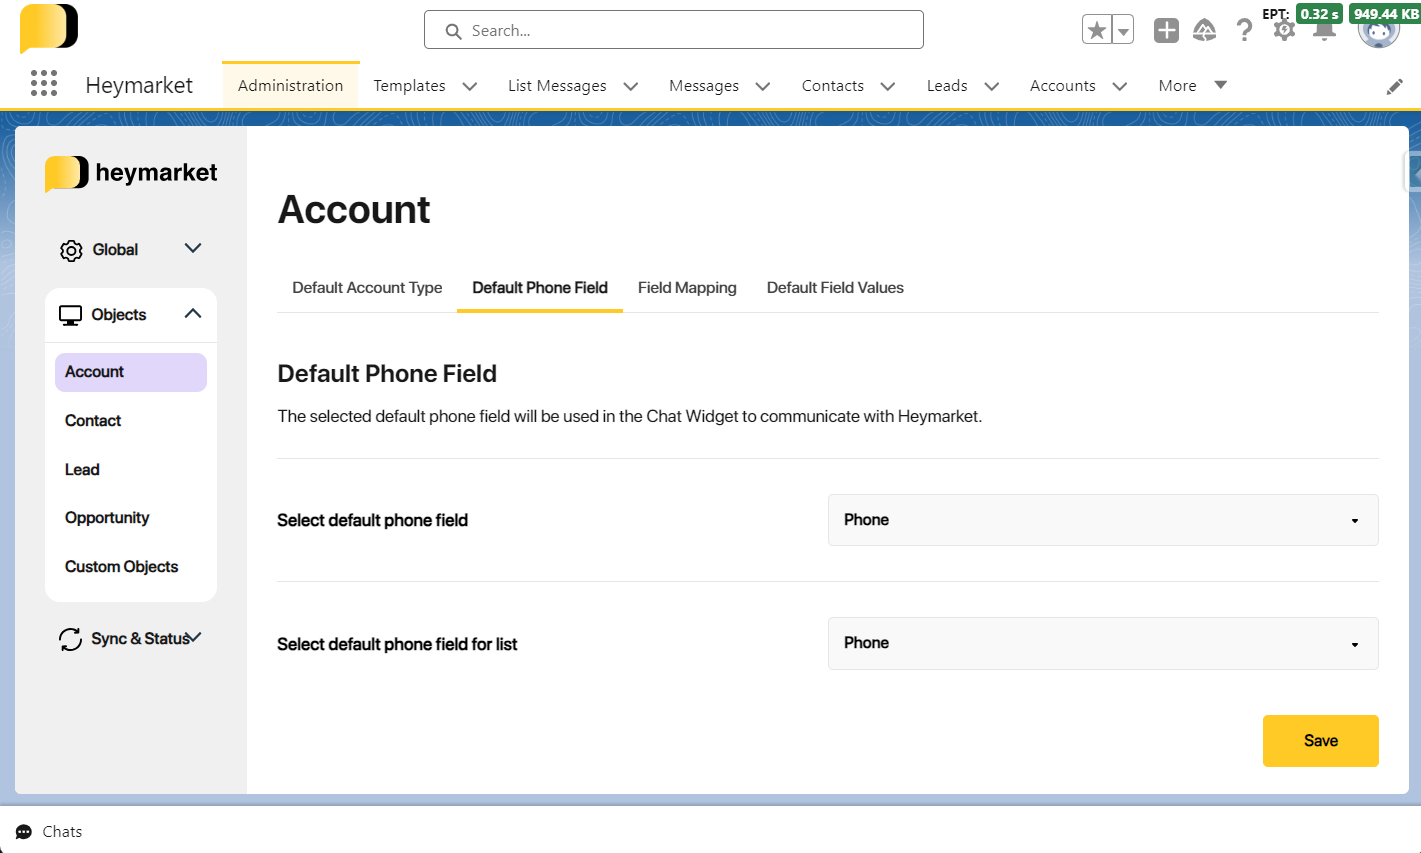
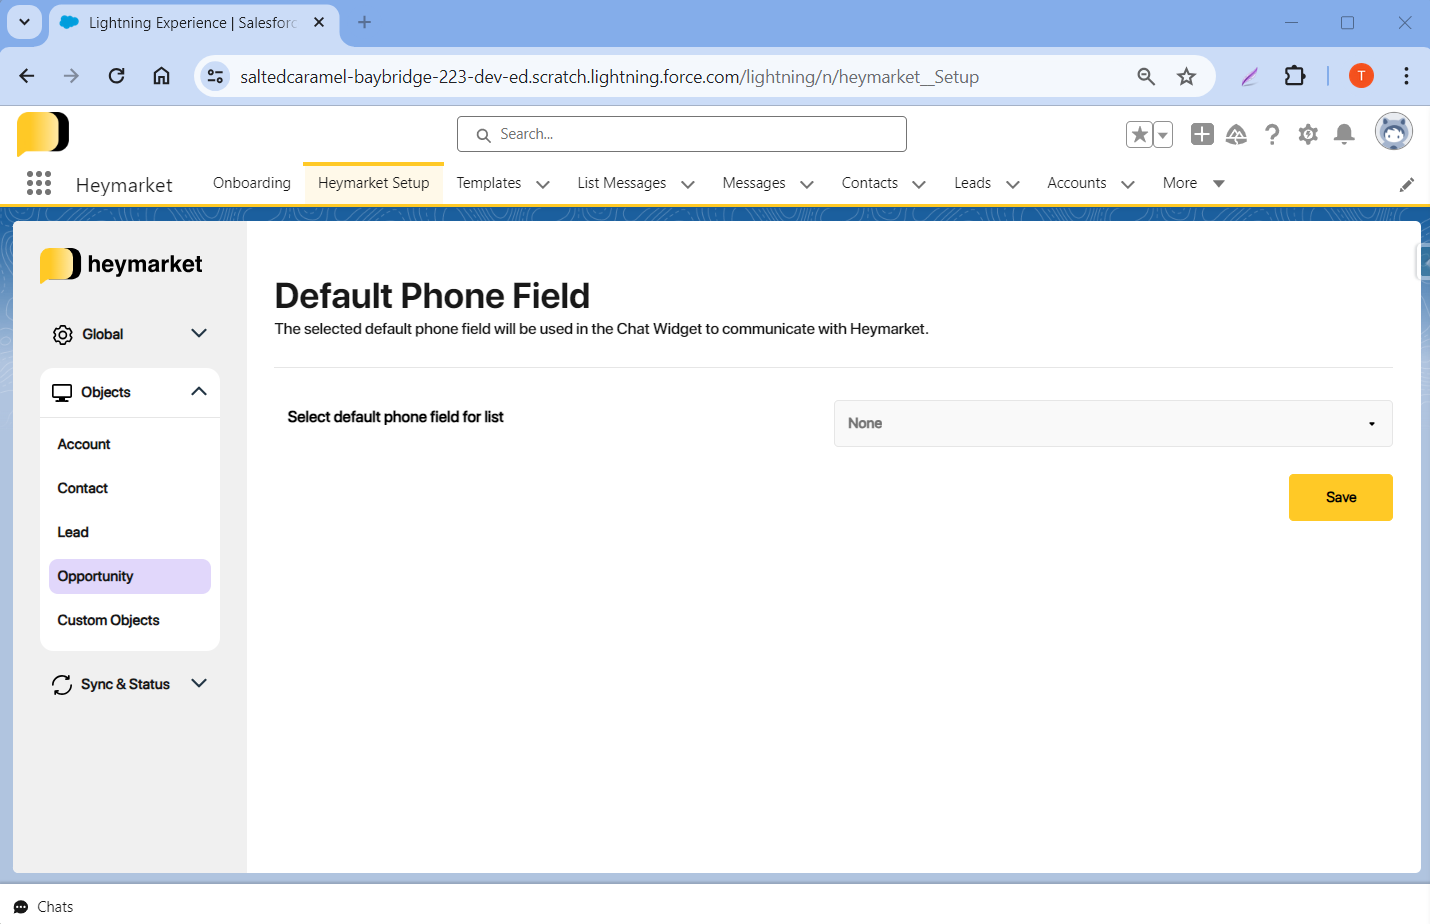
Default Phone Field
- Default Phone Field: Select the primary phone field Heymarket will use for chatting and record syncing for the Object.
- Default Phone Field for List: Select the default phone field for lists, which will be used in List SMS. Once set, users will not be able to edit the selected phone field on the List SMS page. If the default field is set to "None," users will be able to select the phone field on List SMS.
Email-Based Syncing: A phone number is no longer required to sync records between Salesforce and Heymarket — records can now sync using an email address. This is supported on Account (Person Account), Contact, and Lead, using the standard email fields (Account → PersonEmail, Contact → Email, Lead → Email). Support for Custom Objects and custom email field mapping is planned for a future release.
Note: Although this field can be changed at any time, it is generally not recommended to do so to maintain consistency and avoid potential issues.
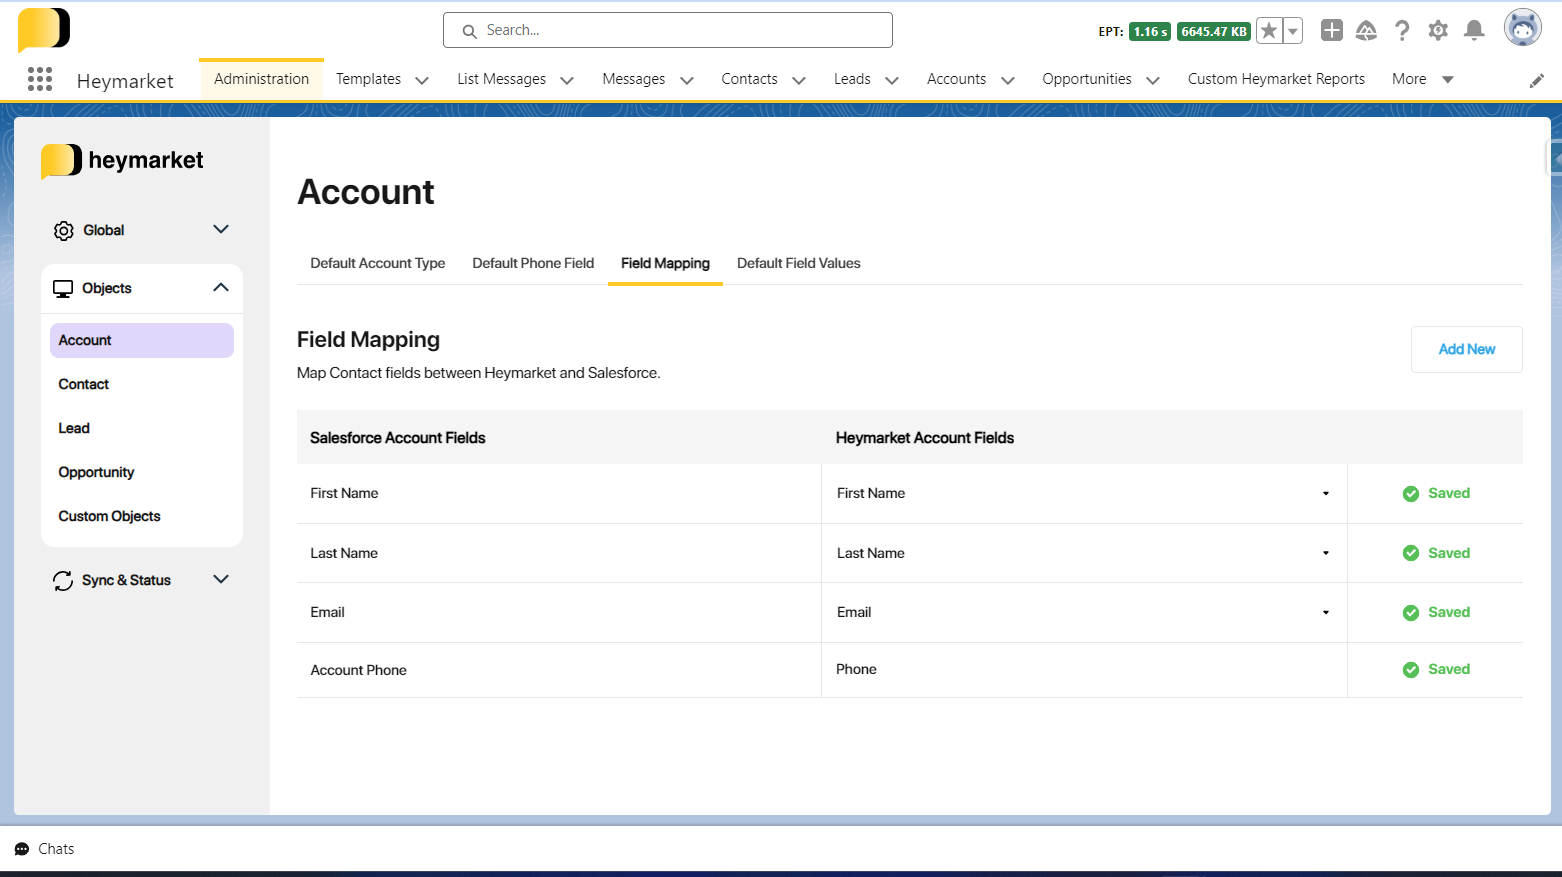
Field Mapping
In this section, you’ll configure how Salesforce fields map to Heymarket Contact fields for syncing. The system offers flexibility to map any number of additional custom/standard Salesforce fields with any other custom fields in Heymarket’s Account.
Hit the Add New button to start mapping new custom fields.
Note: REFERENCE, DATETIME, TIME, and ADDRESS fields can't be mapped with Heymarket. Address fields are a compound field; the system allows mapping individual parts of the ADDRESS field like Street, State, etc. Salesforce Date and Number fields are supported and map to Heymarket Date and Number respectively, while Salesforce Text, Picklist, Formula, Relationship, Text Area, Checkbox, URL, Phone, Email, and Currency fields map to Heymarket Text.
Standard and Formula fields can be mapped. Note that a Heymarket → Salesforce sync will not change the values of these fields in Salesforce, because Salesforce does not allow updating Standard System or Formula fields. However, a Salesforce → Heymarket sync will populate their data into Heymarket contacts.
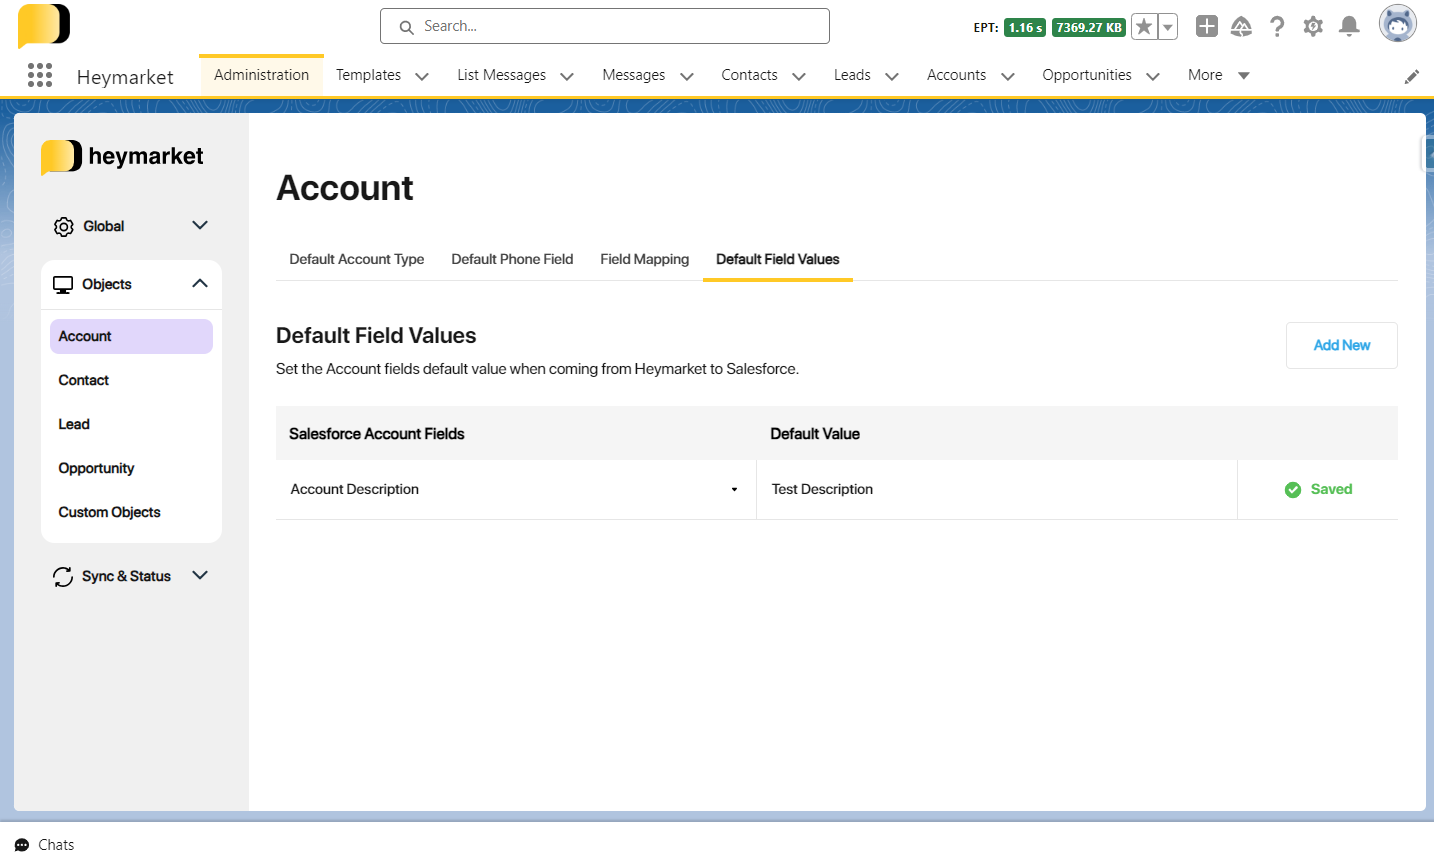
Default Field Values (Optional)
The default phone field configuration lets you set any custom text field to a default value. If you assign a value to any text field in Salesforce, it will have that default value every time upon syncing.
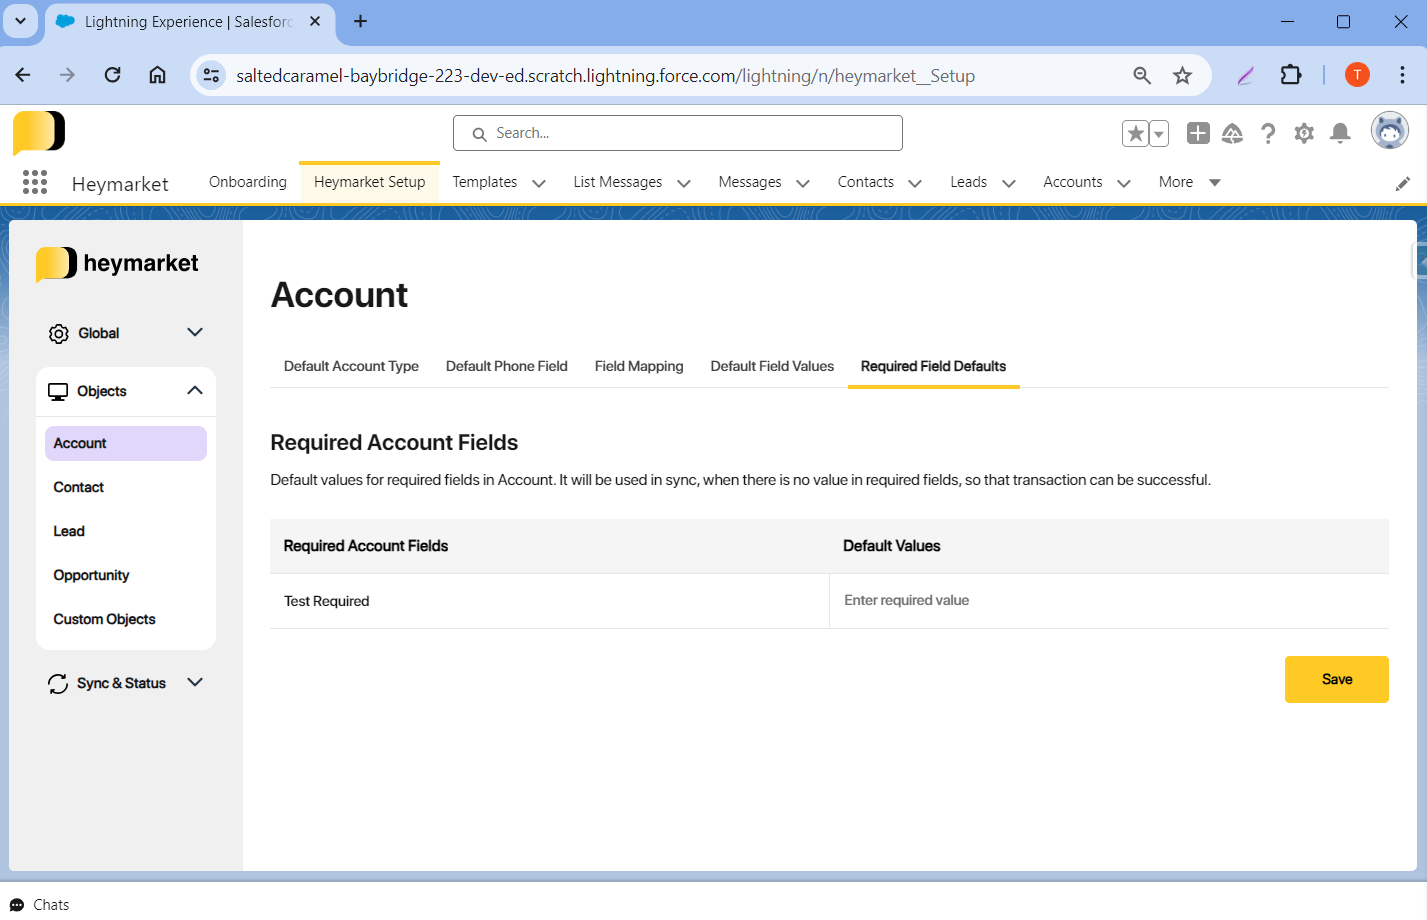
Required Field Defaults (Optional)
In this section, you can set default values for the required fields of sync-enabled objects.
In the screenshot below, the Test Required field is marked Required on Account object. We can set required values under the Default Values column.
Opportunity
The Opportunity section allows you to configure the default phone field for list messages, specifically for the Opportunity Object.
Custom Object
This configuration allows you to use the chat widget on a custom object that has a phone number field inside it.
Formula Field
You need to create a custom formula field to help the chat widget run.
Creating a Formula Field
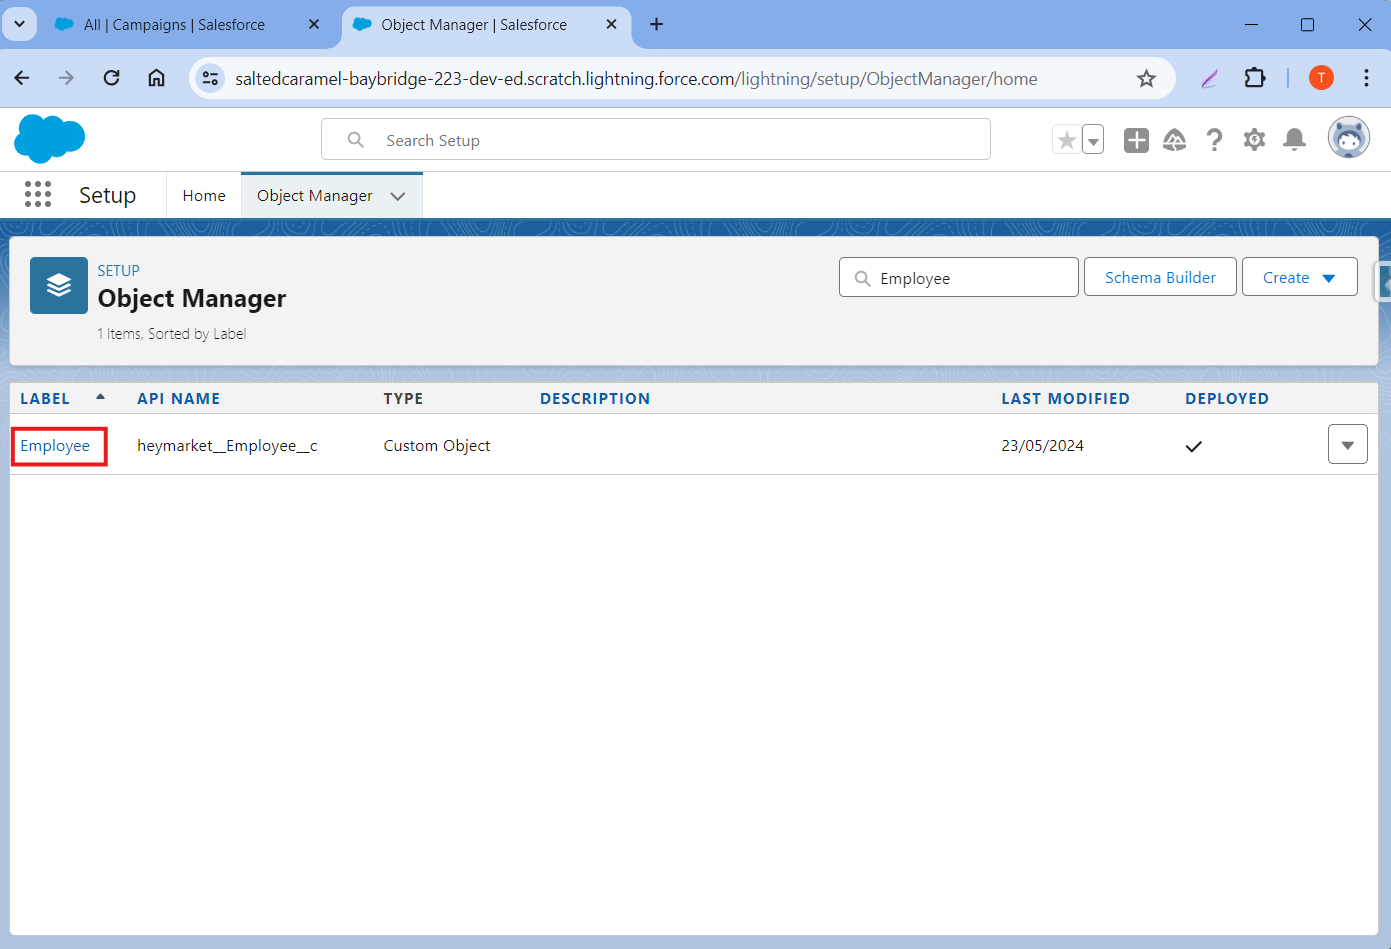
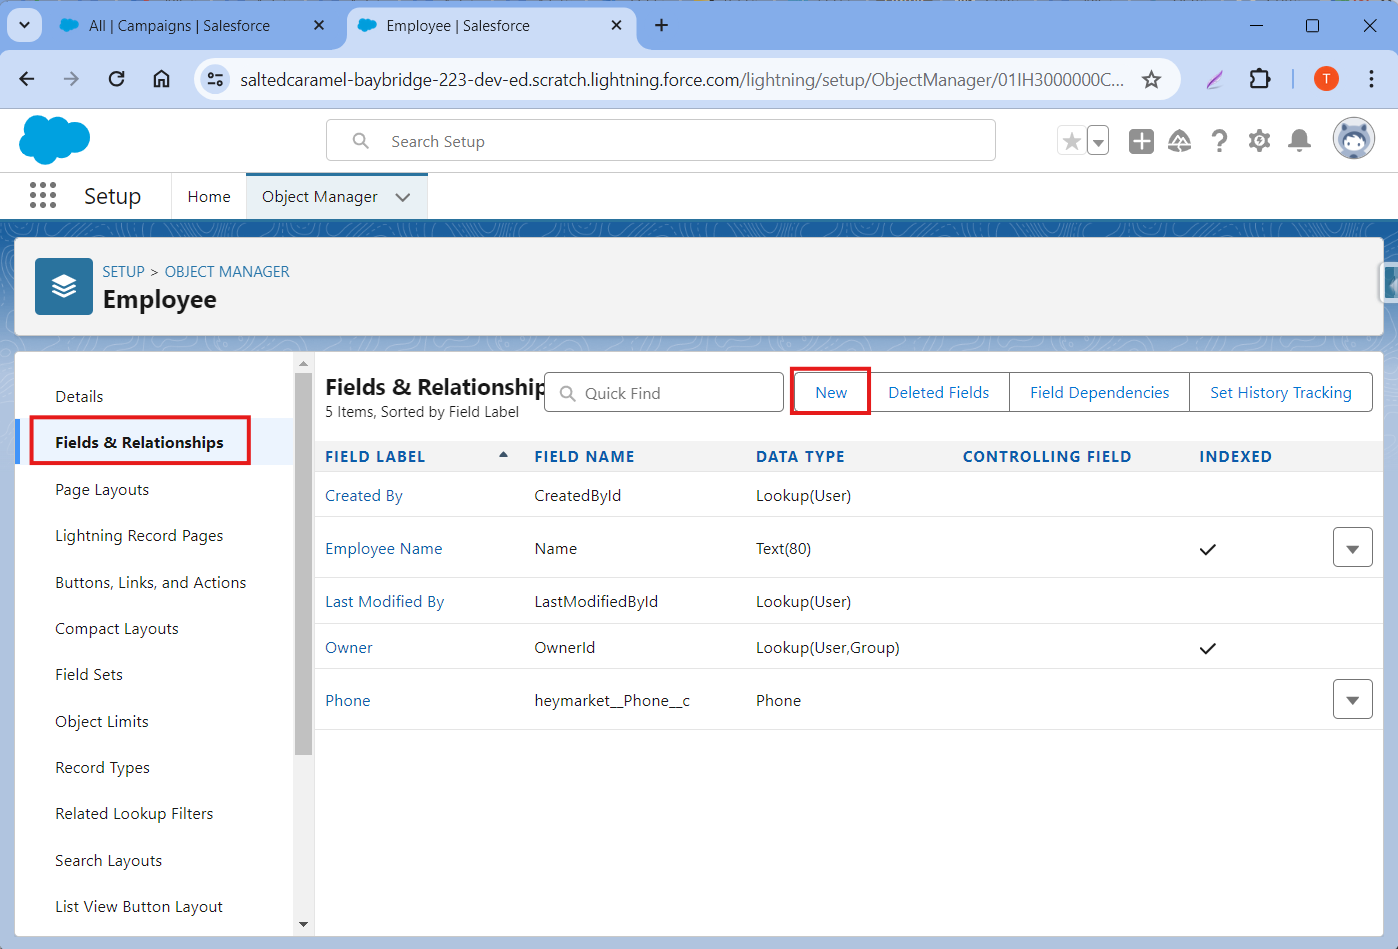
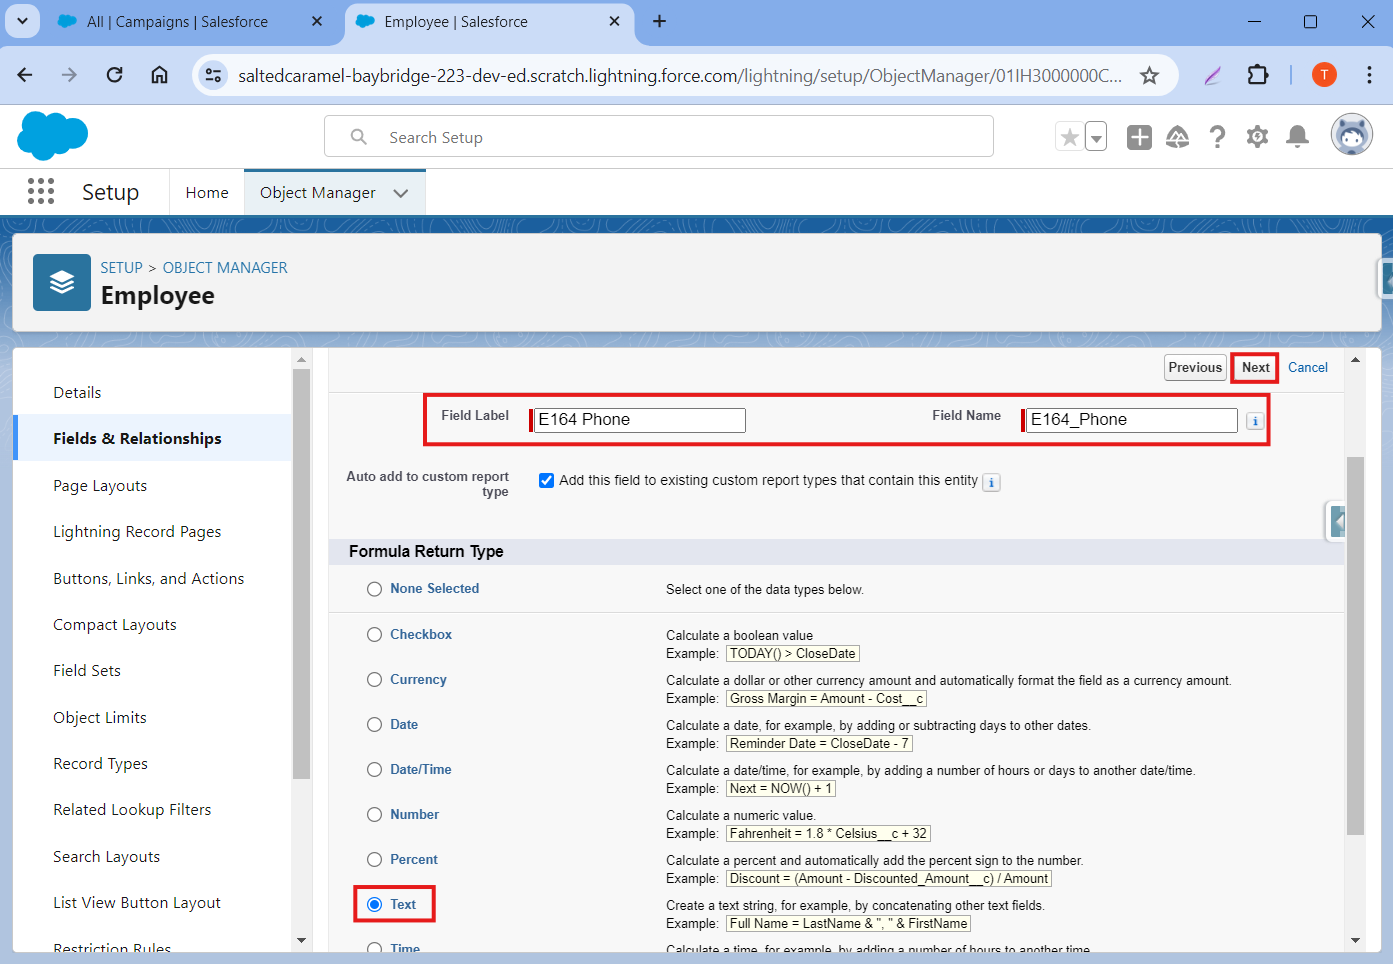
Step 1: Go to Setup > Object Manager and search for your Custom Object.
Step 2: Select Field & Relationships from the left side and click the New button.
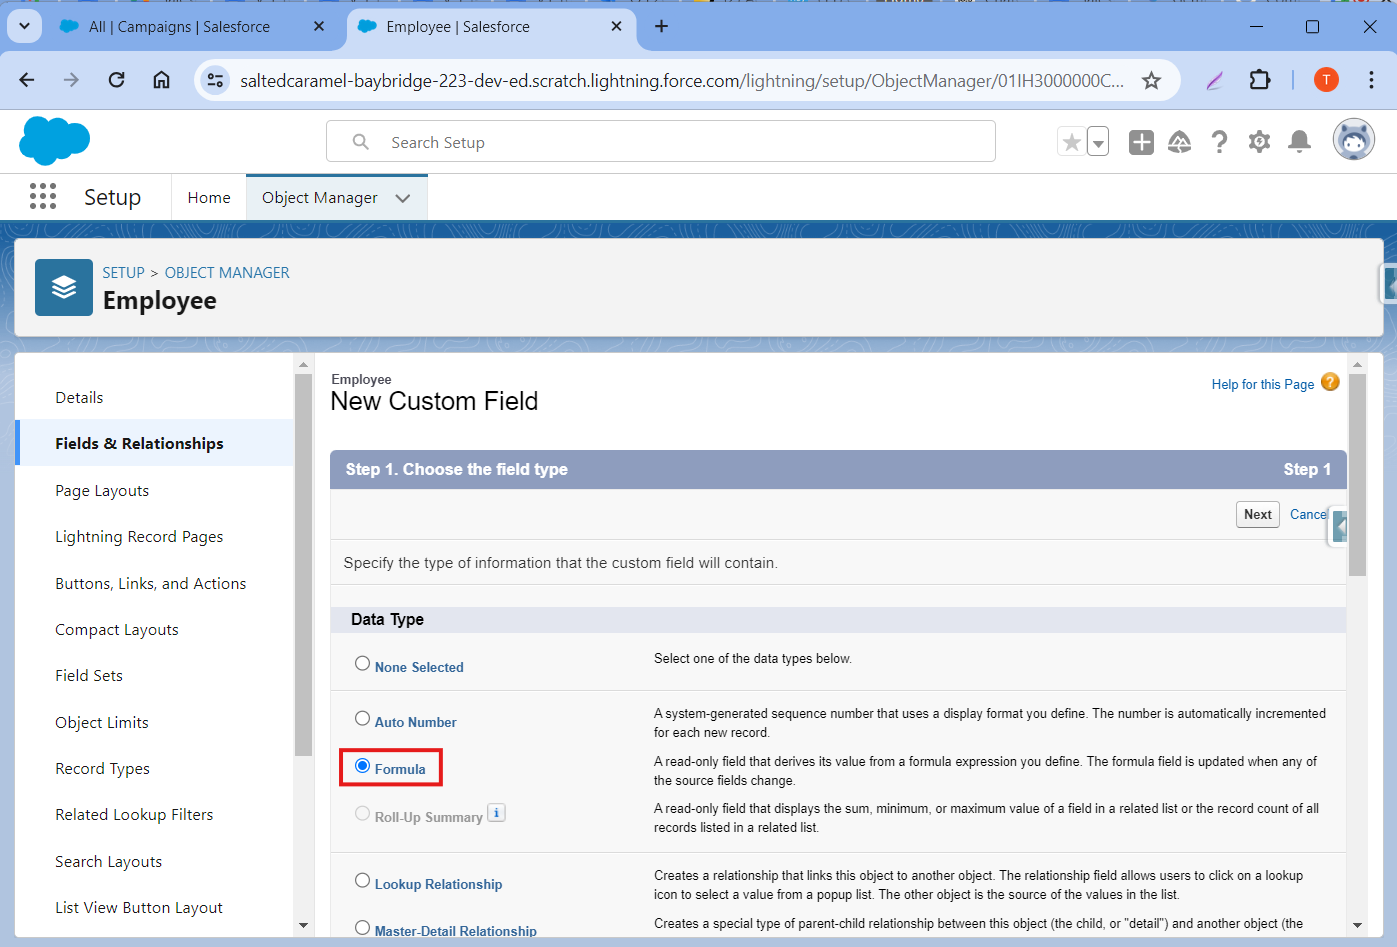
Step 3: Select Formula from the options, and click Next.
Step 4: Enter E164 Phone in the Field Label and E164_Phone in the Field Name, select Formula Return Type as Text, then click Next.
Note: Please make sure that the Field Name is “E164_Phone”. Otherwise it will not work for the app.
Step 5: Replace Phone__c from the formula field with the Field Name of the Phone Field you have on your Custom Object.
For Example: If you have Mobile_Phone__c on your Custom Object, then replace Phone__c with Mobile_Phone__c.
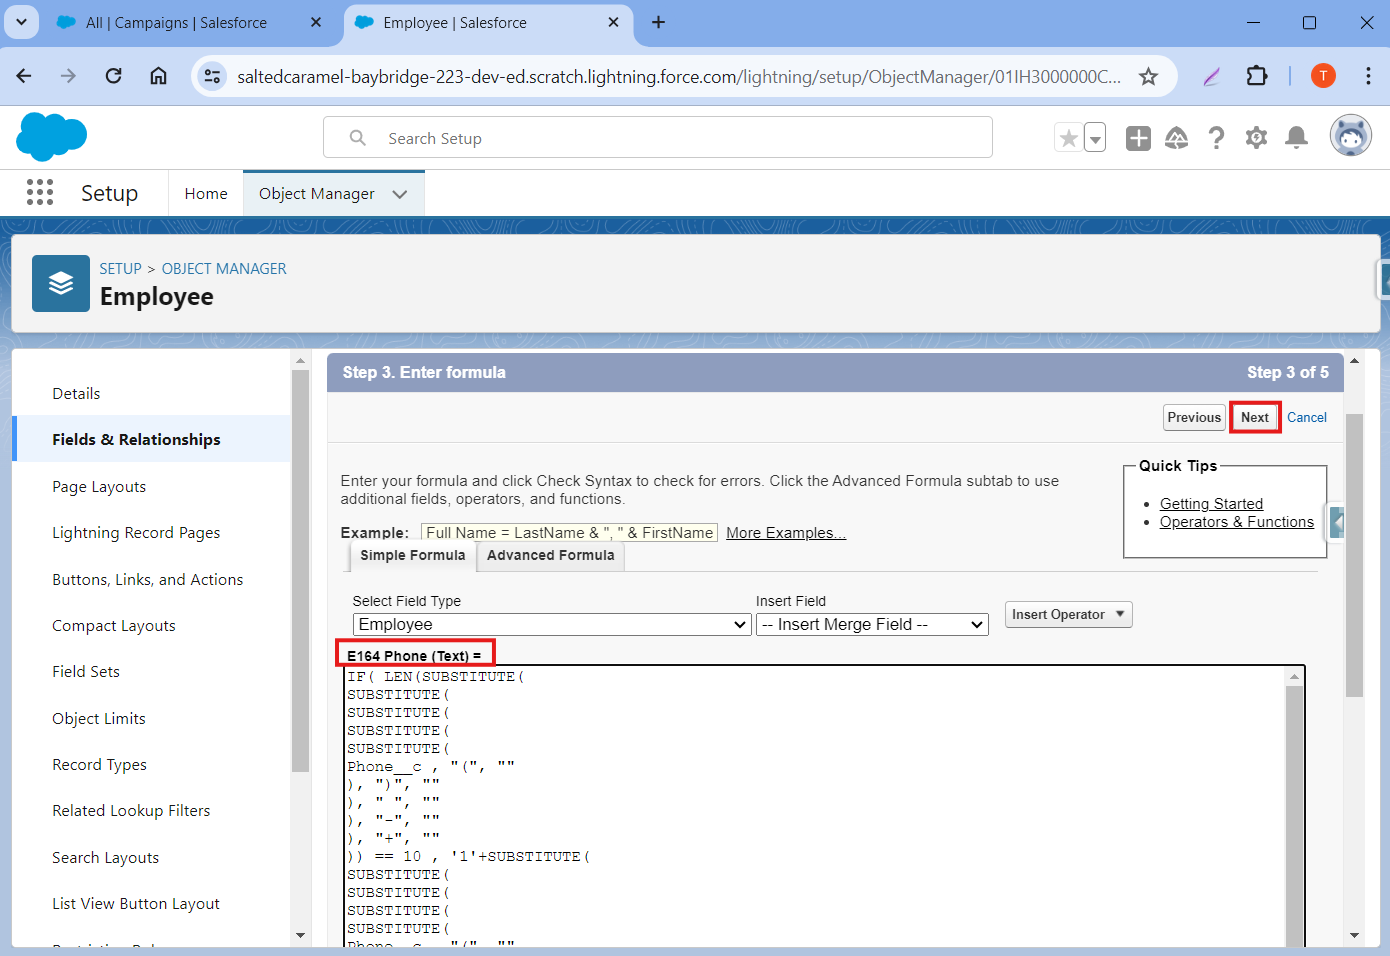
IF( LEN(SUBSTITUTE(
SUBSTITUTE(
SUBSTITUTE(
SUBSTITUTE(
SUBSTITUTE(
Phone__c , "(", ""
), ")", ""
), " ", ""
), "-", ""
), "+", ""
)) == 10 , '1'+SUBSTITUTE(
SUBSTITUTE(
SUBSTITUTE(
SUBSTITUTE(
SUBSTITUTE(
Phone__c , "(", ""
), ")", ""
), " ", ""
), "-", ""
), "+", ""
), SUBSTITUTE(
SUBSTITUTE(
SUBSTITUTE(
SUBSTITUTE(
SUBSTITUTE(
Phone__c , "(", ""
), ")", ""
), " ", ""
), "-", ""
), "+", ""
))
Step 6: Click on the Next button to review the Field Level Security and add it to your page layout (optional).
Step 7: Click Save.
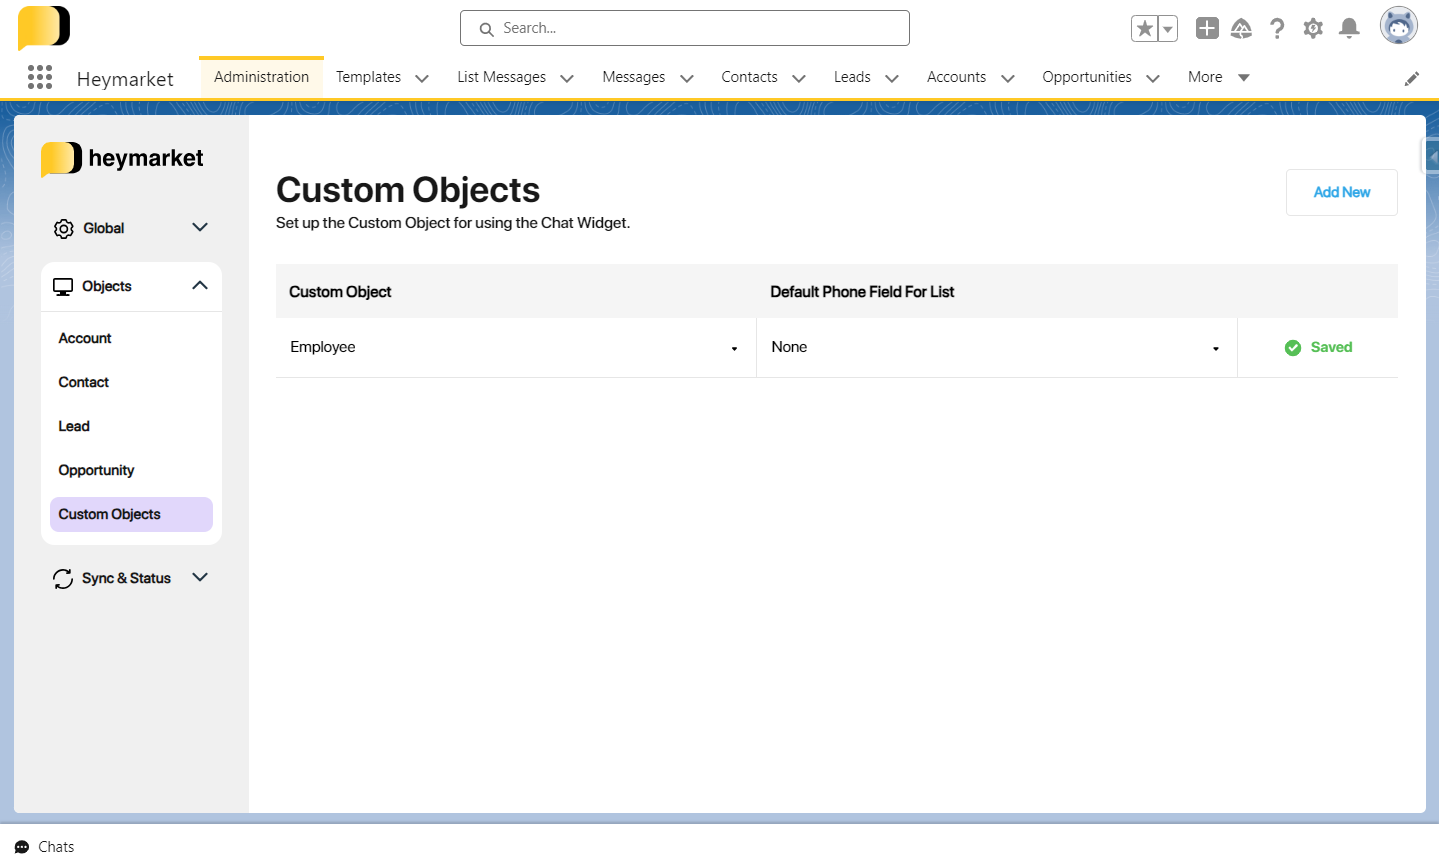
Setting Up a custom object in Heymarket
You have to specify the Custom Object in Heymarket Setup to use the chat widget with it.
Step 1: Go to Administration tab > Objects > Custom Objects.
Step 2: Select the Custom Object that you want to use with the Heymarket app. Click Save.
You can also select the Default Phone Field For List SMS, which is used when you are sending List SMS.
Note: Only the custom objects that have a Phone Number Field and E164 Formula Field will appear in this section. If you don’t have any Custom Object with a Phone Number Field and E164 Formula in it, then this dropdown will not show any list item to select from.
Adding Chat Widget to Lightning Record Page
Follow these steps to add a Chat Widget to the Lightning Record Page.
Message Object
The Message object stores chat messages along with sender information, timestamps, and other details. You can use these records in Salesforce Flows or Triggers to automate message responses or apply custom logic.
Fields in Message object
- Account (Reference to Account)
If a message is related to an Account, the Account ID will persist in the Account field.
- Contact (Reference to Contact)
If a message is related to a Contact, the Contact ID will persist in the Contact field.
- Lead (Reference to Lead)
If a message is related to a Lead, the Lead ID will persist in the Lead field.
- Cc Address (Long Text)
This field stores comma-separated "Cc" addresses for emails.
- Conversation Id (Text)
A unique identifier that groups all messages belonging to the same conversation.
- Created On Heymarket (DateTime)
This field displays the date and time that the Message was first created on Heymarket in UTC format.
- Custom (Long Text)
JSON string containing full email details (HTML, raw text, headers, etc.
- Email Template Id
This field stores the Lightning Email Template ID if sent via the "Send Bulk Email" action or List view broadcast.
- Error (Long Text)
If a message fails to send, this field captures the reason for the failure. It helps you troubleshoot why a message was not delivered — for example, an invalid phone number or an inbox configuration issue.
- External ID (Text)
The external ID of the Message record is only used for the Heymarket team’s internal purposes.
- From Address (Text)
This field stores the sender's address for emails.
- Heymarket User ID (Text)
This field indicates the Heymarket User ID of the sender.
- Heymarket UserName (Text)
This field indicates the Heymarket UserName of the sender.
- Inbox ID (Text)
This field indicates the Heymarket Inbox ID that was used to send the message.
- Inbox Number (Text)
This field indicates the Heymarket Inbox number that was used to send the message.
- Is Bulk (Checkbox)
If the message was sent from List SMS then it will be true; otherwise, it will be false.
- Is Flow (Checkbox)
If the message was sent from an automation like Flows or Process Builder, then this field will be true; otherwise, it will be false.
- Is_From_Chat_Load__c (Checkbox)
This checkbox field is used to identify messages created when a chat widget is loaded in Salesforce. The field is set to true for messages that are:
- Saved through a chat widget load.
- Older than 24 hours.
The 24-hour limit is added to prevent confusion in the system. Messages created by the chat load but not the system itself will be saved without the Is_From_Chat_Load__c field being set to true.
Use Case in Flows
This field can be helpful in Flow logic. For example, imagine a Flow that deletes messages periodically. If the Flow retrieves older messages after loading the chat widget, these messages won't have the Is_From_Chat_Load__c flag set. However, any new messages created by the chat load itself will have the flag set to true.
- Is Updated (Checkbox)
When a message is sent through List SMS or Automation (like Flows or Process Builder), then its delivery receipts will be updated after a few minutes. Initially, this field will be false and the Status field will be Sent. After the message is updated with delivery receipts, this field will be marked as True (Checked) and the Status field will be Delivered.
- Local Id (String)
This unique ID is for Heymarket’s internal purposes.
- Media (Url)
If any media URL is included in a message, it will be mentioned in the Media field of the message record.
- Owner Id
This field contains the Salesforce ID of the user who sent the message. If the Heymarket user is not mapped in Salesforce, the OwnerId field will be populated with the default user ID.
- Salesforce Record Id (Id)
When a message is sent or received, it will always be related to a Salesforce record. The Salesforce ID of the related record will populate in this field.
- Status (Text)
The status of a message is based on the delivery report, which marks it as Failed, Delivered, Received, Sent, or Undelivered.
- Failed: When the message failed to send.
- Delivered: When the message was sent through List SMS or Automation (Process Builder, Flows).
- Undelivered: When the message was sent through List SMS or Automation (Process Builder, Flows) but failed to deliver.
- Received: When a message was received.
- Sending: When a message was sent from the chat widget in Salesforce,
- Sent: When the message was successfully sent. Status will be marked Sent for Messages sent via Flow or List SMS initially, then will be updated to Delivered later. See the (Is Updated) field for more details.
- Subject (Text)
This field stores email subject line. - Targeted Phone (Text)
This field indicates the phone number of the customer/contact.
- Template (Reference for Template)
When a message is sent using a Salesforce template, this field will be populated with the Template ID.
Note:This field will not be populated if you use templates from the Heymarket web app instead of Salesforce native templates. It is recommended to always use Salesforce native templates. Refer to this section for more information.
- Text (Long Text)
This field provides the text contents of the message.
In case of emails, stores the stripped/raw text version of the email body.
- To Address (Long Text)
This field stores comma-separated "To" addresses for emails.
- Type (Text)
Type of message (i.e. text, photo, system, gallery, memo).
- text: Normal text message used for communication.
- photo: If the message only contains an image.
- system: Messages such as Assigned or Automation.
- gallery: Message with a gallery URL (having more than one image).
- memo: Private messages.
- email: Email messages.
- Updated On Heymarket (dateTime)
The time when the message was last updated in Heymarket in UTC time zone.
Message Target Object (Message_Target__c)
This new object stores detailed information about which Salesforce records are associated with the recipients of an email message.
- Functionality: For every 'To' or 'Cc' email address that is matched to an existing Salesforce record (Account, Contact, Lead), a Message_Target__c record is created.
- Key Fields:
-
Message__c: Master-Detail to the parent Message__c record.
- Sf_Record_Id__c: The ID of the associated Salesforce record (Account, Contact, or Lead).
- Target__c: The email address (To, Cc, or From).
- Type__c (Picklist): Defines the email role (to, cc, from).
-
- Usage: These records are only created when the Channel is ‘email’.
Email Event Object (Email_Event__c)
Gain visibility into email performance with the new Email Event (Email_Event__c) object. Email Events sync every minute with message sync and are associated with the parent Message object.
Tracked Events:
- unsubscribe, deferred, responded, dropped, spamreport, click, open, bounce, processed, delivered
Email Event Fields:
- Email (Email__c): The target email address the event relates to.
- Message (Message__c): Master-detail link to the parent message.
- Event Time (Event_Time__c): Date/Time stamp of when the event occurred.
- Event Type (Event__c): The specific status (e.g., "opened", "click").
Sync and Status
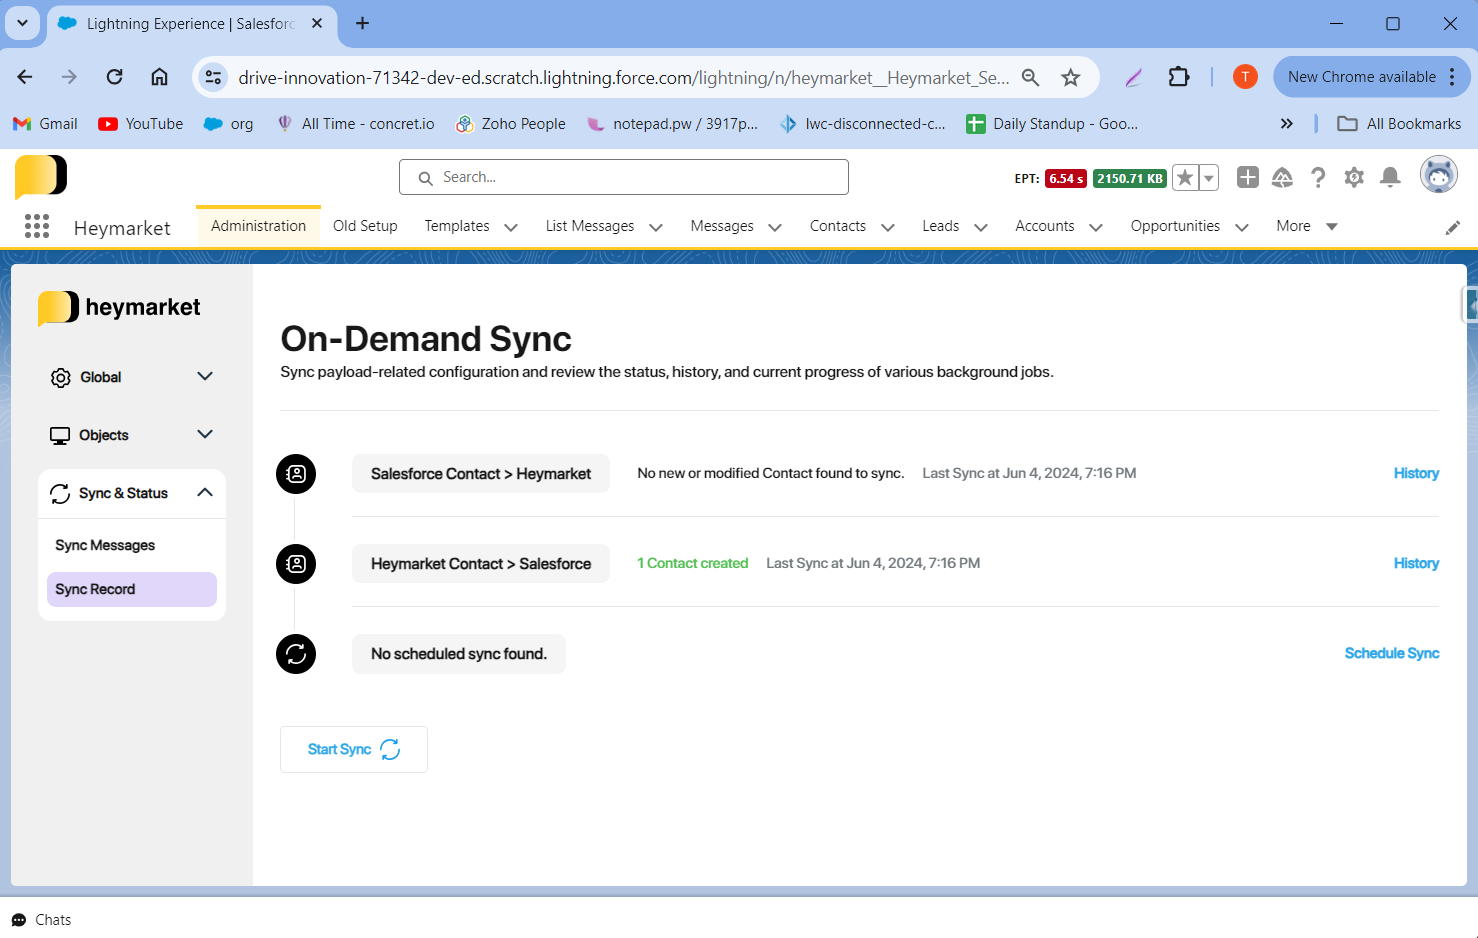
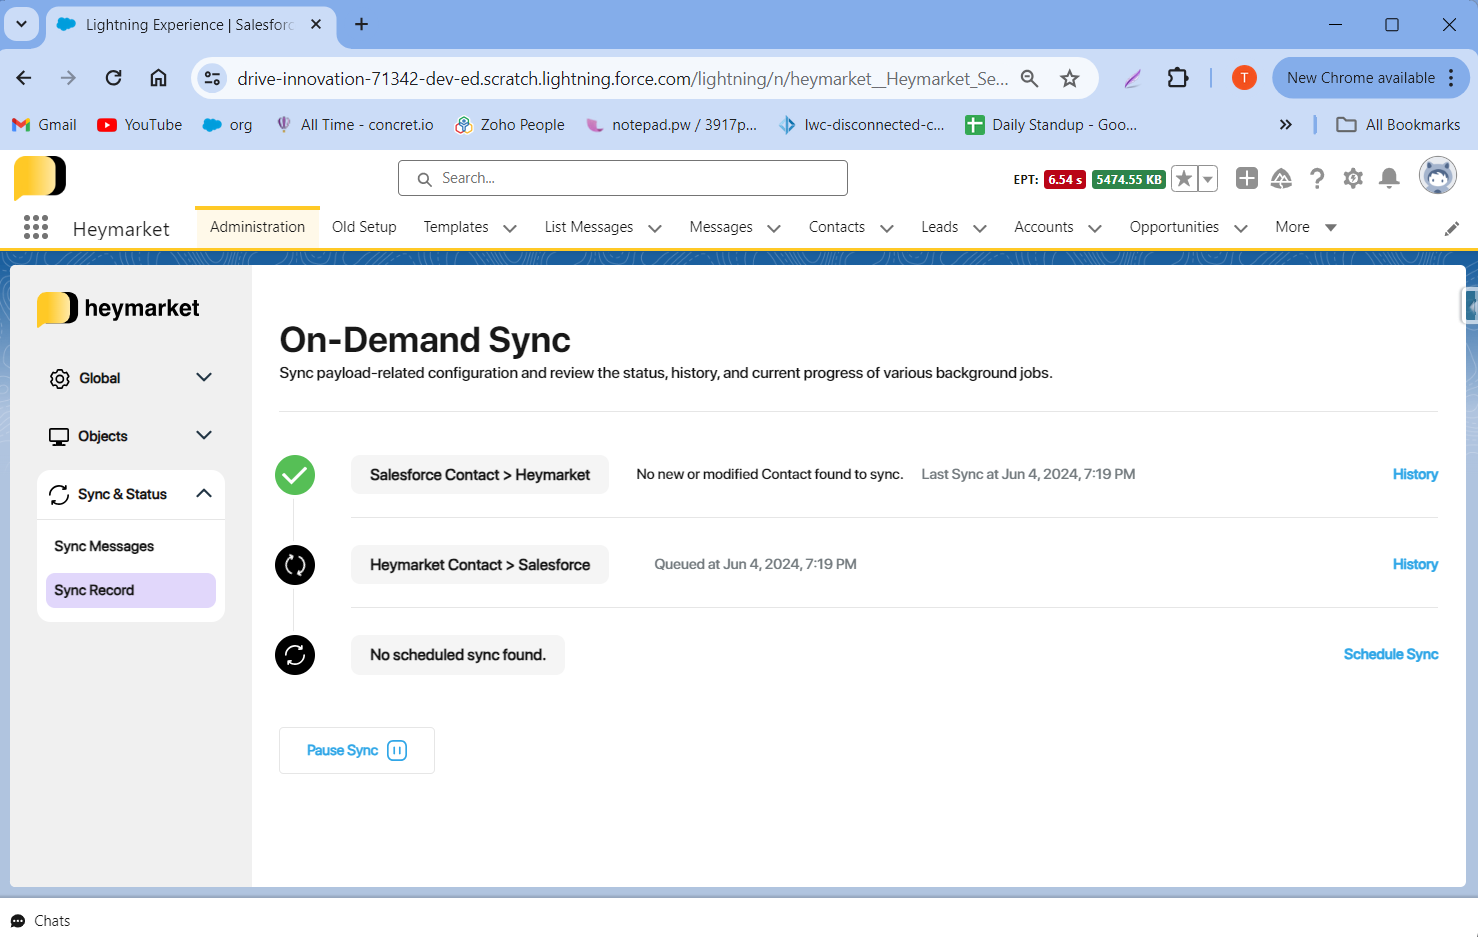
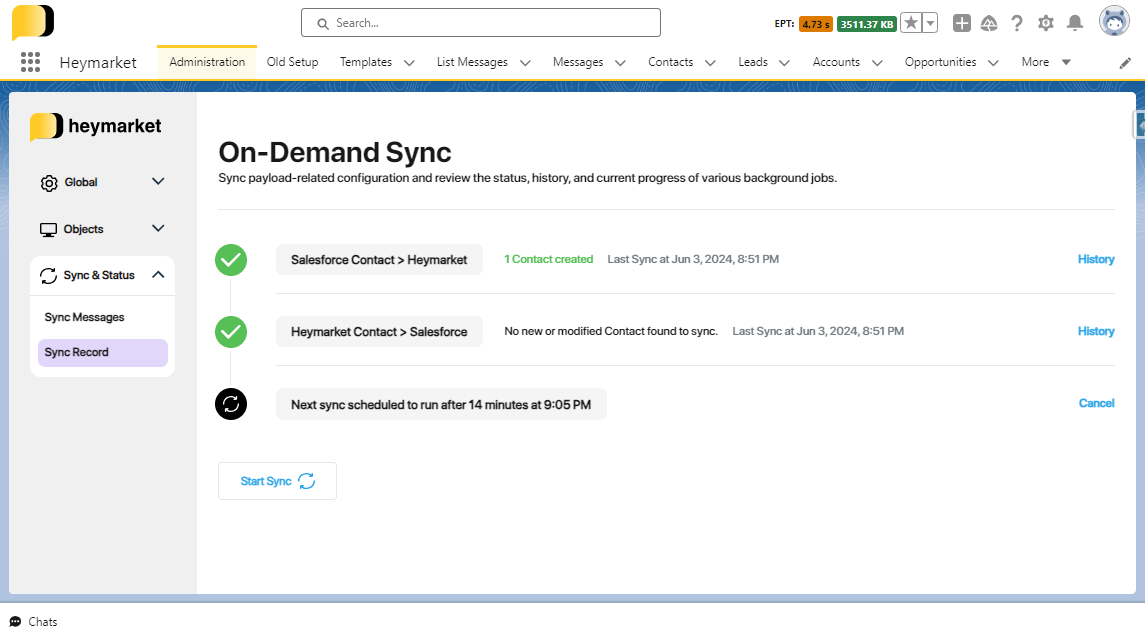
This feature allows you to sync messages (Sync Messages) and records (Sync Records) between Salesforce and Heymarket whenever you need to, based on configuration. You can also track the status of sync from here.

When you click on the Start Sync button, it will begin to sync data between Salesforce and Heymarket.
After you click on the Start Sync button, you are allowed to cancel the sync while in progress (if needed). You can click the Pause Sync button, which will cancel the sync instantly. If the syncing stopped successfully when you clicked on the Pause Sync button,you will see a green toast.
You can schedule a sync to execute every 30 minutes by clicking on the Schedule Sync button. For example, if the current time is 12:15 and you just scheduled a sync, then it will schedule the next sync at 12:30. If you don’t want to schedule a sync, just hit the Cancel button in front of Next Sync Schedule and it will abort all scheduled syncs.
On this screen, you can also see the number of records being updated, created, and deleted. The rotating sync icon indicates current sync progress. If it's not present, there is no current sync process. You will see a Last Sync time, which indicates when the last sync happened. You will also see a Next Sync Schedule time if a sync is scheduled. You can see all the previously synced details upon clicking on the History button on the right side of the screen.
Note: We cannot guarantee the cancellation of a sync (if already started), because the UI changes may take 2 or 3 seconds to update. There may be a case in which the data is too small and it will sync before you cancel it. We cannot roll back those changes.
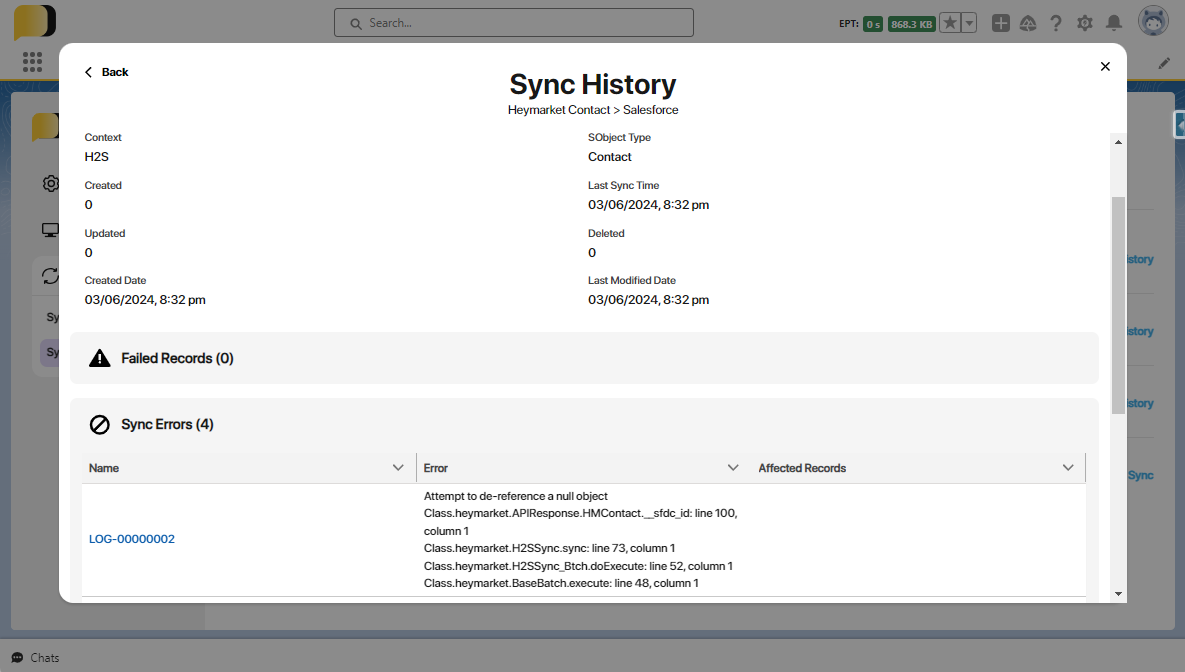
Sync History
The sync history page displays a list of previous sync jobs for a particular context (e.g. Heymarket Contacts to Salesforce Contacts). You can see more details of any sync job by clicking its row. On clicking any row, you’ll open a page with the details of failed records and errors within that sync.
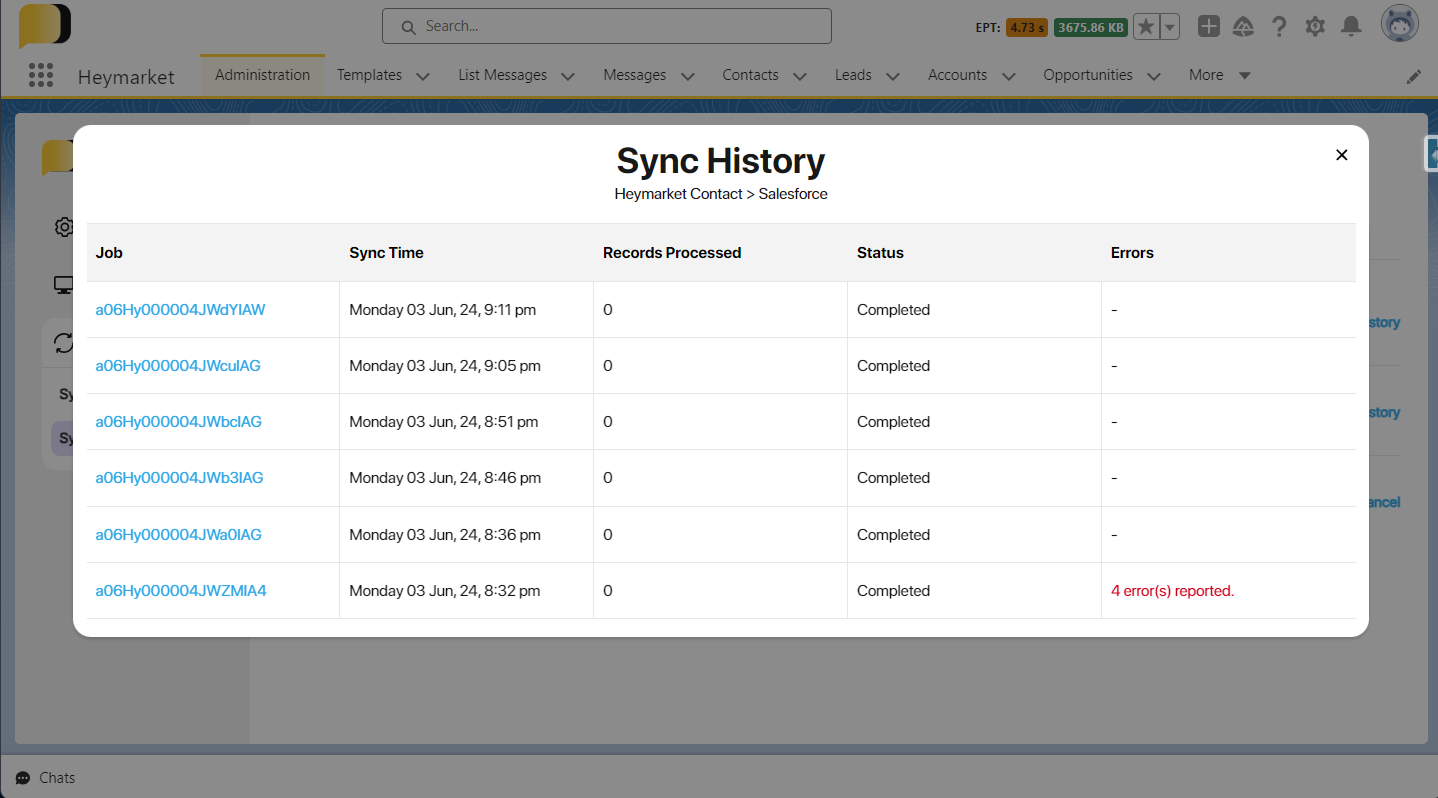
Failed Records
You can track failed records and their reasons. Find them by clicking a sync history row. In failed records, you will see the record name sync status and the reason for failure. You can also open that particular record by clicking on its name.
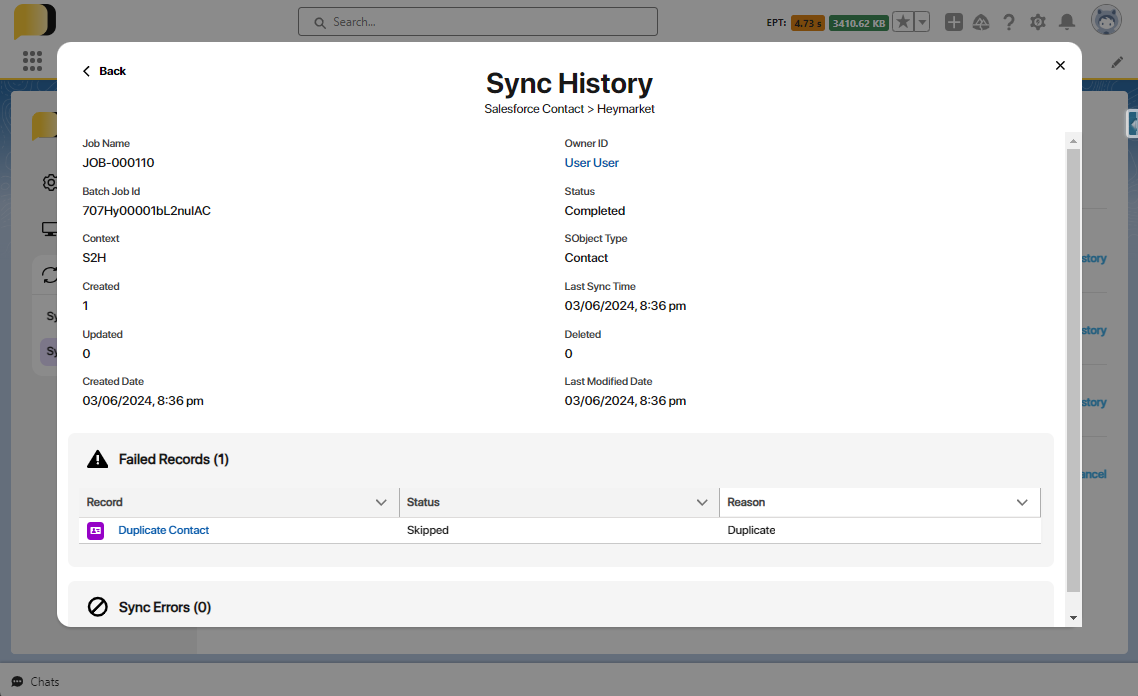
Sync Errors
You can also track the errors that occurred while syncing. Errors are available below the Failed Records section.
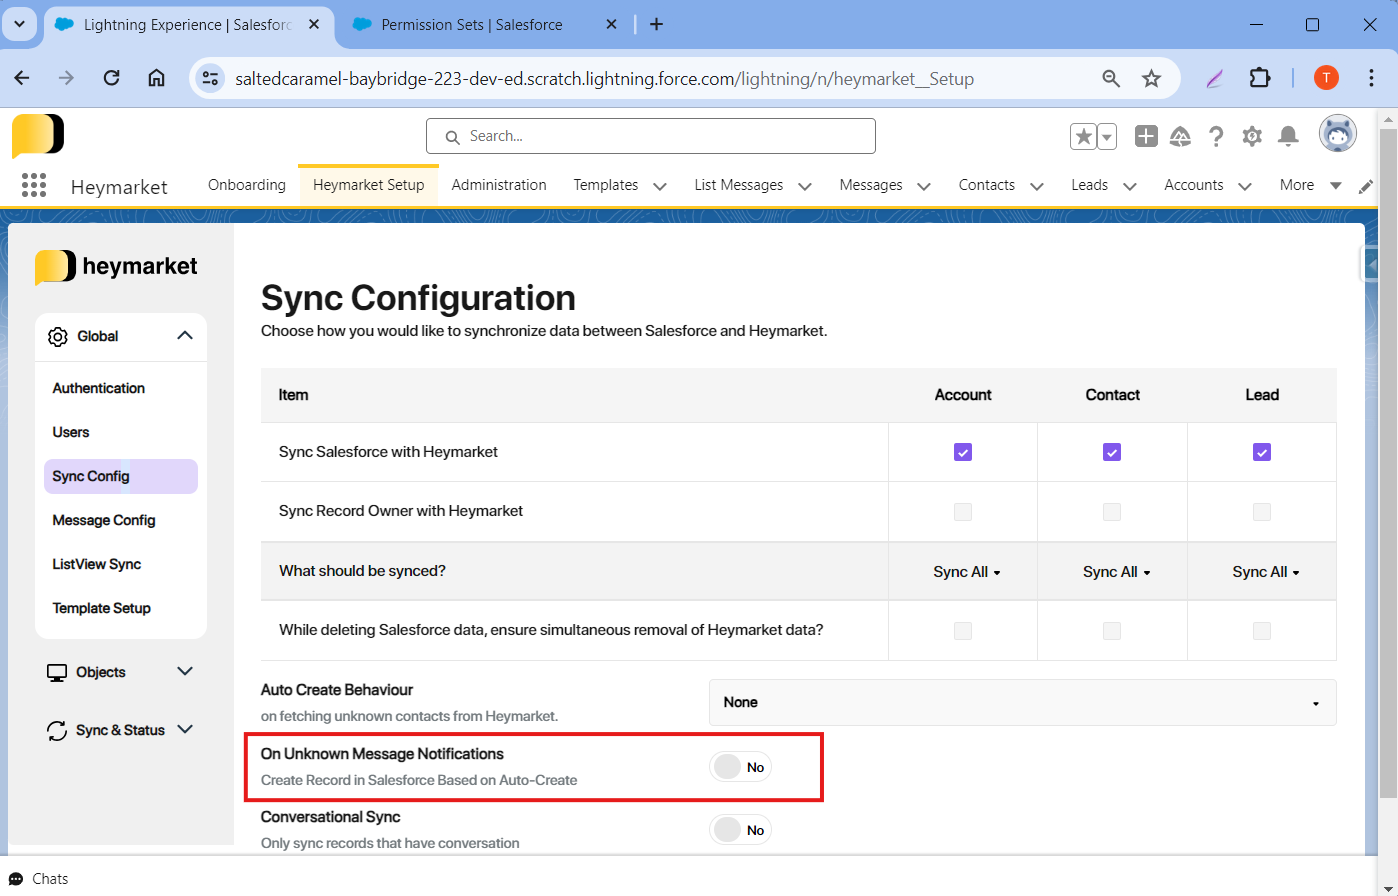
Things to consider before starting your first sync:
- Any Process Builders on Account/Contact/Lead should be inactive.
- Any Flows/Workflows/Field Updates on Accounts/Contacts/Leads should be inactive.
- Record creation should be disabled On Unknown Message Notifications.
Disabling record creation:
Step 1: Go to the Administration tab > Sync Configuration
Step 2: Scroll down to the bottom.
Step 3: Ensure it is toggled to No.
Chat Widget
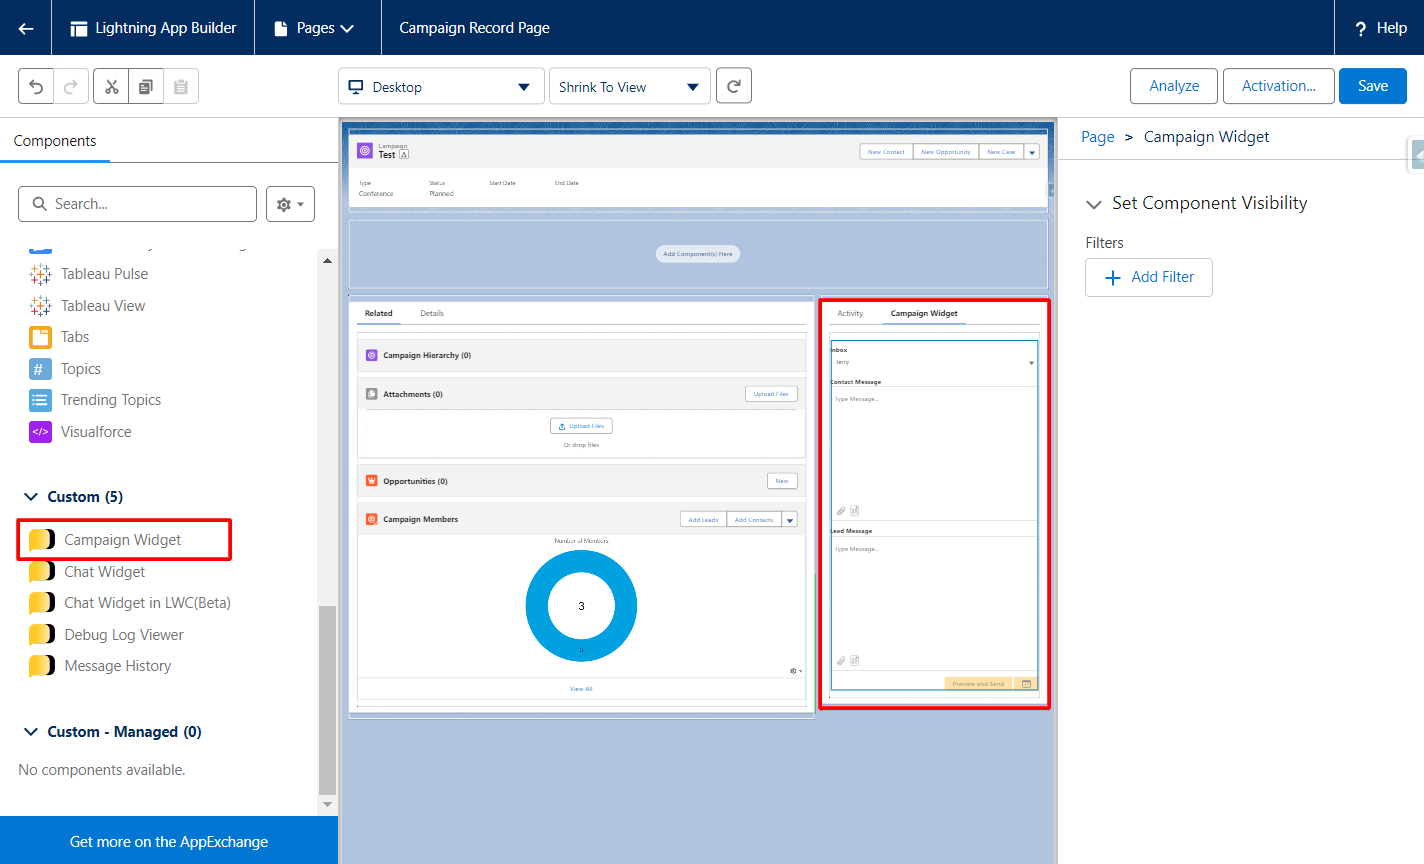
Adding a Chat Widget to Lightning Record Page
Step 1: Navigate to the Lightning Page Builder by clicking on Edit Page on the record page of the Object where you want to add the Chat Widget (Heymarket Chat component).
Step 2: Add a new tab Heymarket Chat
This will create a real estate for the “Heymarket Chat” component to sit in. This is optional if you have a Left sidebar or another similar area available in the page layout. The same could be used for the drag-drop of the Heymarket Chat component.
Step 3: Drag and drop the Heymarket Chat component on the tab. Then set component visibility as shown below.
Note: Please make sure you take care of your org’s permission and security model while exposing Heymarket Chat to various users in the Salesforce Org. A few steps could vary, especially if your layouts/lightning pages are different from typical Salesforce defaults.
Adding the Chat Widget on Salesforce Mobile
The Heymarket Chat Widget is supported on the Salesforce mobile app. To use it, add the Heymarket Chat Widget component to any Lightning Record Page that is enabled for mobile.
For an optimized mobile experience, we recommend creating a Lightning Action button that opens the Heymarket Chat Widget in the Salesforce Mobile App.
Steps to Create and Add the New Action Button:
- Go to Setup > Object Manager and select the object where you want to add the button (e.g., Lead, Contact).
- Navigate to Buttons, Links, and Actions, then click New Action.
- Fill in the required fields as shown in the screenshot (typically, choose Action Type: “Lightning Component”, and select the Heymarket Chat Widget component), then click Save.
- Go to Page Layouts, and select the layout where you'd like to add the button.
- Drag and drop the Heymarket Chat button into the Salesforce Mobile and Lightning Experience Actions section.
- Click Save.
Mobile View
Adding Chat History to Lightning Record Page
Edit the page, as indicated in the screenshots below. You can also edit the page via Setup > Object Manager > Object > Lightning Record Pages.
Step 1: Navigate to the Lightning Page Builder by clicking on Edit Page on the record page of the object where you want to add the Chat History.
Step 2: Add a new Chat History tab, as shown in below picture.
Step 3: Drag and drop the Heymarket Chat component on the tab. Then, set component visibility as shown below.
Utility Bar Configuration
The Heymarket App comes with a handy utility bar item called Conversations. It lets you start SMS-based conversations with any Salesforce Object record that is configured. This utility bar comes pre-configured with the Heymarket App, and appears as follows:
Adding the Utility bar to your Lightning Apps:
Heymarket ships a component called Conversations, which can be added as a utility bar item to any other Lightning app. Here are the steps for setting it up.
Note: If you are using the Heymarket App, the utility bar configuration is not needed.
Step 1: Go to Setup.
Step 2: Search for App Manager. Then search for your Lightning App where you want to add the Conversations utility bar item and click Edit.
Step 3: Navigate to the Utility Items tab. Click on the Add Utility Item button. Then search for Conversations
Step 4: After selecting the Conversation item, fill in some details as shown below:
Broadcast Messaging
Campaigns
Using the Campaign Widget, you can send messages to campaign members. Within the Campaign Widget, you can utilize various Salesforce native templates for Contact and Lead campaign members.
Adding a Campaign Widget to a Campaign Layout
Step 1: Go to Lightning Page Builder, and edit the Campaign object page, as indicated in the screenshot below.
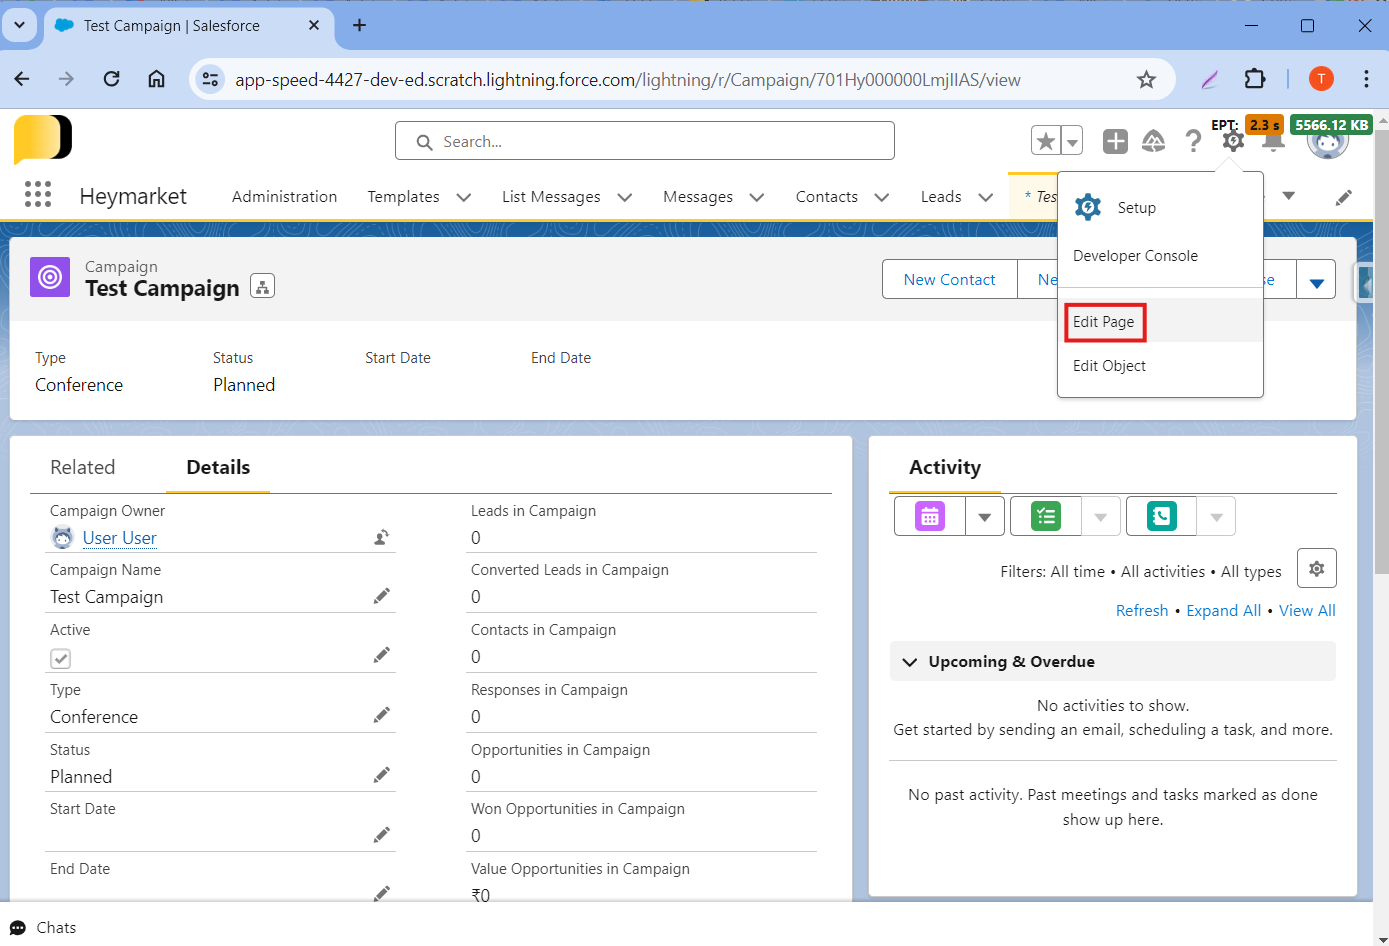
Step 2: Drag and drop the Heymarket Chat Campaign component on the page. You can create a separate tab for this or you can drop the component on a similar area available in page layout.
Note: Make sure the campaign has at least one member and is active.
Drip Campaign
Campaigns are a sequence of messages that can be scheduled to be sent at predefined dates and times. They're a great way to automate follow-up messages or provide regular updates to contacts.
A campaign can include any of the lists in Heymarket. Once a contact is added to the list, they'll begin receiving the scheduled campaign messages. Contacts can easily be removed from a campaign at any time. Each message can be personalized with the first name or any custom fields of each contact.
Heymarket text messaging campaigns have been used for appointments, review requests, and customer satisfaction surveys. Drip campaigns for SMS can also be used to engage with new leads and make it easy to answer any questions they might have. A critical component of a successful drip campaign is ensuring that recipients receive personalized messages.
To learn more about drip campaigns, go to the following links:
- https://help.heymarket.com/hc/en-us/articles/360041725712-Campaign-Example
- https://help.heymarket.com/hc/en-us/articles/115001080428-What-are-campaigns-
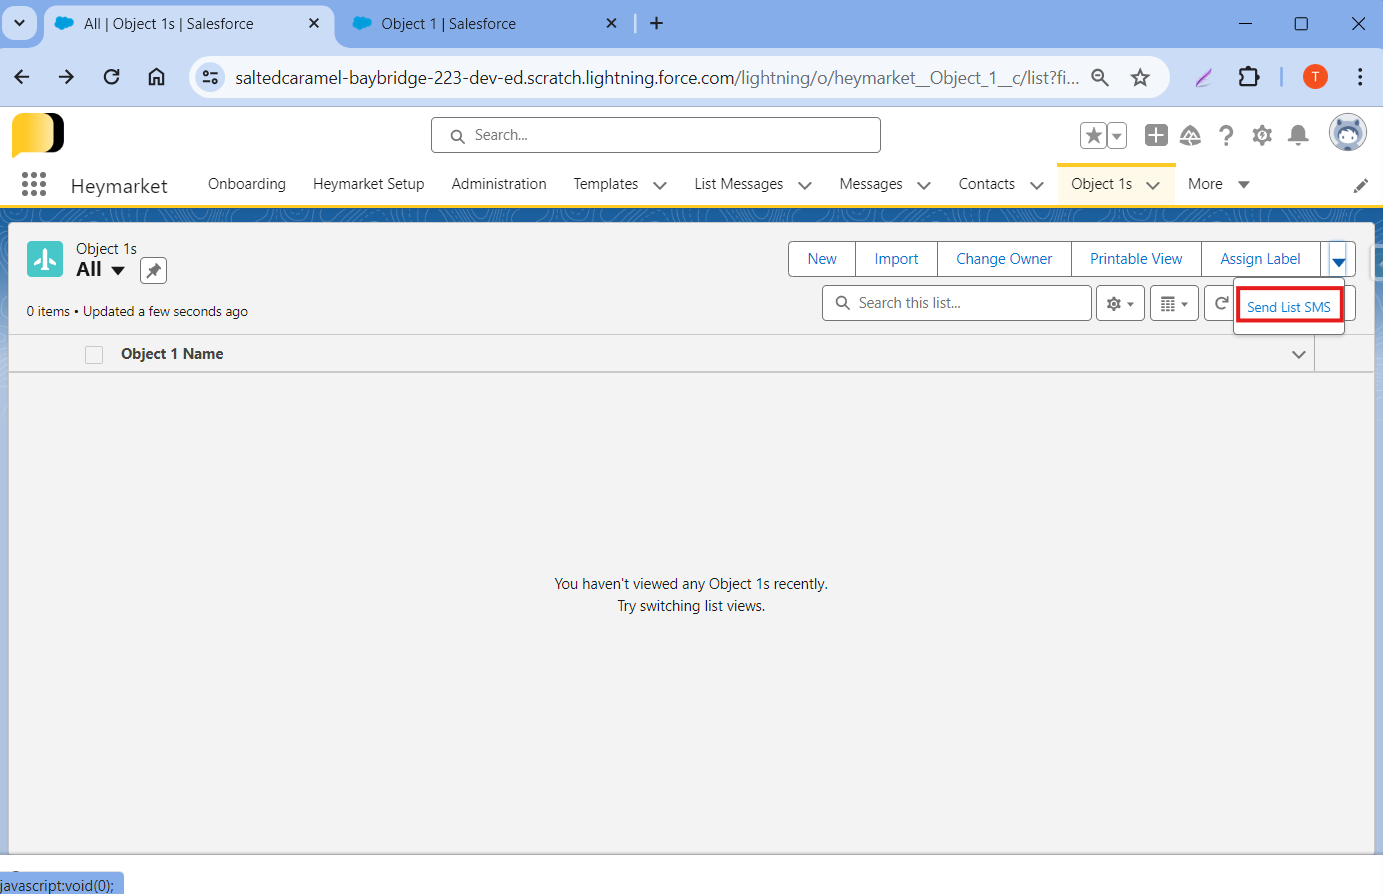
List SMS Configuration
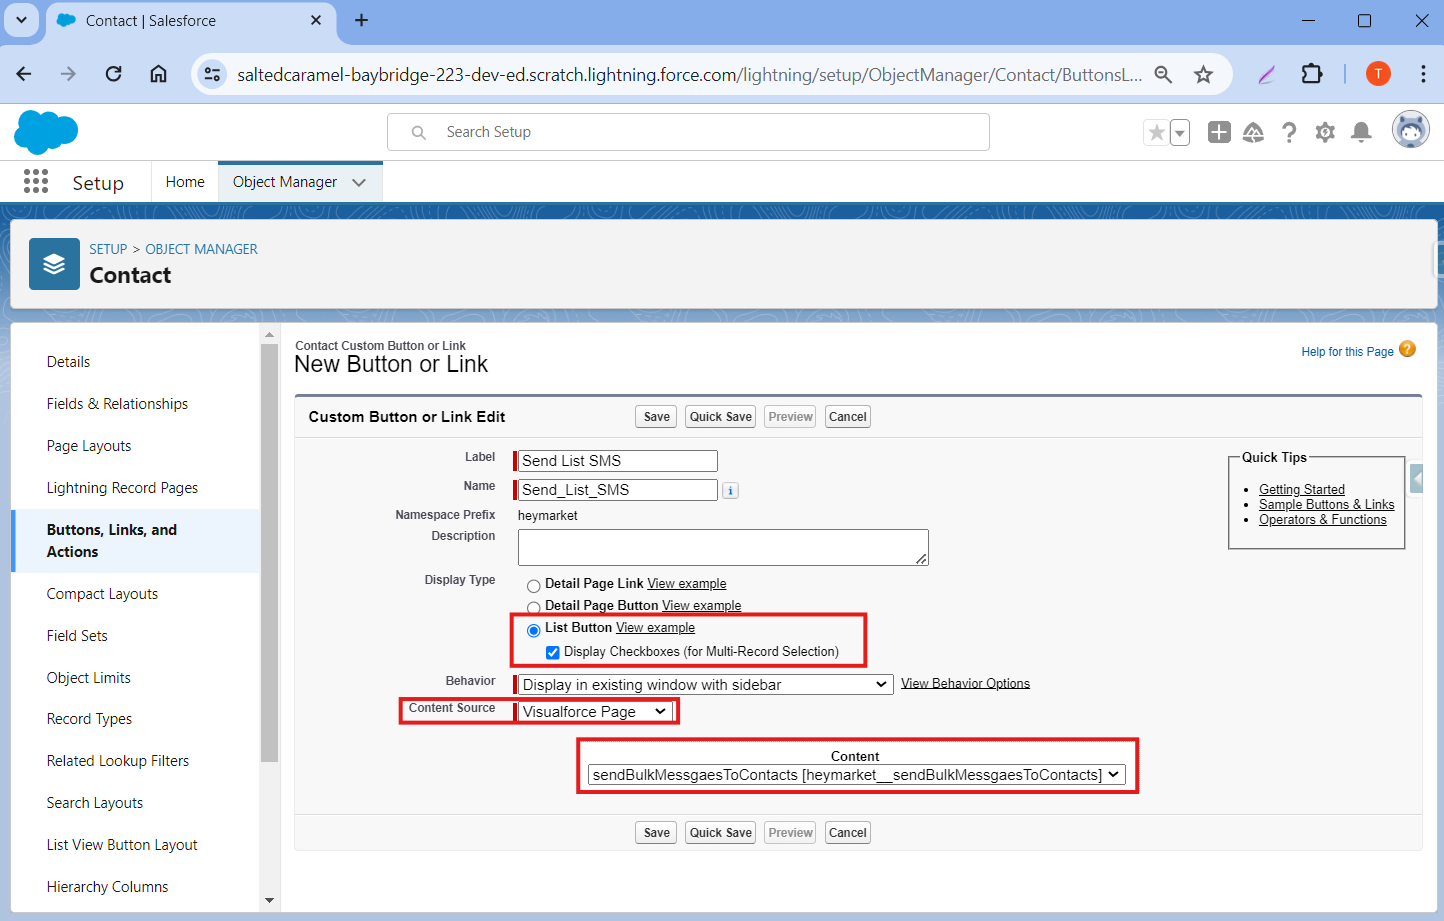
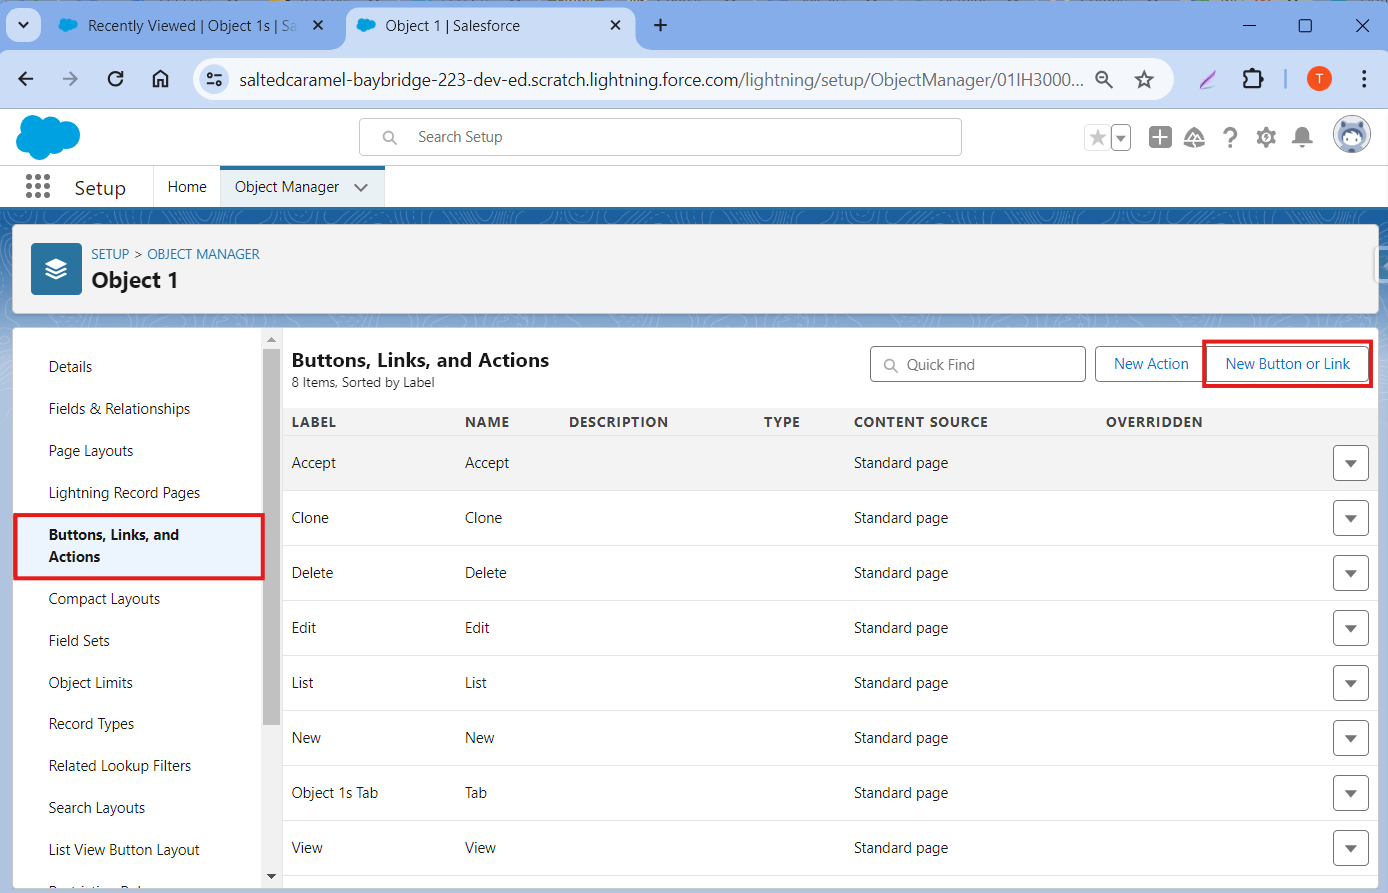
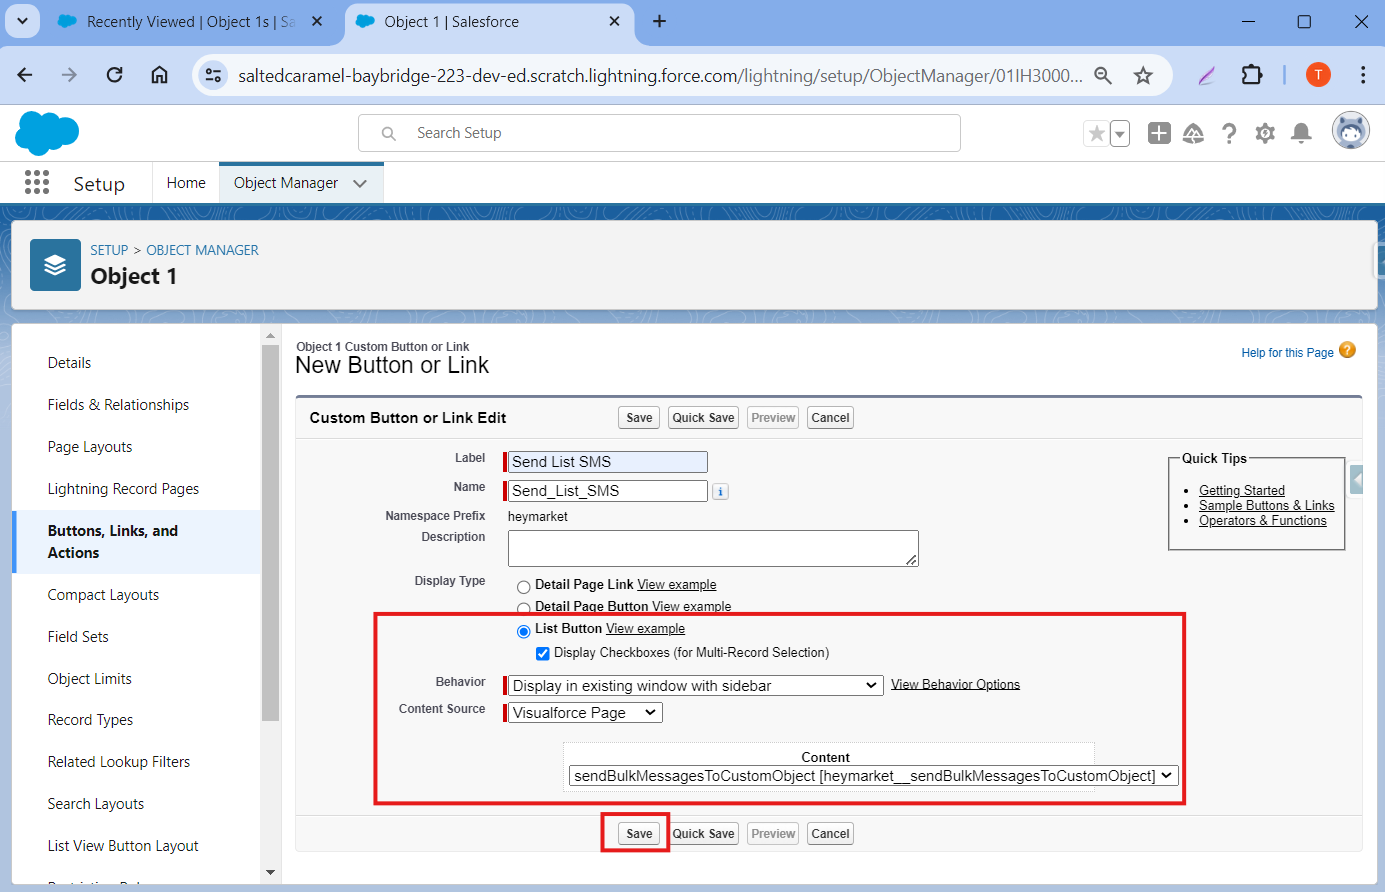
Step 1: Go to Setup > Object manager > Select Object (Contact/Account/Lead) > Buttons, Links, and Actions > then Click on New Button or Link.
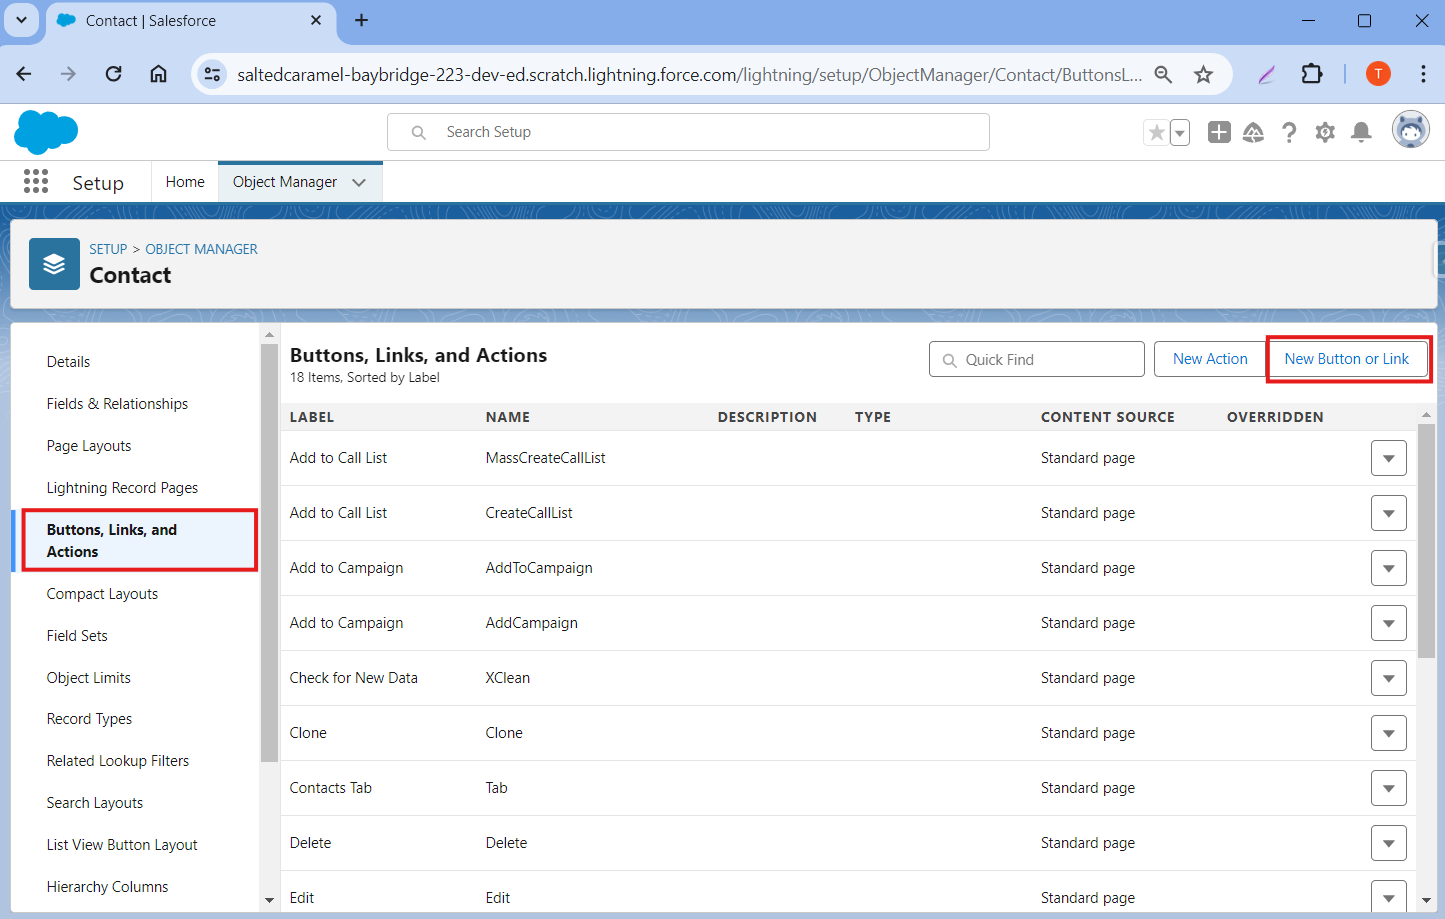
Select the following options as shown in the below screenshot, and click Save.
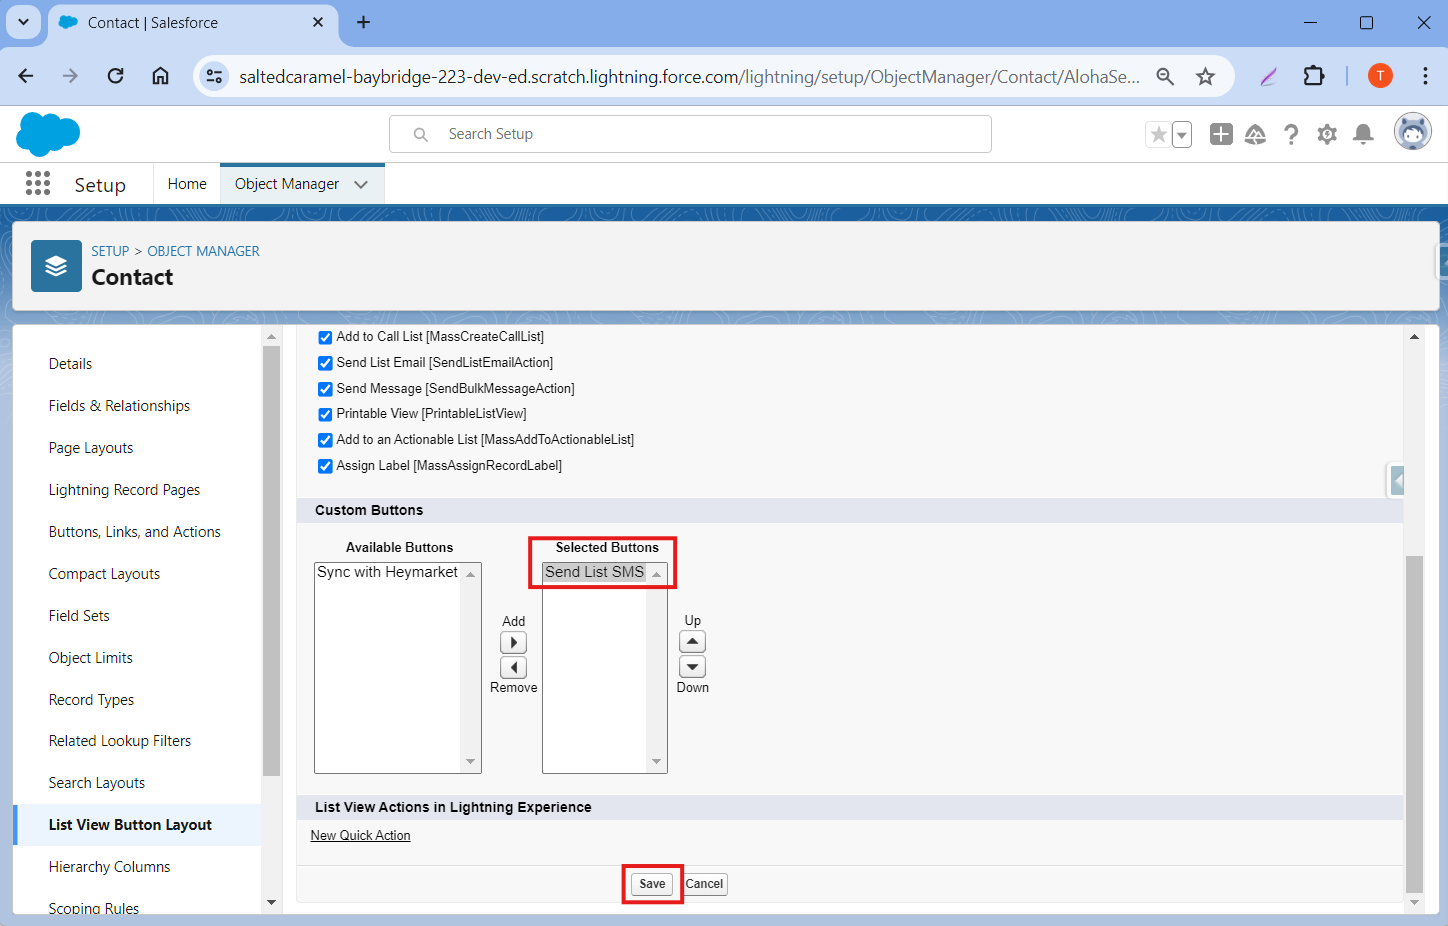
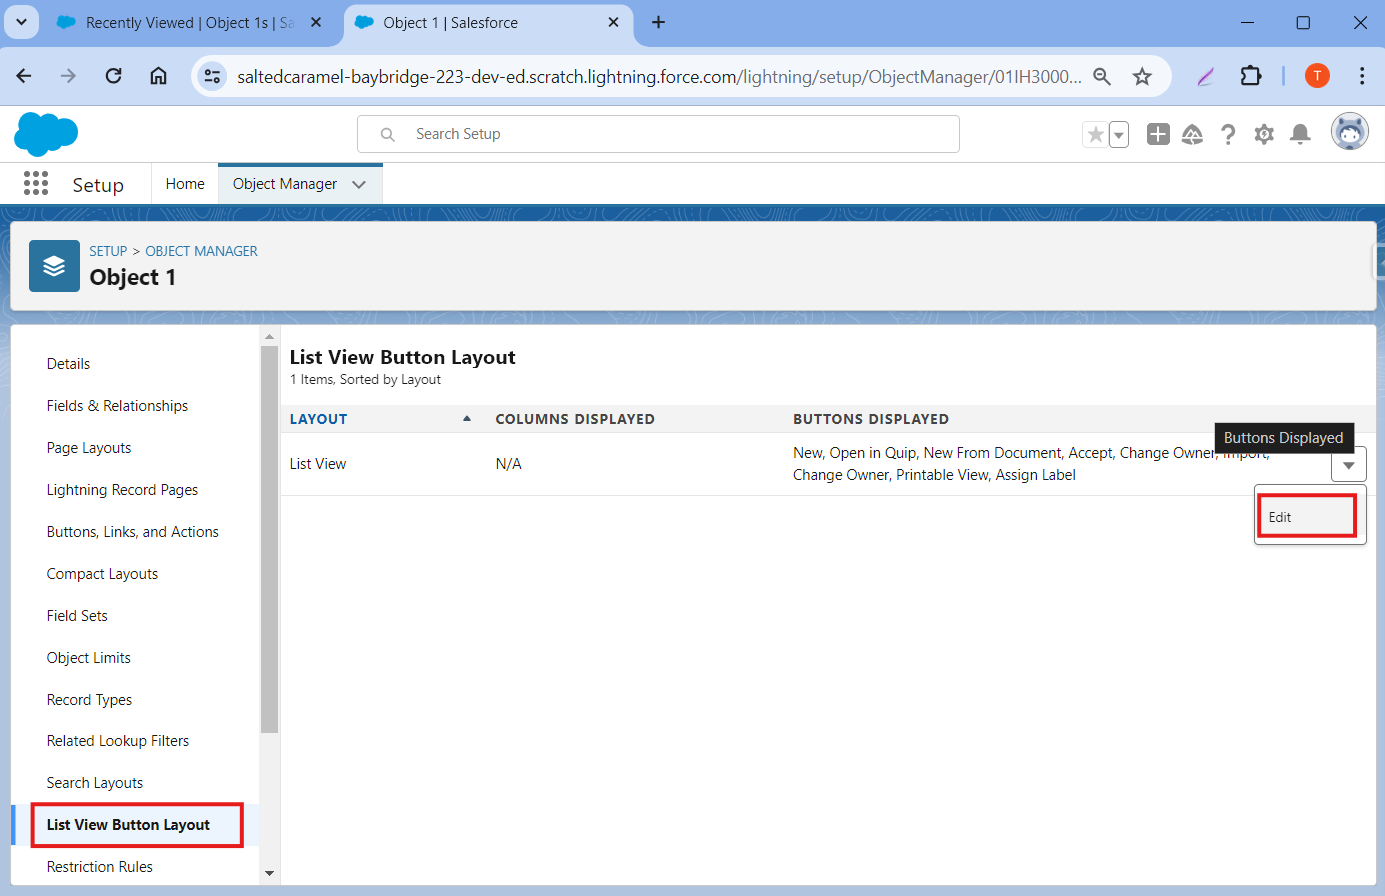
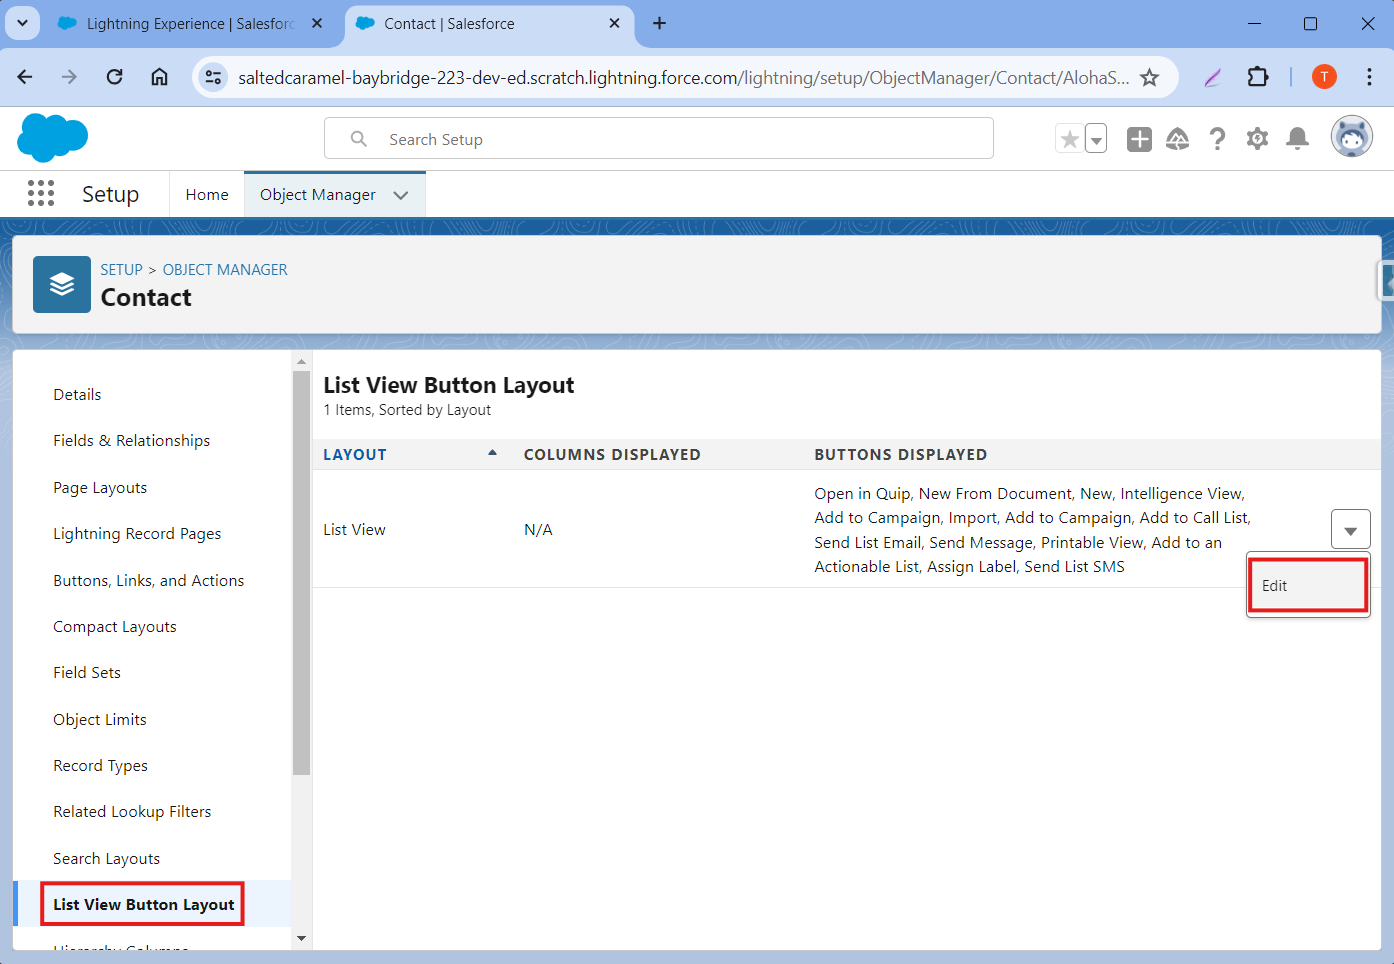
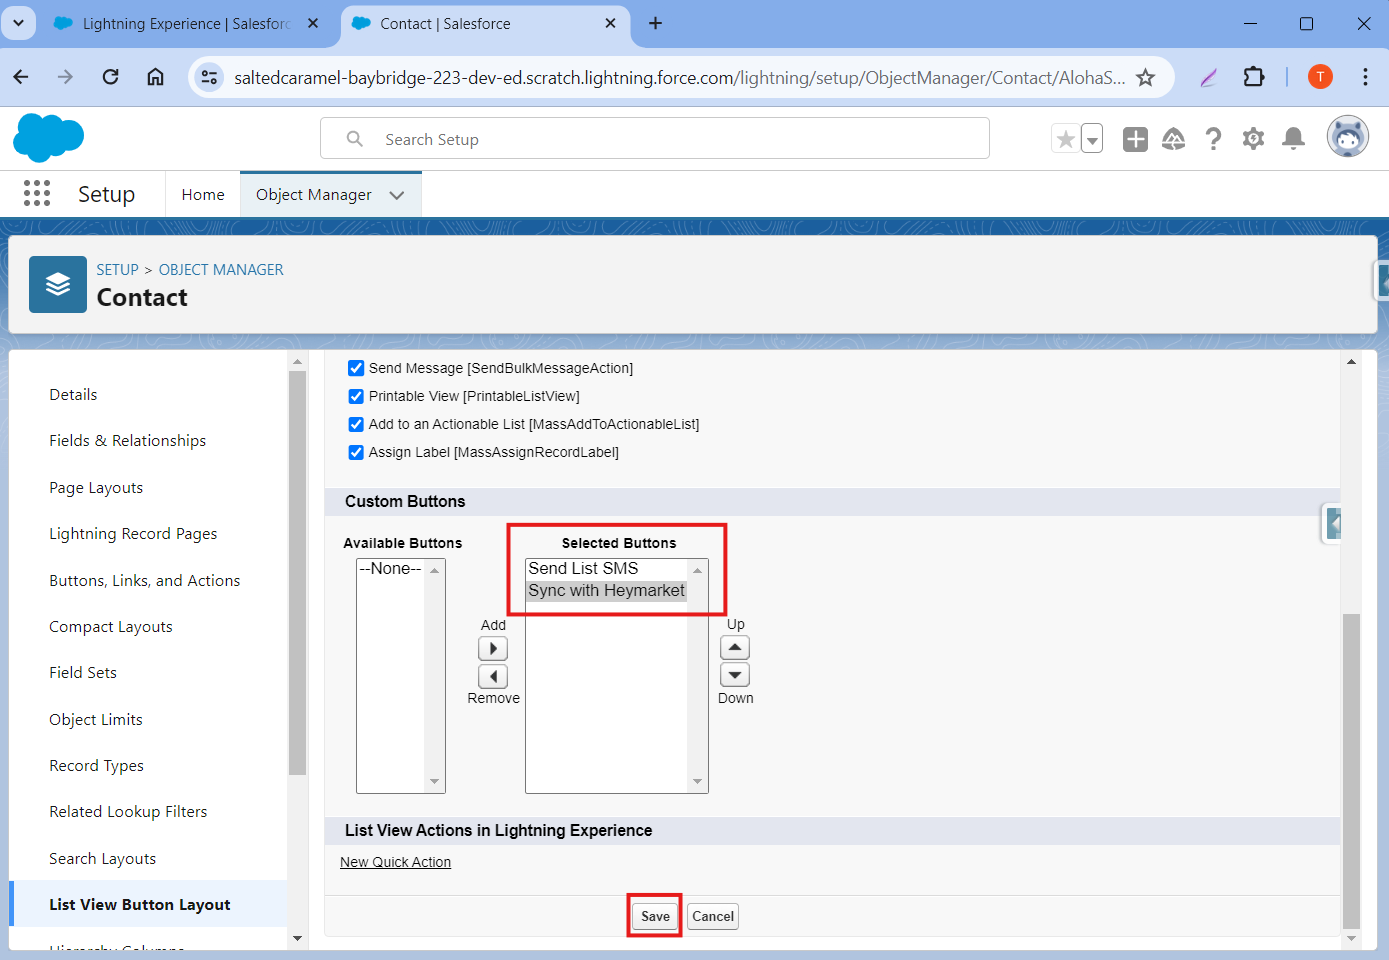
Step 2: Go to List View Button Layout > Edit.

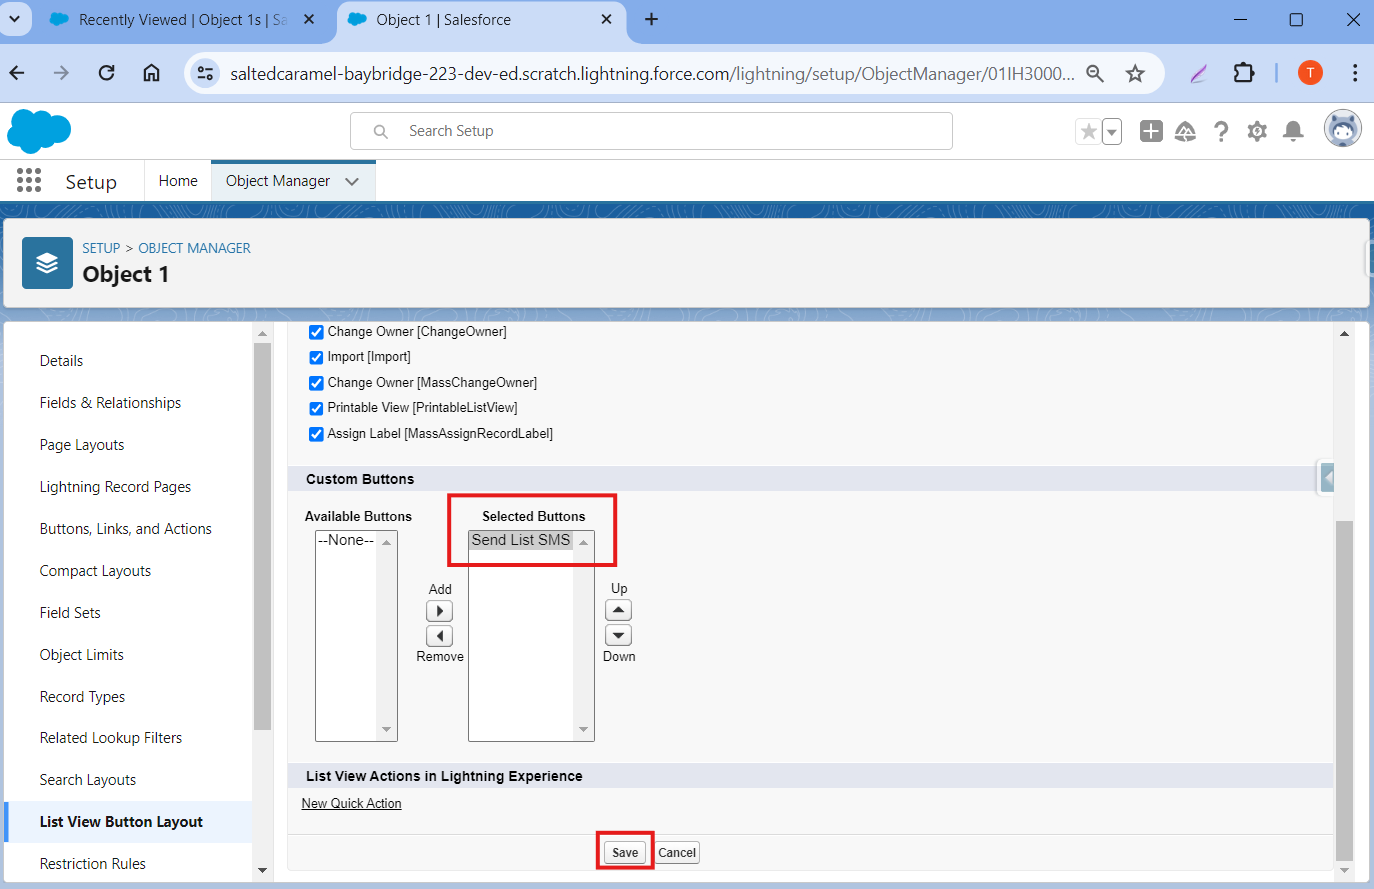
Move the Send List SMS button from the Available Buttons to the Selected Buttons and click the same, as shown in the below screenshot.
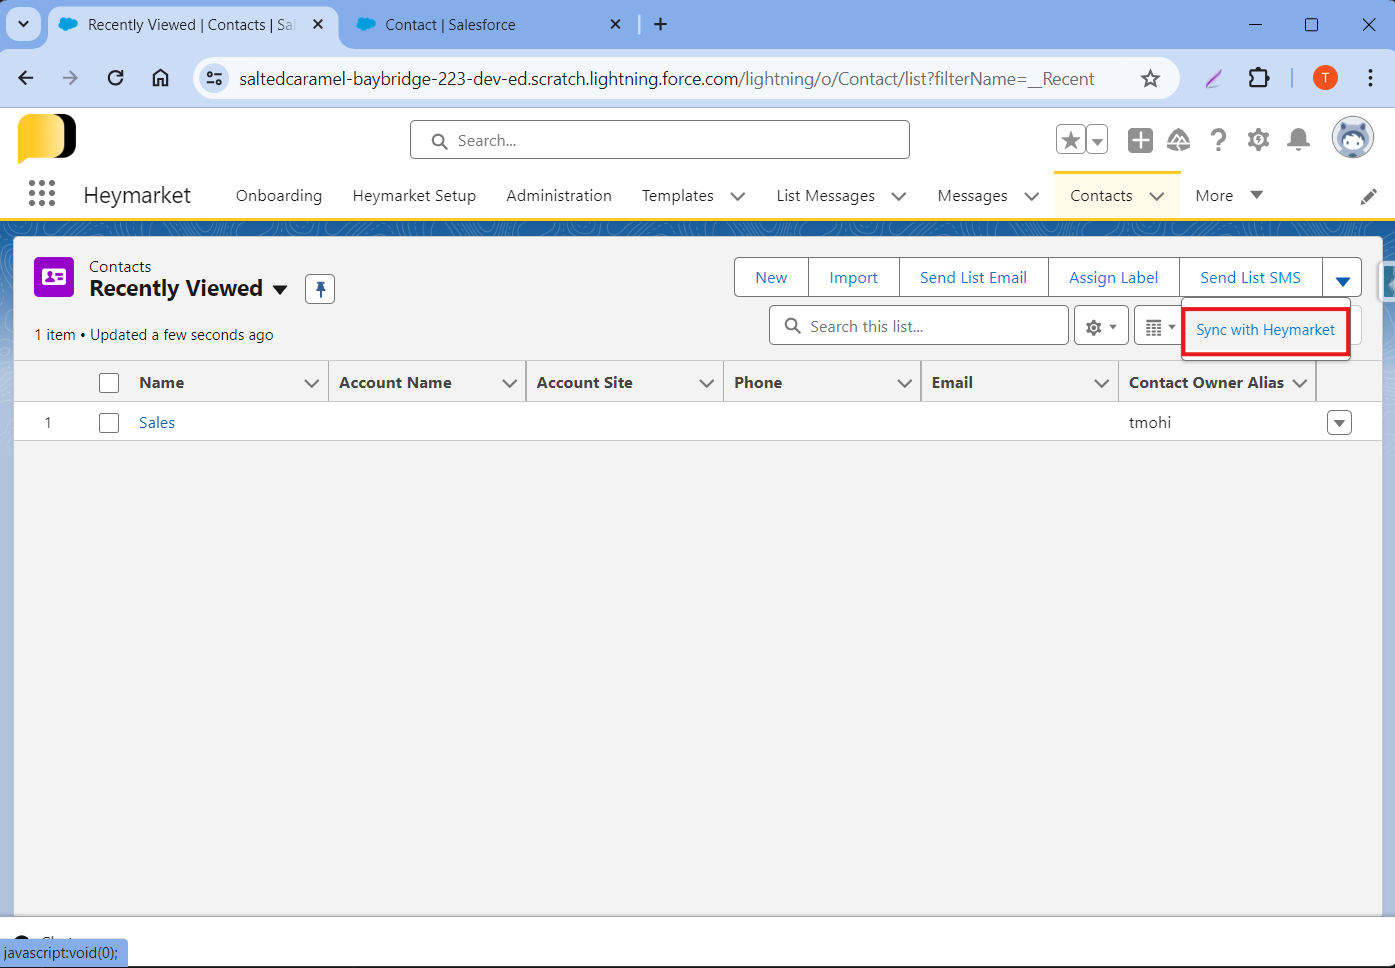
Now check the object list view page, and find the button Send List SMS. Click on Send List SMS. You will be redirected to the screen from where you can send List SMS.

Note: When nothing is selected from the list, then SMS will broadcast to the whole list or else to the selected members.
List SMS Configuration for Custom Object
Step 1: Create a new VF page and put the below code.
Change standard Controller and objectType as per the Custom Object. In this example, the user is adding List SMS on an Object with API NAME Employee__c, so their VF page code will look like this:
<apex:page standardController="Employee__c" extensions="heymarket.sendBulkMessages_ctrl" recordSetVar="Employees">

    <heymarket:ListSms_Cmp objectType="Employee__c" myData="{!model}" records="{!records}"></heymarket:ListSms_Cmp>

</apex:page>
Step 2: To add the Send Bulk SMS button on the Custom Object, click Edit Object.
Step 3: Click on Buttons, Links, and Actions, then New Button or Link.
Step 4: Select the options as shown in the below screenshot, then click Save.
Step 5: Go to List View Button Layout > Edit.
Step 6: Move the Send List SMS button from Available Buttons to Selected Buttons and click the same, as shown in the below screenshot.
Step 7: Now return to the Custom object list view page and click Send List SMS.
Email Broadcast from Salesforce List View
Users can send email broadcasts directly from Salesforce List Views — similar to the List SMS functionality. This allows you to select records from any list view and broadcast emails without leaving Salesforce.
When no records are selected from the list, the email will broadcast to the entire list. If specific records are selected, the email will only be sent to the selected members.
Supported Objects: Account, Contact, Lead
New Objects
1. List Email (List_Email__c)
A new custom object that stores the details of each email broadcast. A new tab called "List Emails" has been added to the Heymarket app, allowing users to view and manage all email broadcasts.
| Field Label | API Name | Type | Description |
| Status | Status__c | Picklist | Broadcast status: Queue, Send, Failed, Deleted, Discard |
| Type | Type__c | Picklist | Normal (immediate) or Schedule (scheduled for later) |
| Execute At | Execute_At__c | DateTime | The date/time the broadcast is scheduled to be sent |
| Subject | Subject__c | Text | The email subject line |
| Content | Content__c | Long Text | The HTML email body content |
| Raw Text | Raw_Text__c | Long Text | The plain text version of the email body |
| Inbox Id | Inbox_Id__c | Text | The Heymarket inbox used to send the email |
| Object Name | Object_Name__c | Text | The Salesforce object (Contact/Account/Lead) |
| Selected Email Field | Selected_Email_Field__c | Text | The email field used on the object |
| Send To Whole List | Send_To_Whole_List__c | Checkbox | Whether the email is sent to the entire list |
| Sf List Id | Sf_List_Id__c | Text | The Salesforce List View ID |
| Sf List Name | Sf_List_Name__c | Text | The Salesforce List View Name |
| Members | Members__c | Number | Count of members in the broadcast |
| Template Id | Template_Id__c | Text | Lightning Email Template ID (if used) |
| List Query | List_Query__c | Long Text | The query used to fetch recipients |
| Batch Id | Batch_Id__c | Text | The batch job ID for tracking |
| Error | Error__c | Long Text | Error details if the broadcast failed |
2. Email Broadcast Member (Email_Broadcast_Member__c)
A child object of List Email that tracks each individual recipient and their send status.
| Field Label | API Name | Type | Description |
| List Email | List_Email__c | Master-Detail | Reference to the parent List Email record |
| Targeted Email | Targeted_Email__c | The recipient's email address | |
| Sf Record Id | Sf_Record_Id__c | Text | The Salesforce record ID of the recipient |
| Status | Status__c | Picklist | Member status: Pending, Sent, Discarded |
| Error | Error__c | Text | Error details if the email failed for this member |
Email Template Support
Email Broadcast only supports Salesforce Native Lightning Email Templates. Classic email templates are not supported.
To learn how to create and set up Lightning Email Templates, refer to the official Salesforce documentation: https://help.salesforce.com/s/articleView?id=sf.email_templates_lightning_parent.htm
Scheduling Email Broadcasts
Users can schedule email broadcasts for a future date and time. When a broadcast is scheduled:
- A List Email record is created with Status = "Queue" and Type = "Schedule"
- The Execute At field stores the scheduled date/time
- A dedicated scheduled job is created to fire at the exact scheduled time
Deleting/Canceling a Scheduled Broadcast
Users can cancel a scheduled email broadcast by deleting the List Email record. The following rules apply:
- Only scheduled broadcasts with Status = "Queue" can be deleted. Broadcasts that are already sending or completed cannot be deleted.
- When a queued List Email record is deleted, the associated scheduled job is automatically aborted so the broadcast will not fire at its scheduled time.
- Attempting to delete a List Email record that is not in "Queue" status will result in an error: "You can only delete a queued email broadcast."
List Email Configuration
Step 1: Go to Setup > Object Manager > Select Object (Contact/Account/Lead) > Buttons, Links, and Actions > then click on New Button or Link.
Select the following options:
- Label: Send List Email
- Name: Send_List_Email
- Display Type: List Button (with "Display Checkboxes for Multi-Record Selection" checked)
- Content Source: Visualforce Page
- Content: BroadcastEmailToContacts (heymarket__BroadcastEmailToContacts) (Select the appropriate page based on the object — Contacts/Accounts/Leads)
Click Save.
Step 2: Go to List View Button Layout > Edit.
Move the Send List Email button from the Available Buttons to the Selected Buttons and click Save.
Now check the object list view page, and find the button Send List Email. Click on Send List Email. You will be redirected to the screen from where you can send email broadcasts.
Note : You can send SMS to the whole list or you can pick a particular recipient from the check box.
Flows and Actions
Considerations for Using Flows
Default process automation users and Flow users must have the Heymarket_User & Heymarket_Admin permission set assigned to them.
- Users must also be mapped in Heymarket’s User Mapping.
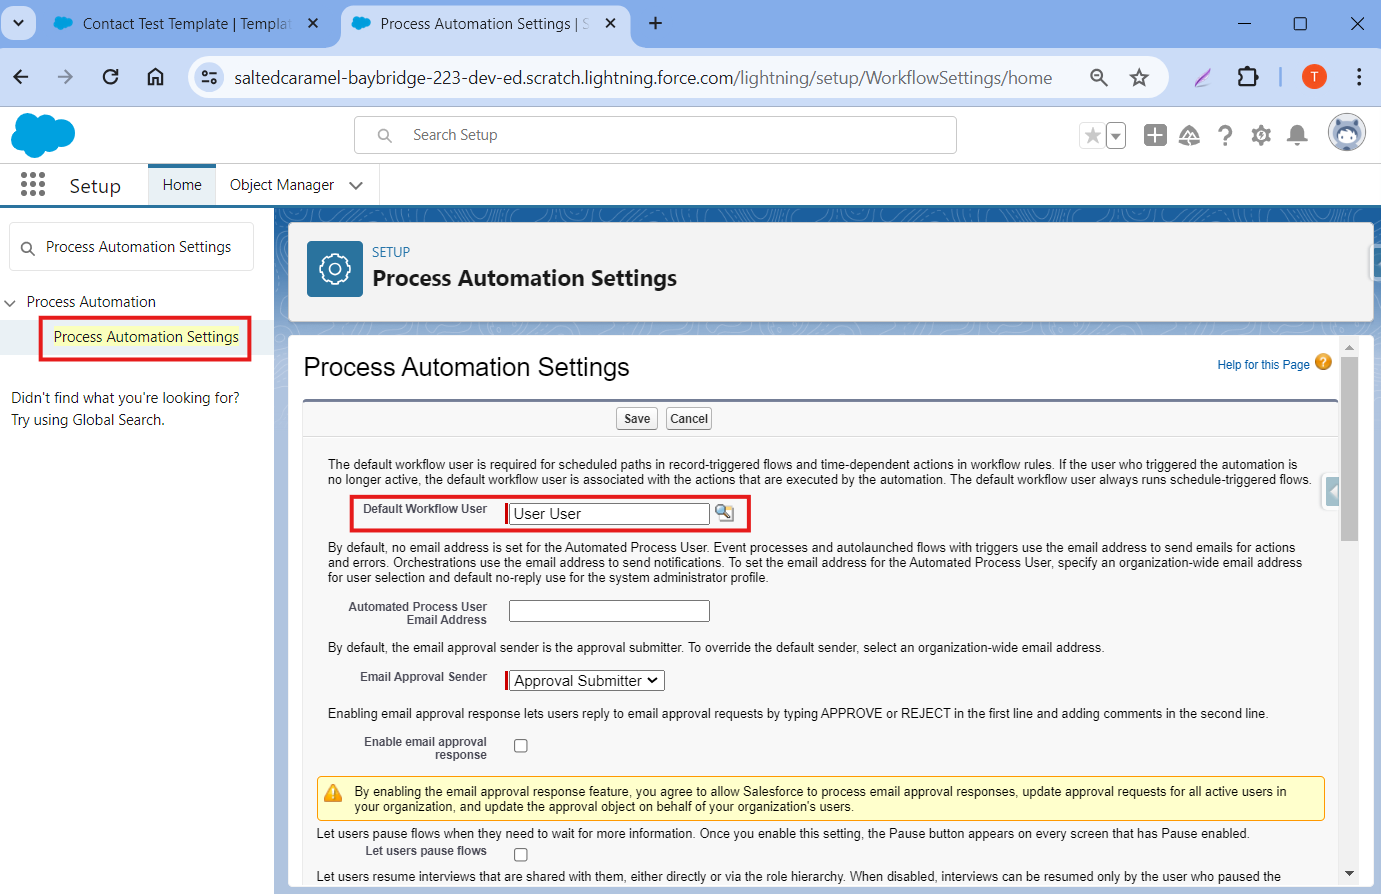
Finding the default process automation user:
Step 1: Navigate to Setup > Process Automation Settings.
Step 2: Here, you will get the default process automation user for your Salesforce org.
Flow Configuration Common Steps
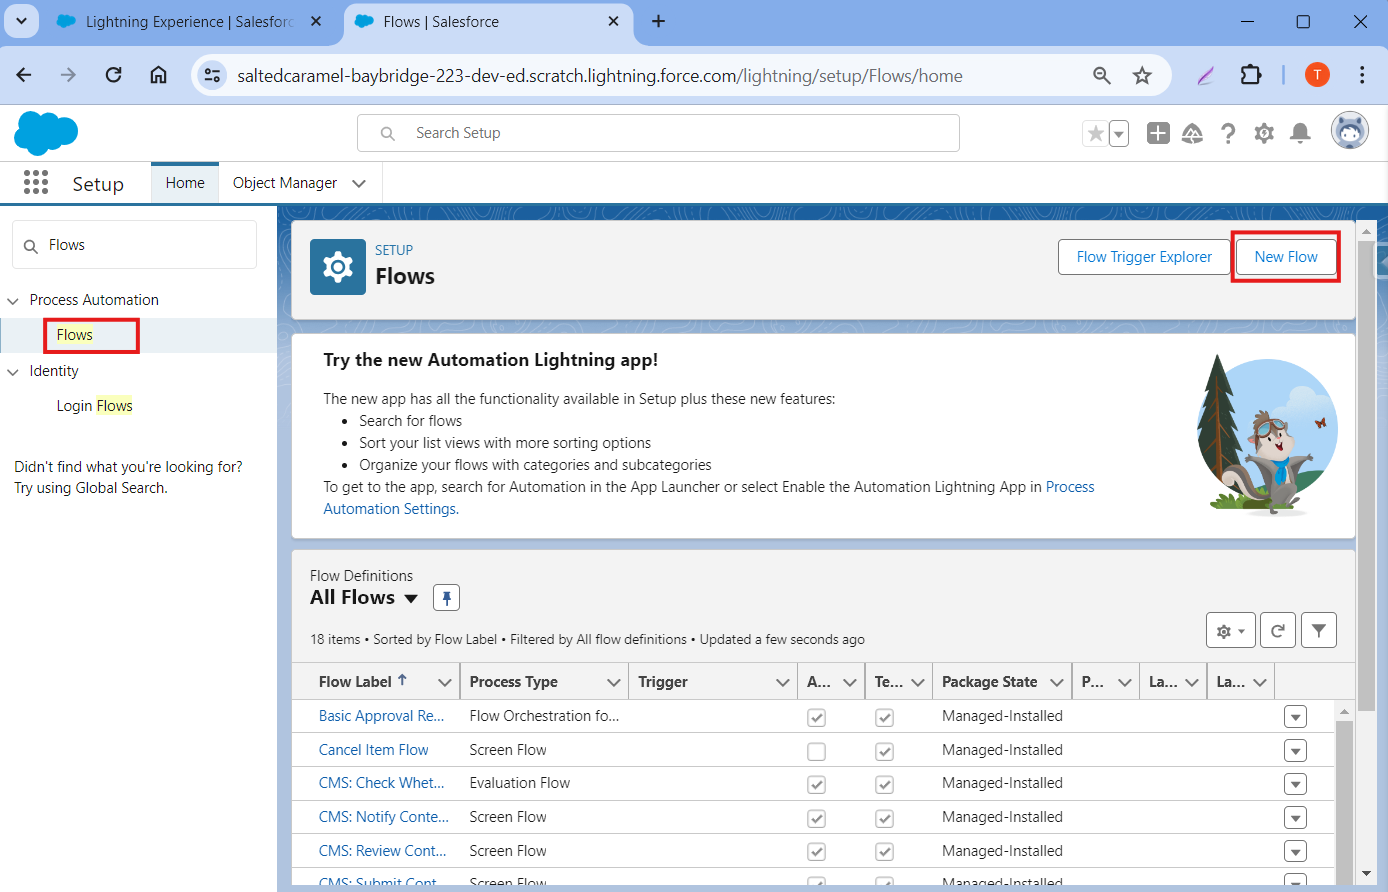
Step 1: Go to Setup > Flows > New Flow.
Step 2: After clicking New Flow, choose Record-Triggered Flow. Then, click Create.
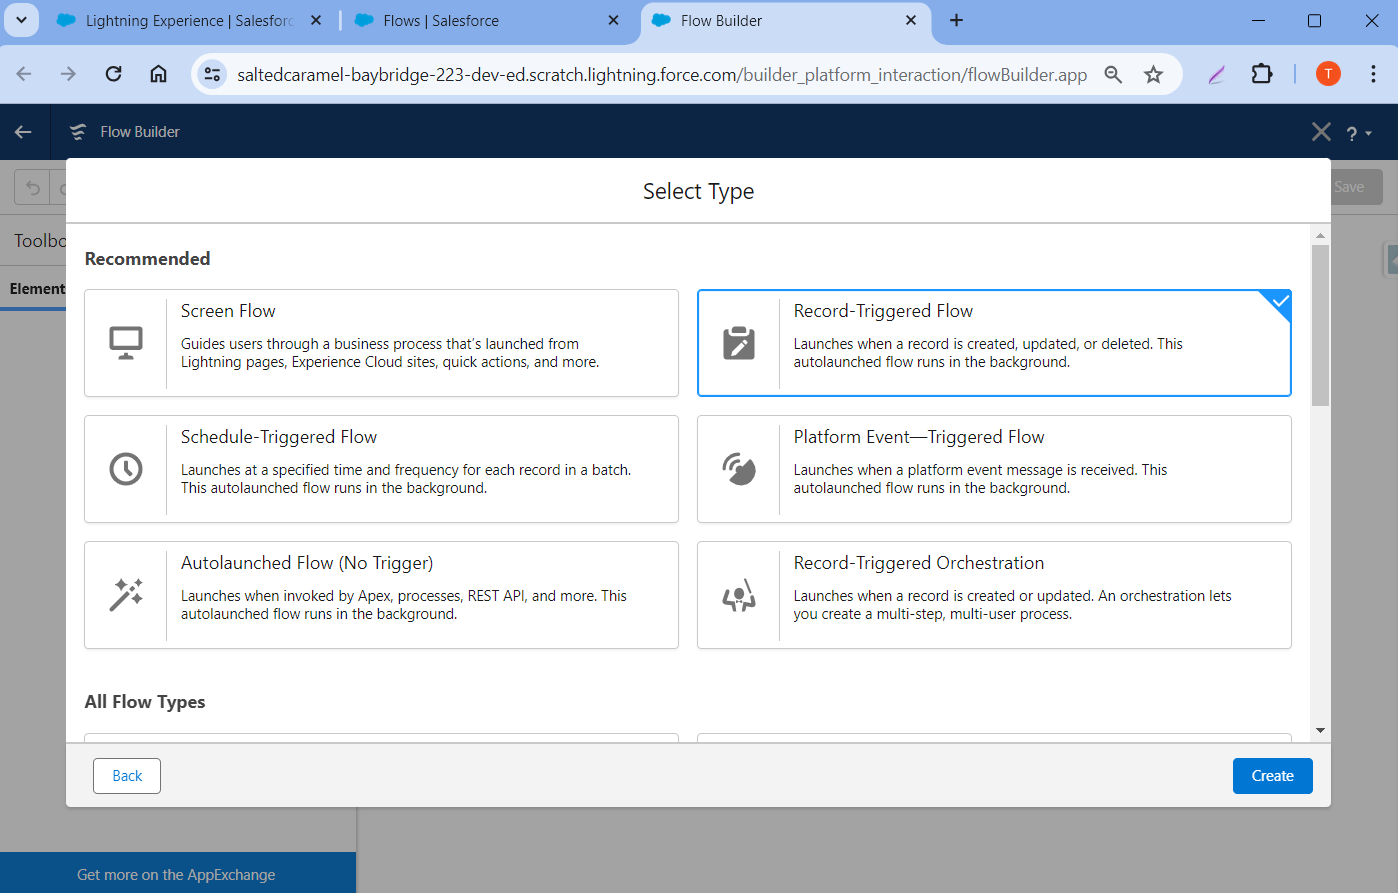
Step 3: After clicking Choose Object, a pop-up window appears. Here, you can choose the Object on which you are creating the Flow.
Setting Up a Notification Bells Flow
Creating Custom Notifications
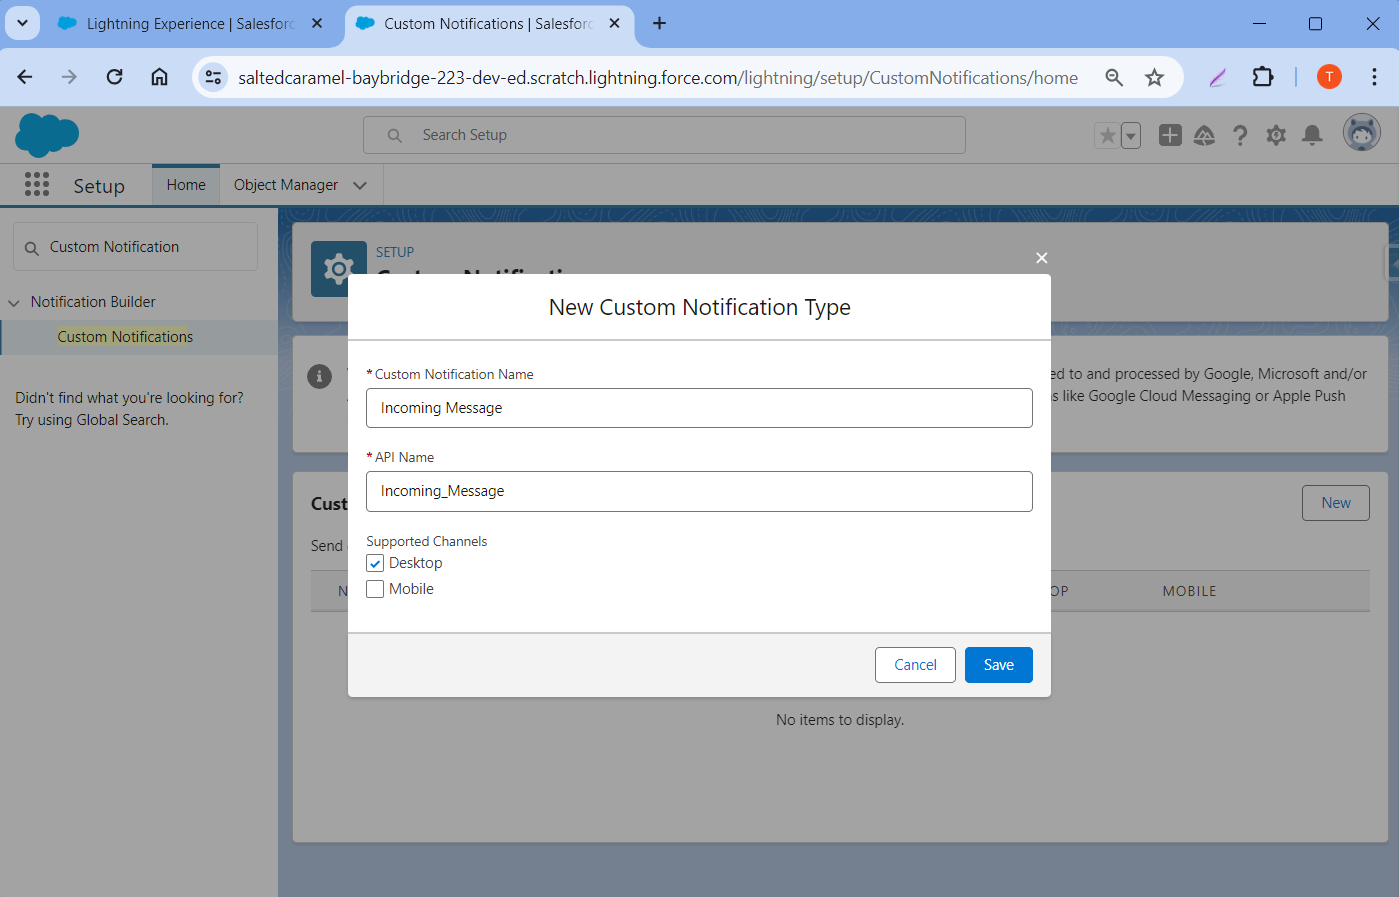
First, you have to create a Custom Notification to see bell notifications. Please follow these steps to create a custom notification:
Step 1: Go to Setup > Custom Notifications > New.
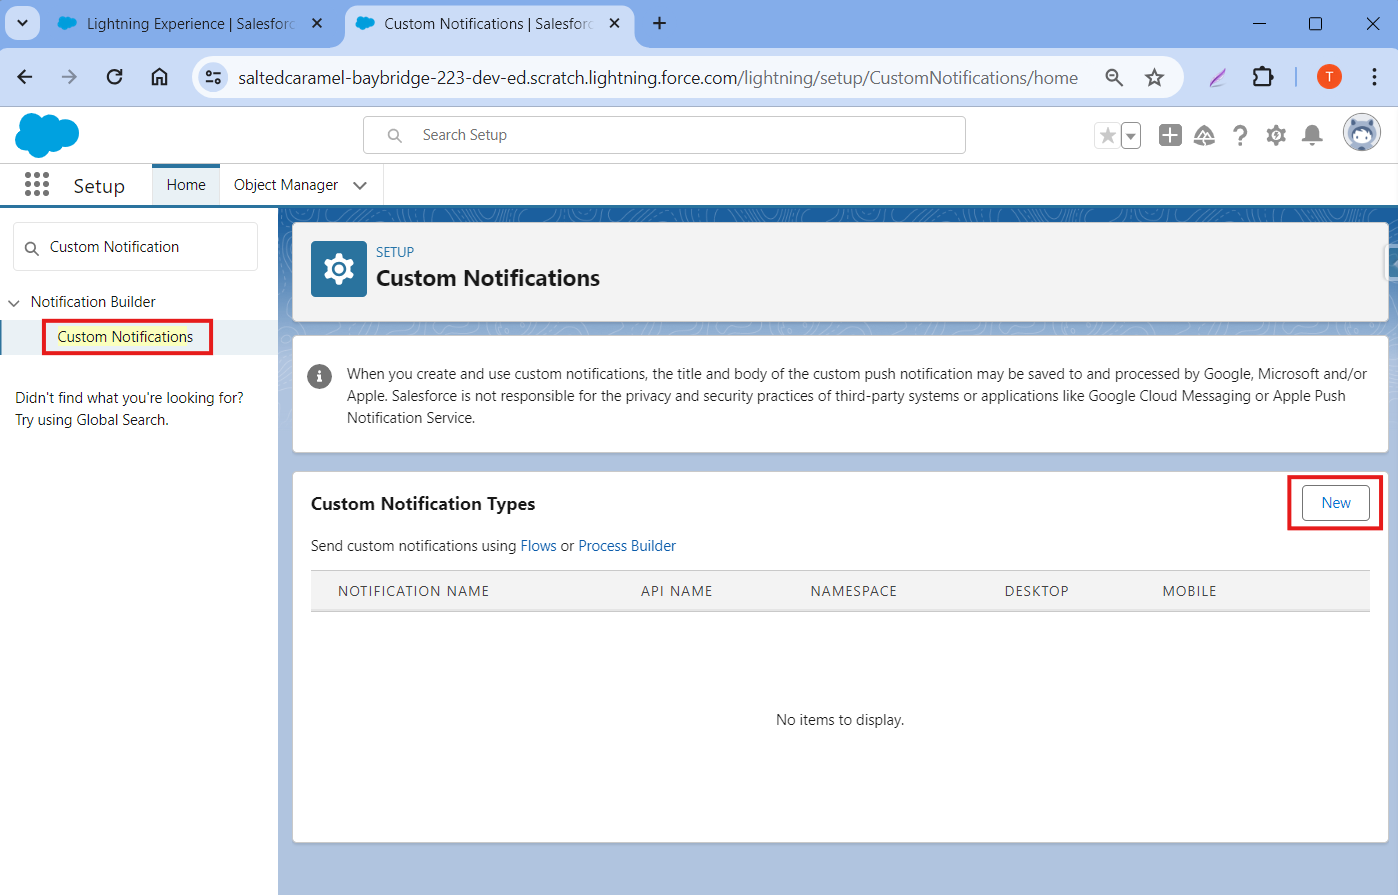
Step 2: Fill in the details as shown below and click Save.
Note: Please ensure that the API name of the custom notification is Incoming_Message. Otherwise, it will not work.
Setting Up an External Permission Set (if you’re not getting notifications)
Please follow the steps below to create an external permission set and assign it to all the users using the Heymarket app:
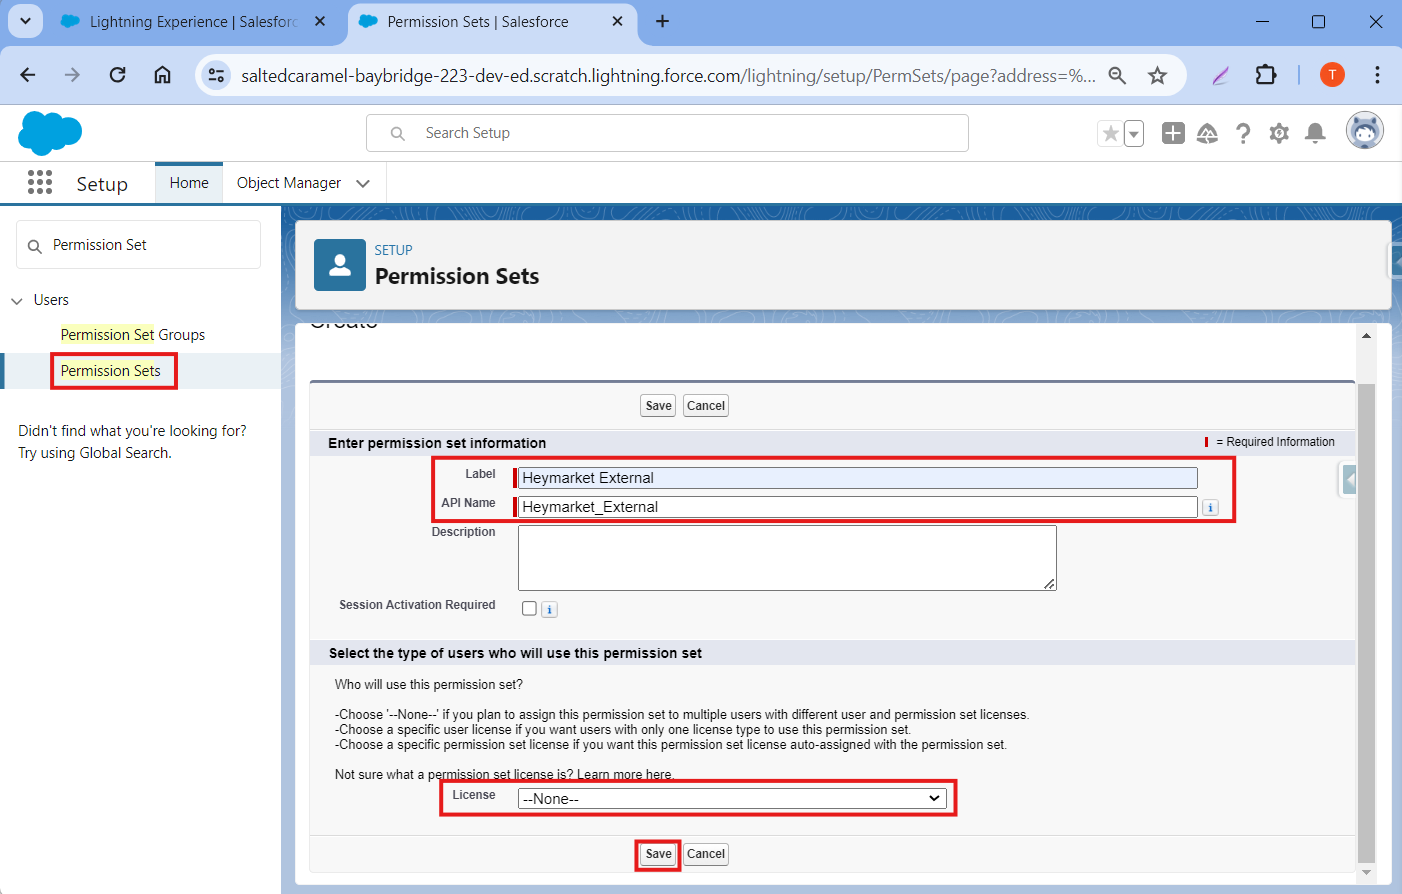
Step 1: Go to Setup > Permission Set > New.
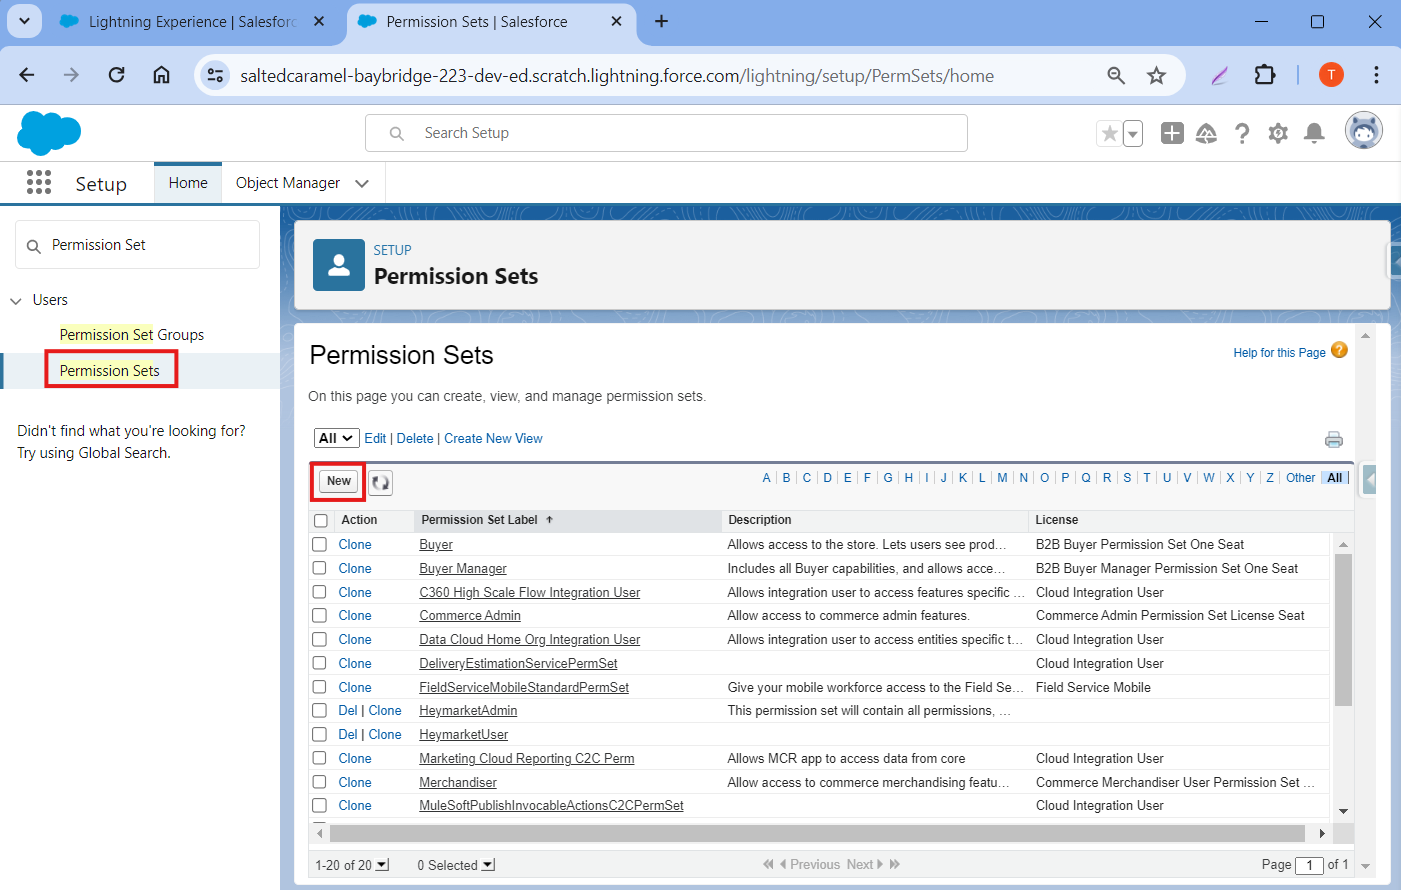
Step 2: Fill in the following details and click Save.
Name: Heymarket External
API Name: Heymarket_External
License: None
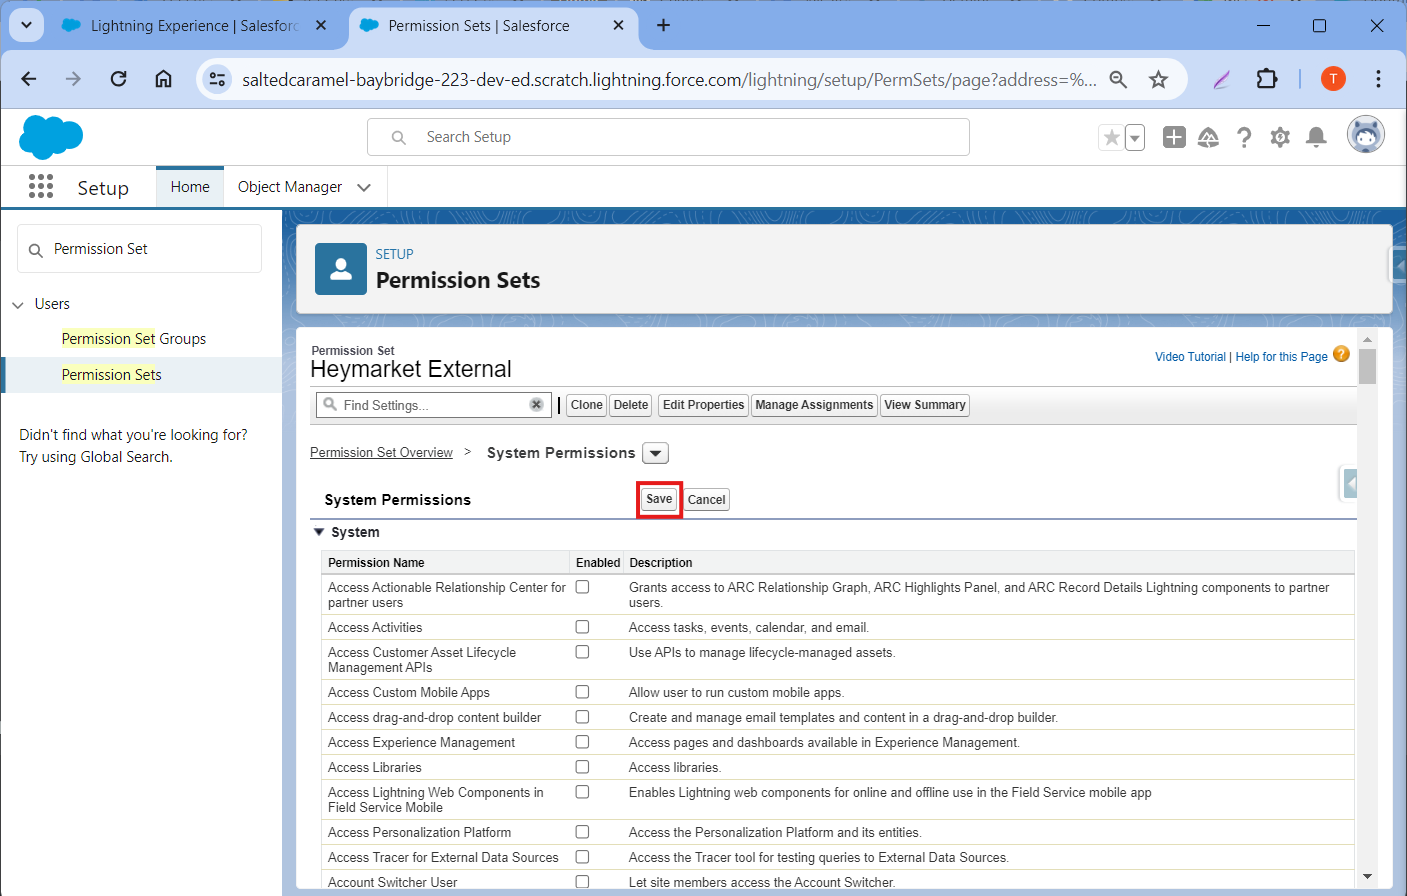
Step 3: Inside the permission set, scroll down to the bottom and click System Permissions
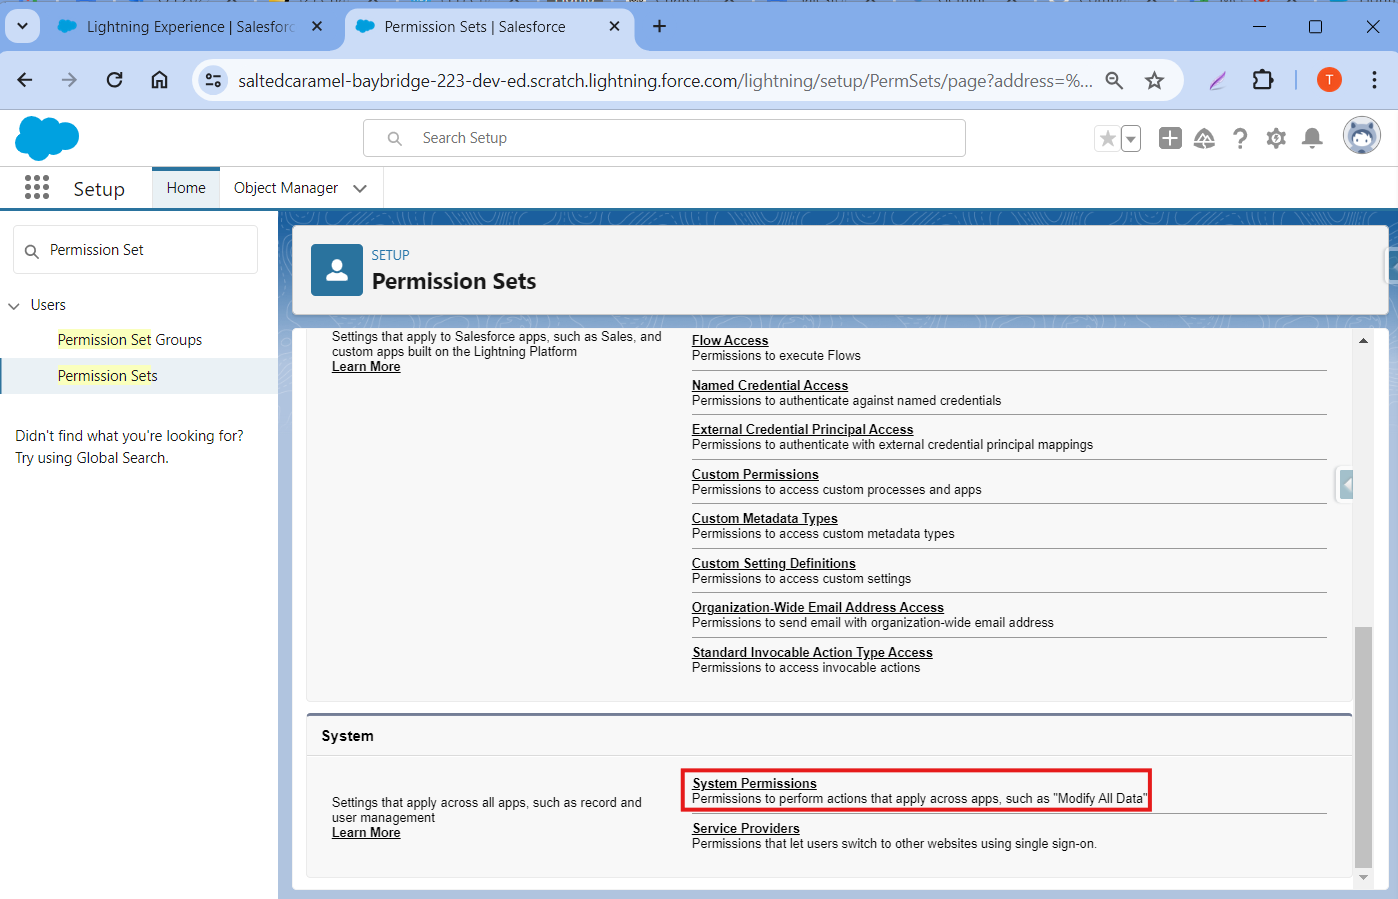
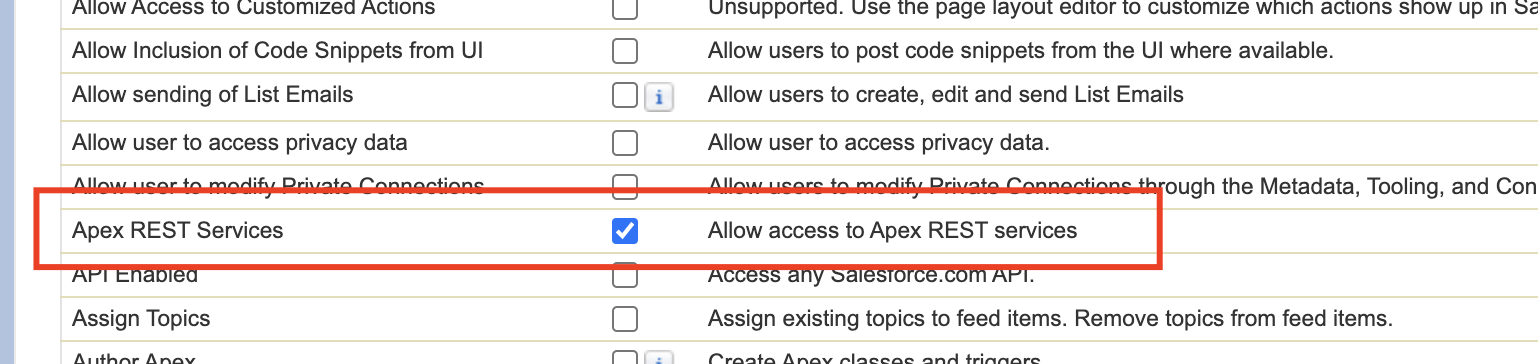
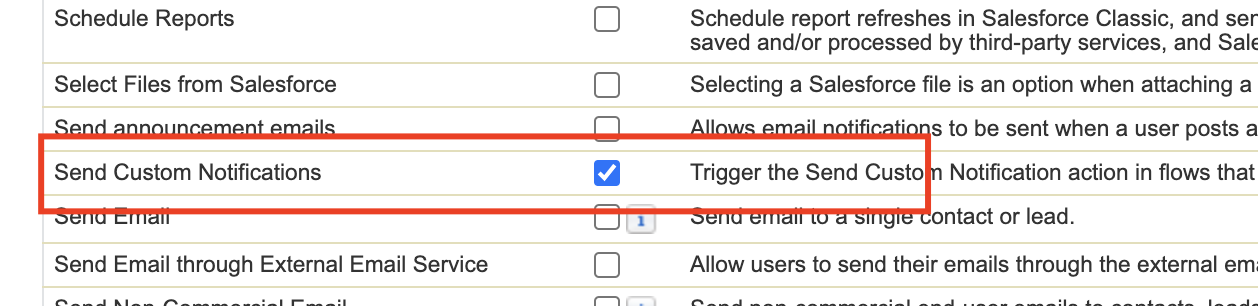
Step 4: Click Edit and search for Apex Rest Services & Send Custom Notifications in the System list. Permissions.
Step 5: Assign the newly created permission set, Heymarket_External, to all the users using the Heymarket app.
Setting up a Flow to Create Notifications
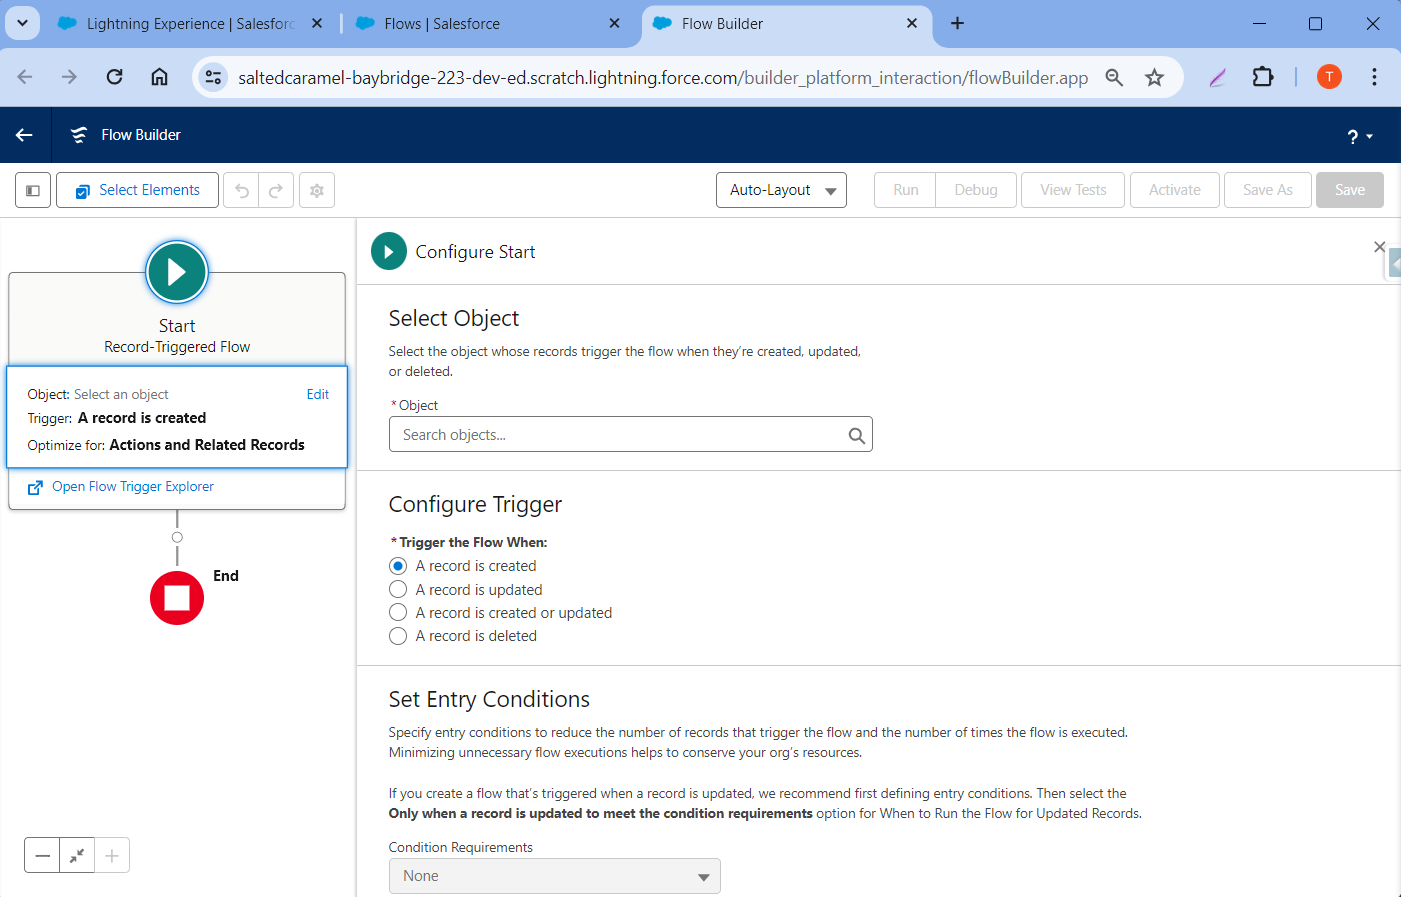
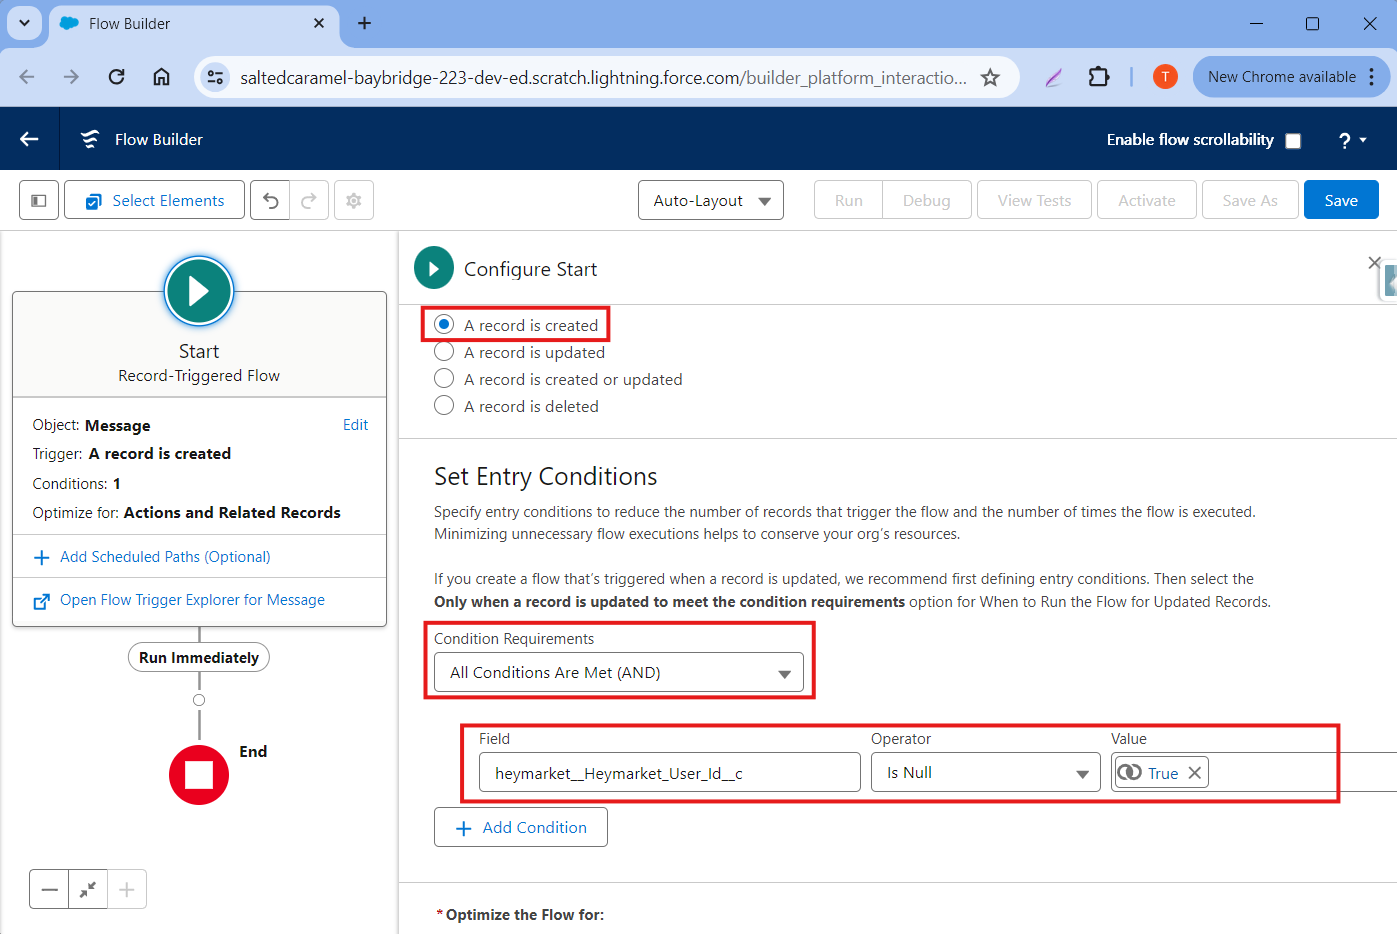
Step 1: Follow all steps mentioned in Flow Configuration Common Step and choose the Message(heymarket__Message__c) object.
Step 2: Choose A record is created in Configure Trigger, choose All Conditions Are Met in Condition Requirement, then in Criteria choose heymarket__Heymarket_User_Id__c is null True, as shown in the picture below.
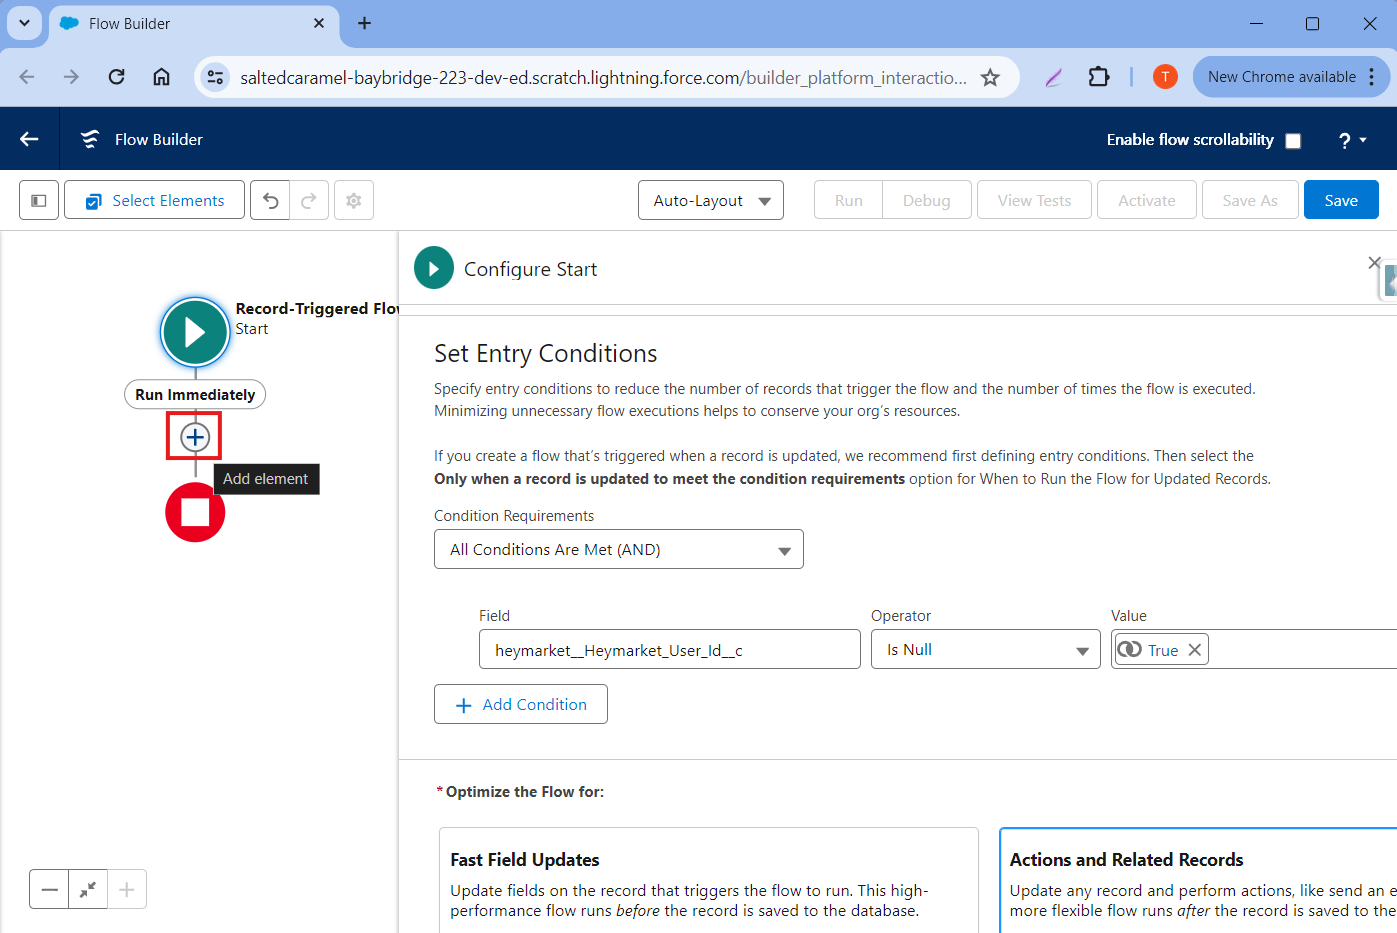
Step 3: Click on the + button.
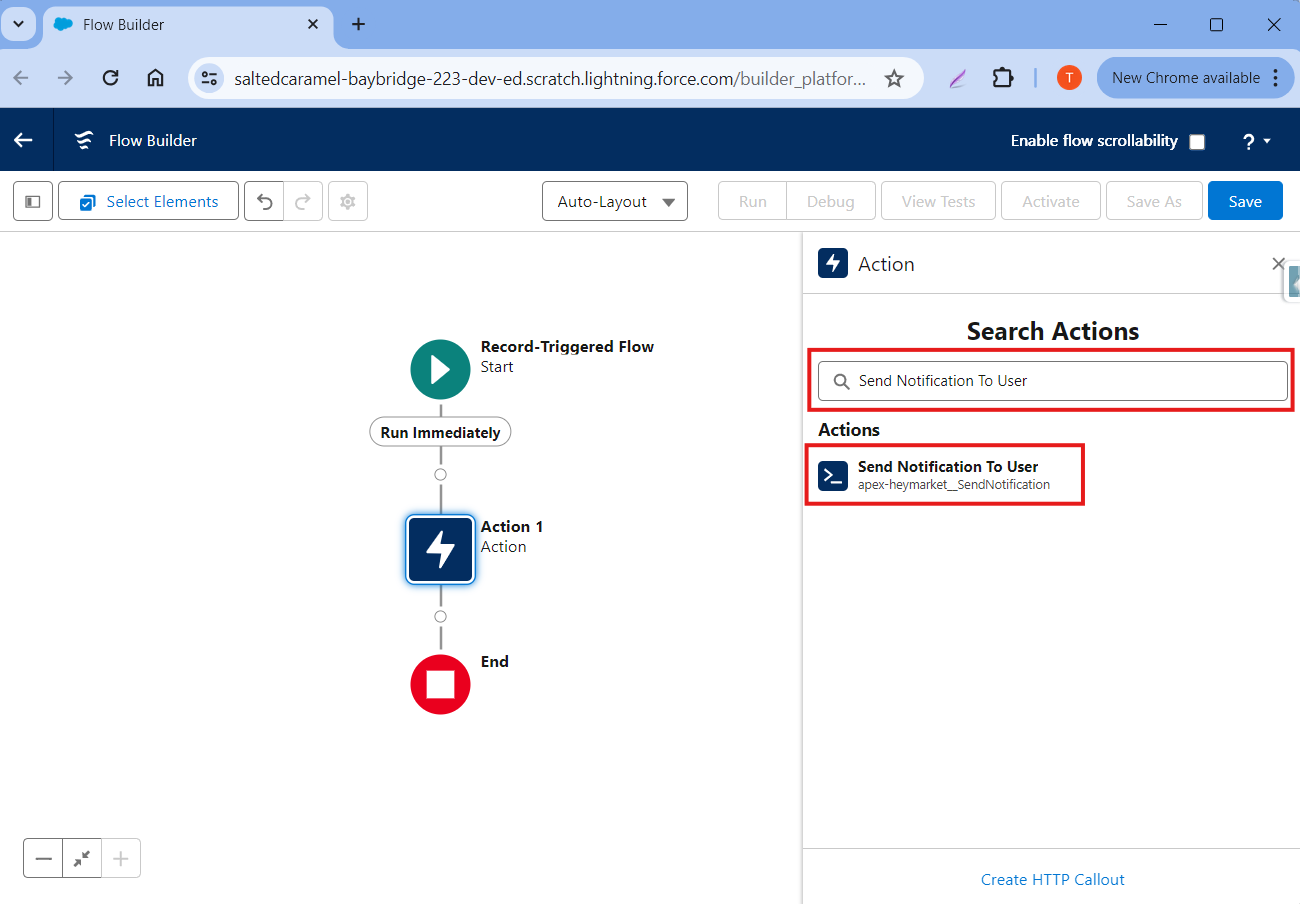
Step 4: Click Action.

Step 5: Search for Send Notification To User and click on it.
Step 6: Fill in the following fields:
- Label Name: Heymarket Message Notification
- API Name: Heymarket_Message_Notification
- Message Id: {!$Record.Id}
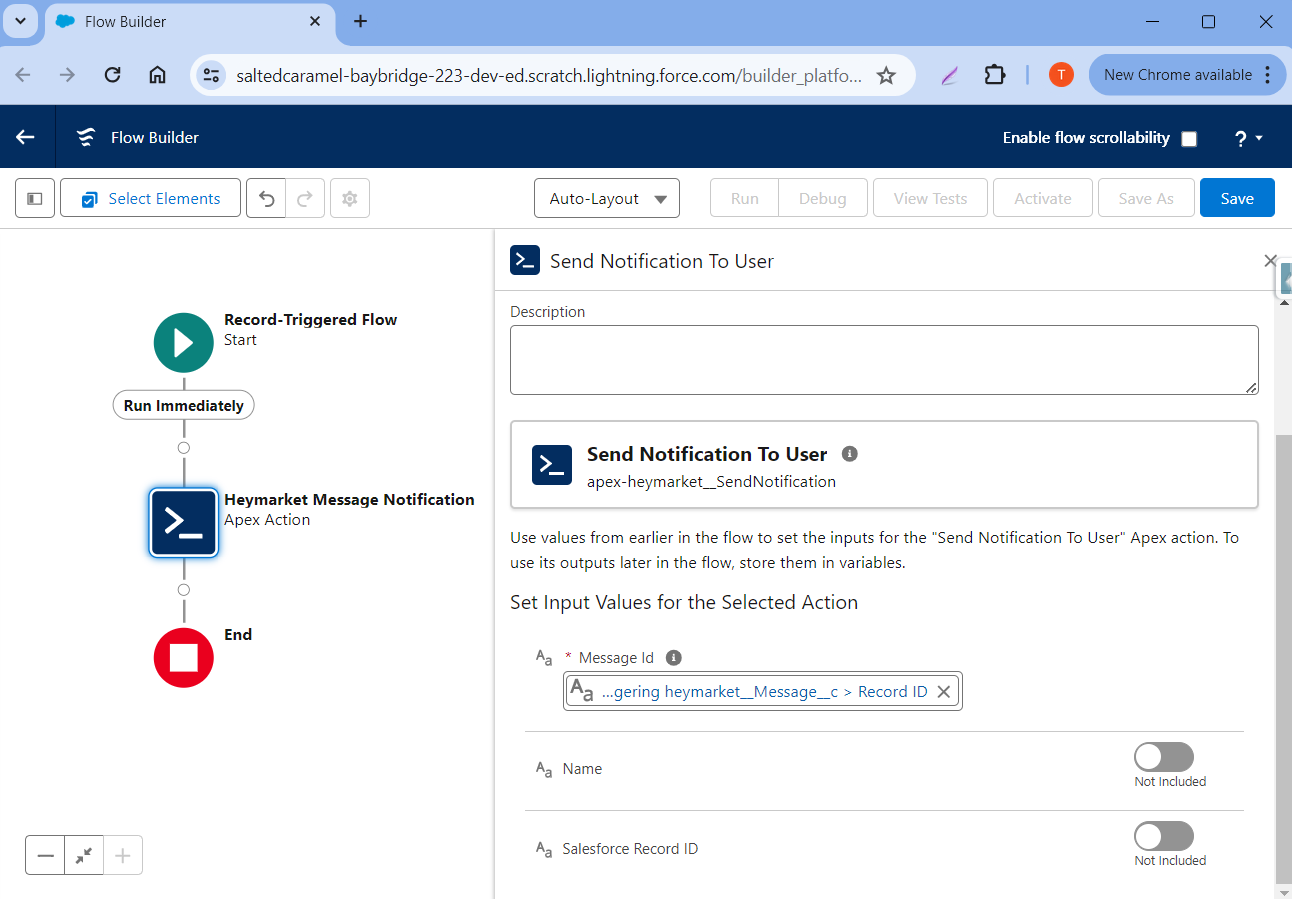
You can also set the Name and Salesforce Record ID in the input fields. It is mandatory to set a name with the Salesforce record ID.
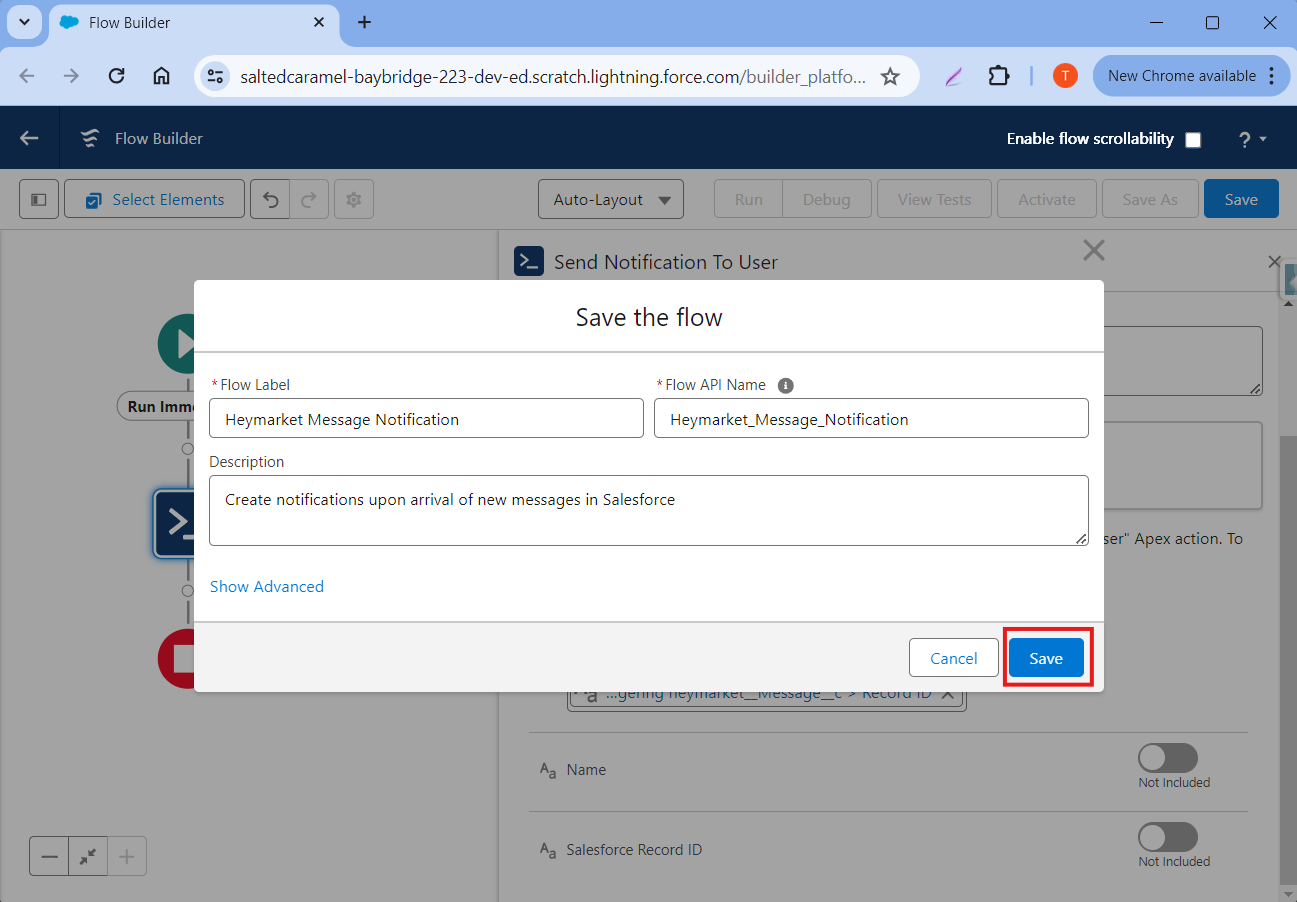
Step 7: Click Save.
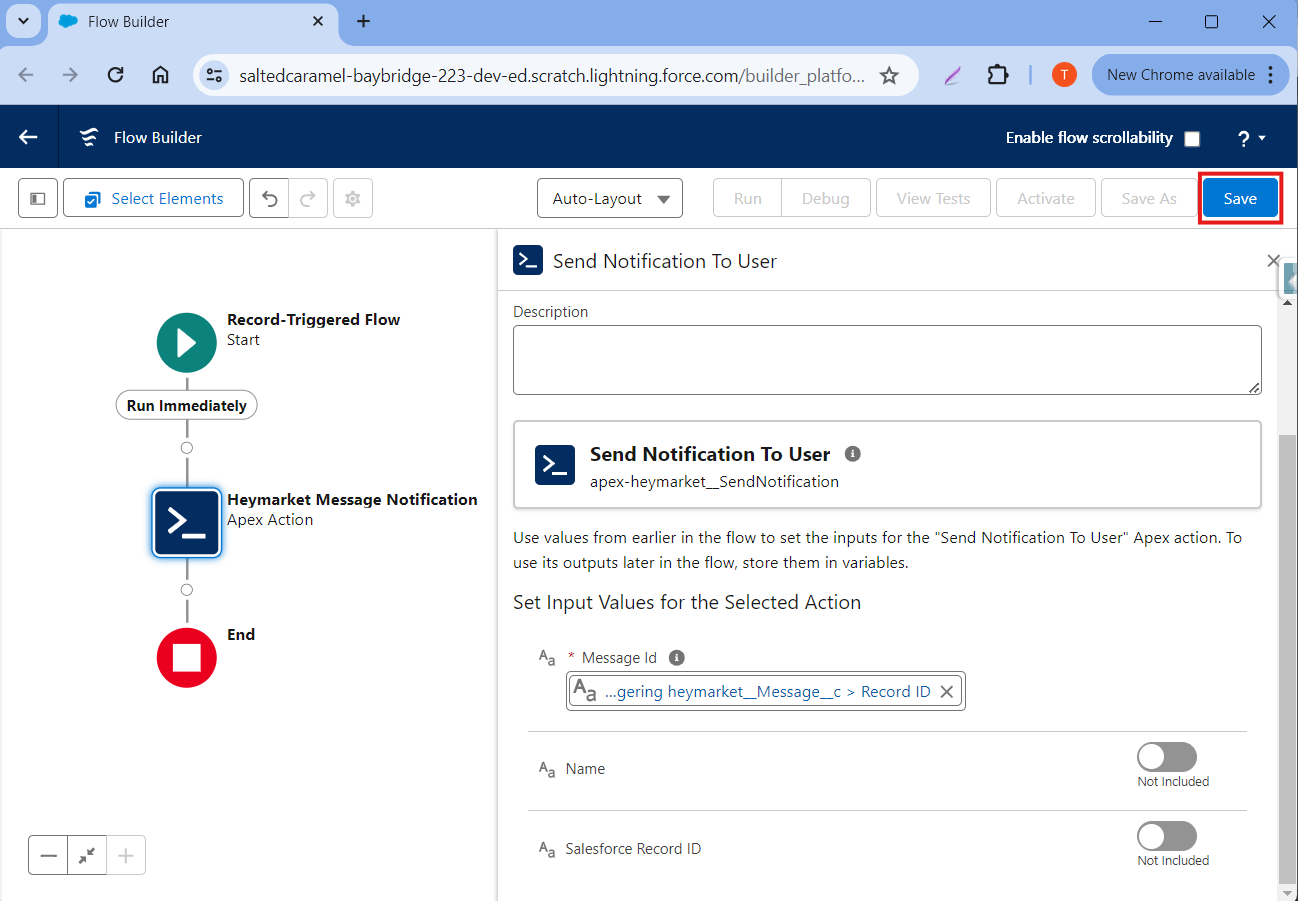
Step 8: After clicking Save, a pop-up window will appear. Enter the following information:
- Flow Label: Heymarket Message Notification
- Flow API Name: Heymarket_Message_Notification
- Description: Create notifications upon arrival of new messages in Salesforce
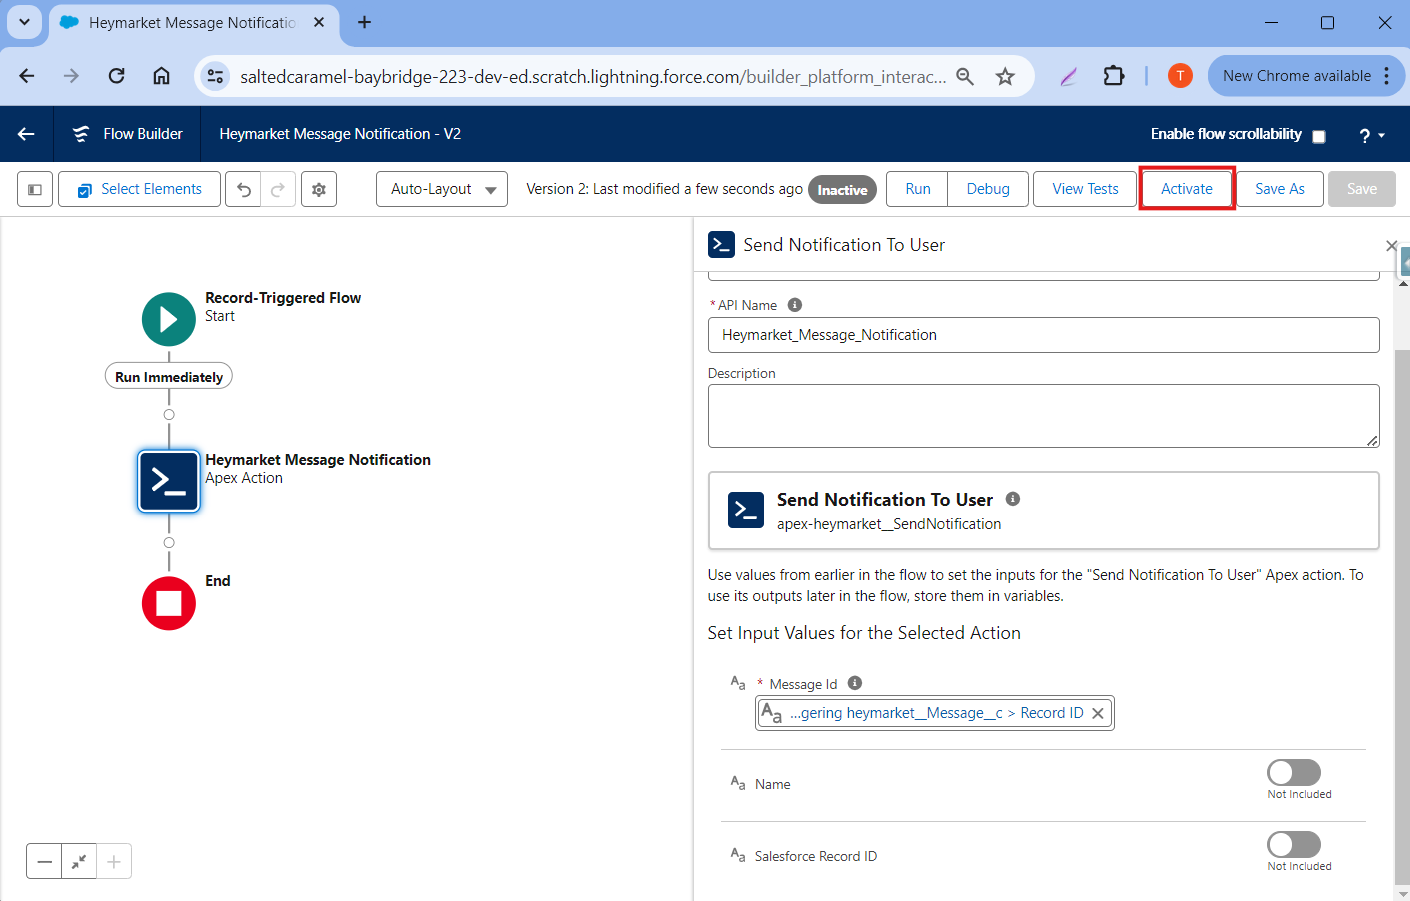
Step 9: Click Activate.
Setting up a Flow to Assign Chats
Configure the flow to assign incoming chats by setting the OwnerId field to the desired user ID. Ensure that the specified user is mapped in Heymarket, as chat assignment will fail if the user mapping is missing.
- Create a record-triggered flow on the Lead/Contact/Account object and set it to run when a record is created or updated
- Add the Chat Assignment Apex Action to the flow.
- Populate the Owner Id field with the User Id that you'd like to assign the chat to. Please note that this user must be mapped in the user mapping.
- Populate the Phone field using the record's E164 Phone value.
Setting up a Flow to Create Notifications with a Custom Object
Step 1: Follow all steps mentioned in Flow Configuration Common Step and choose the Message(heymarket__Message__c) object.
Step 2: Choose A record is created in Configure Trigger, choose All Conditions Are Met in Condition Requirement, then in Criteria choose
- heymarket__Heymarket_User_Id__c Is Null True
- heymarket__Sf_Record_Id__c Is Null False
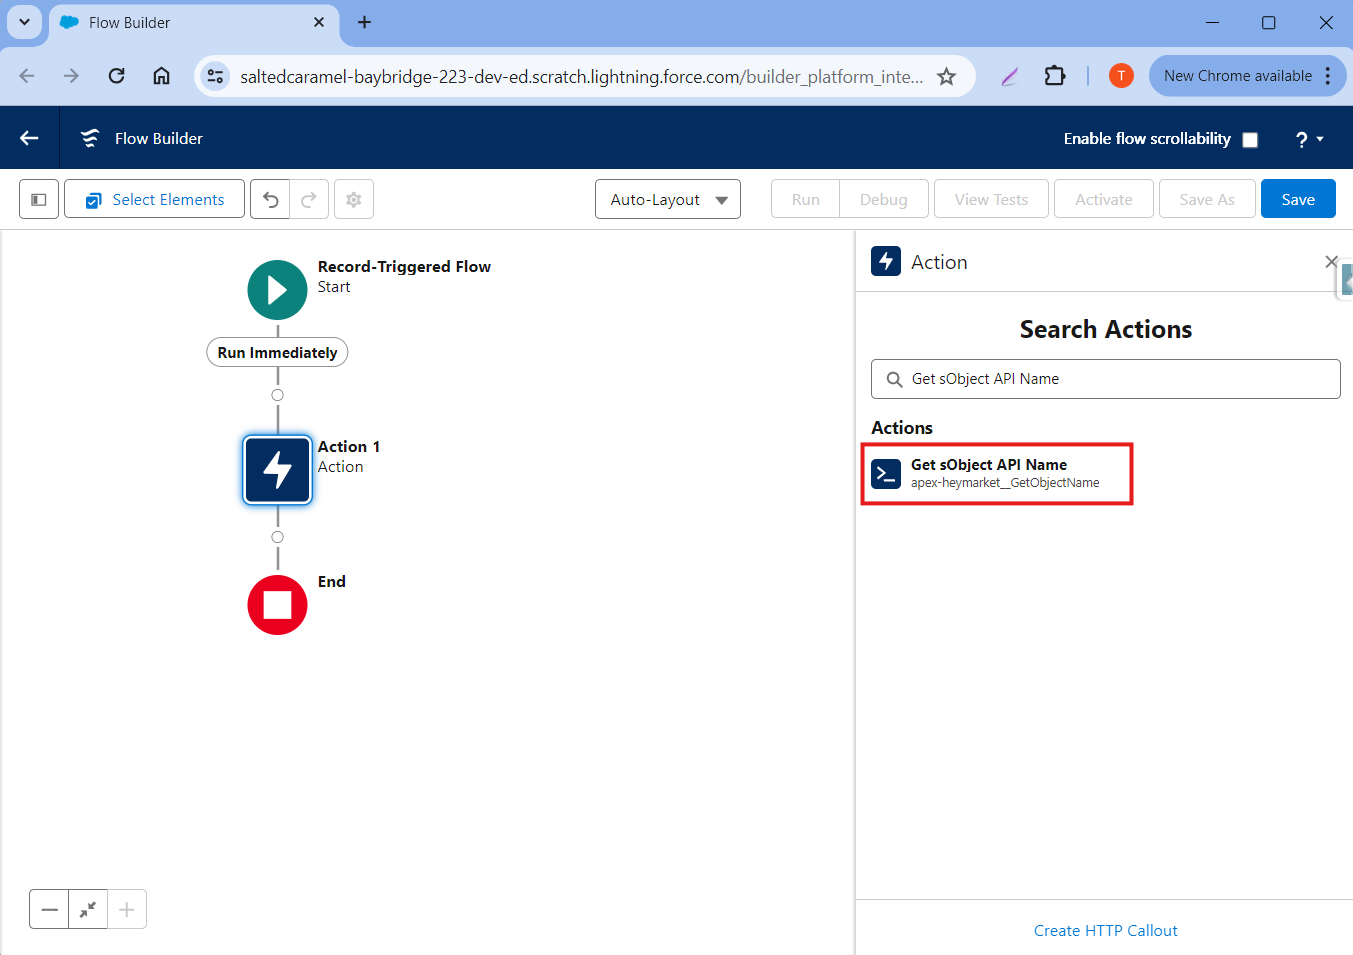
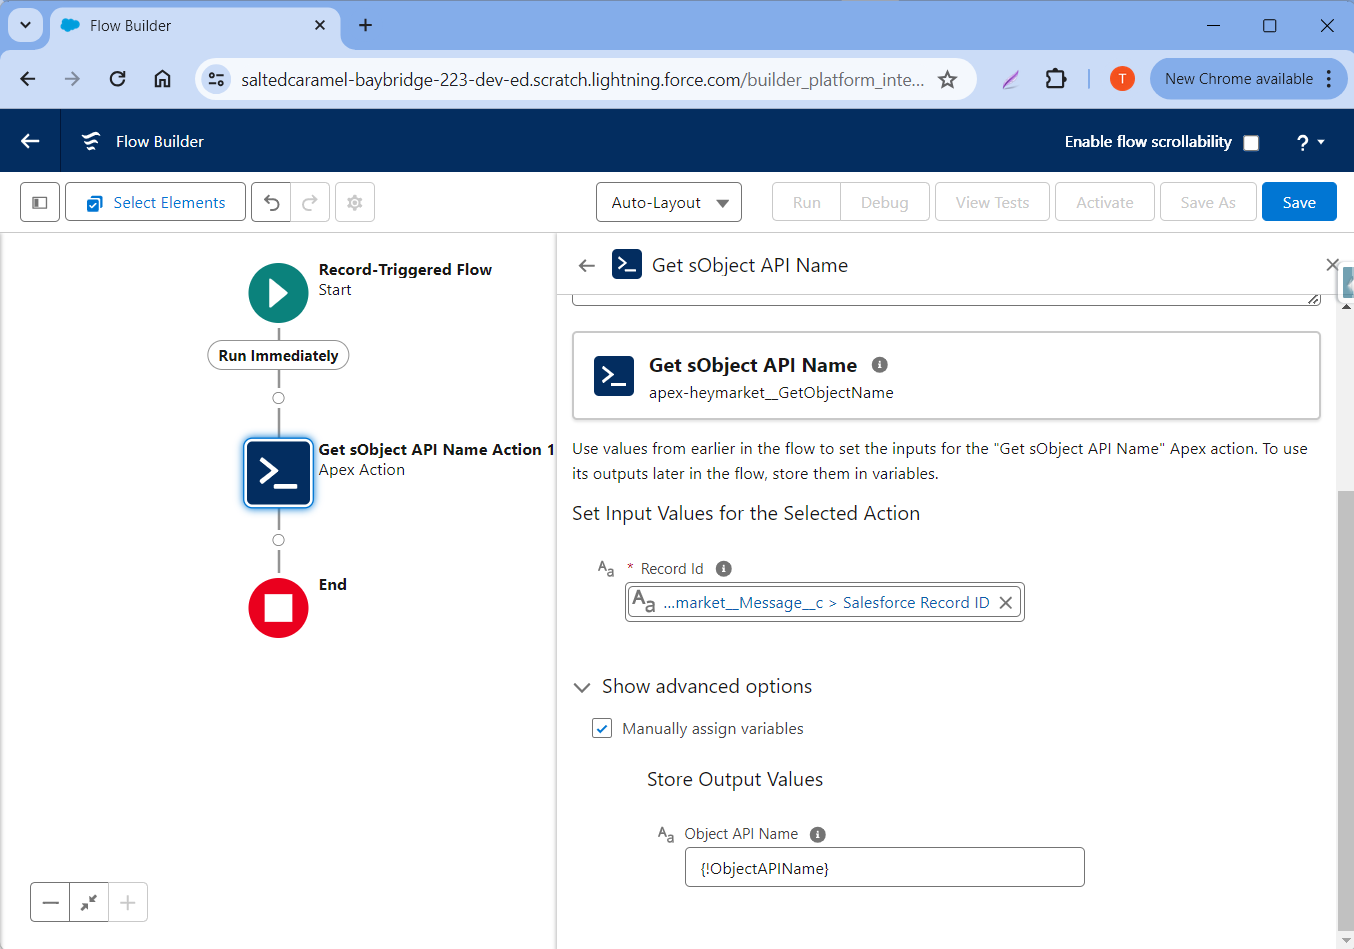
Step 3: Add an Action element. Search for Get sObject API Name and select it.
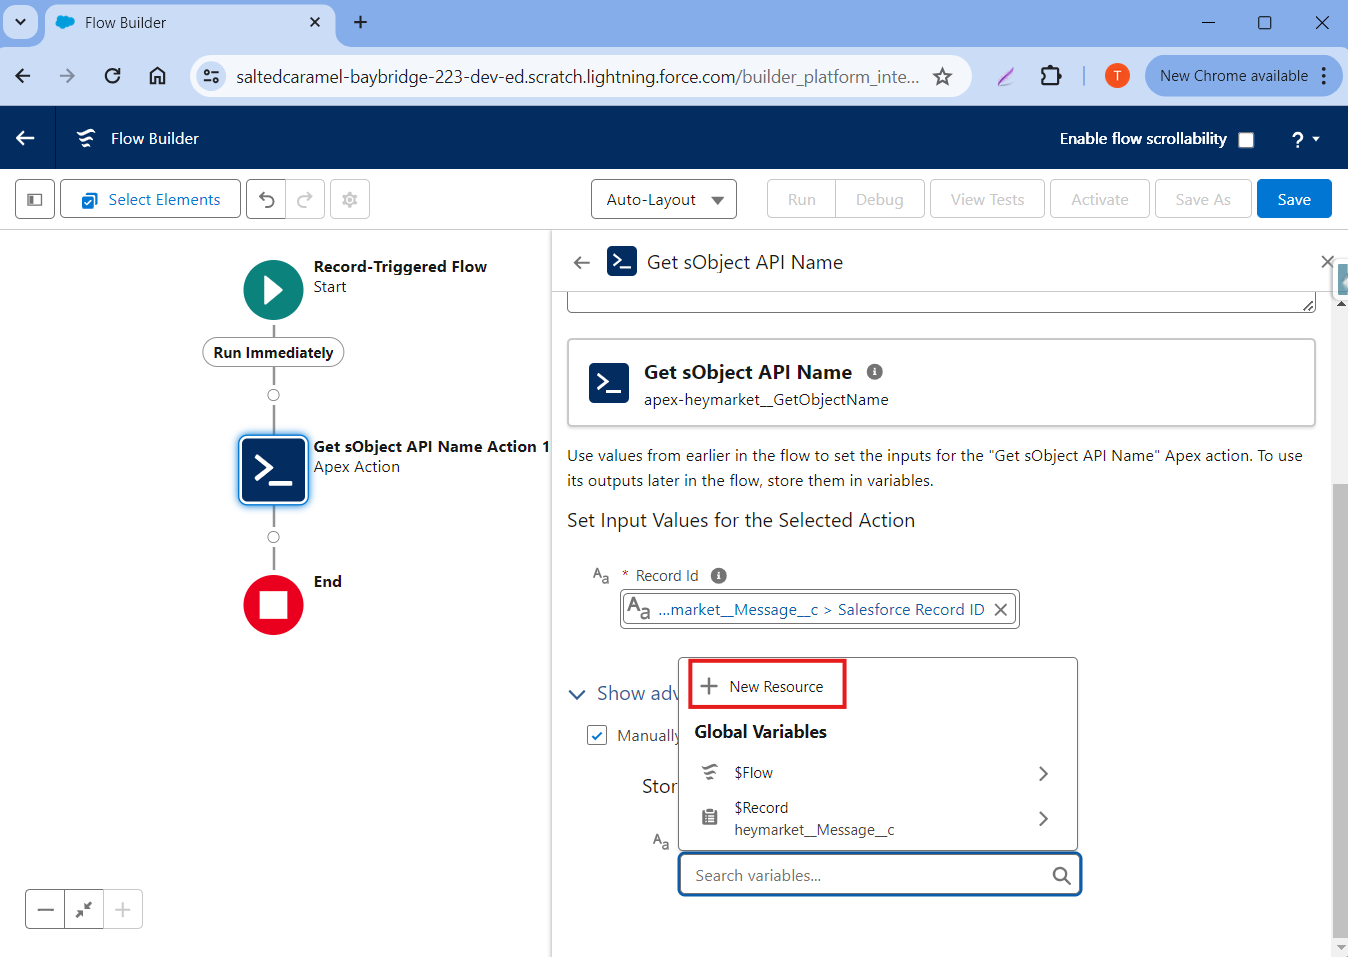
Step 4: Populate Record Id field as “{!$Record.heymarket__Sf_Record_Id__c}”.

Step 5: Click on Show advanced options then mark Manually assign variables. Thenlick on New Resource present on the Object API Name field.
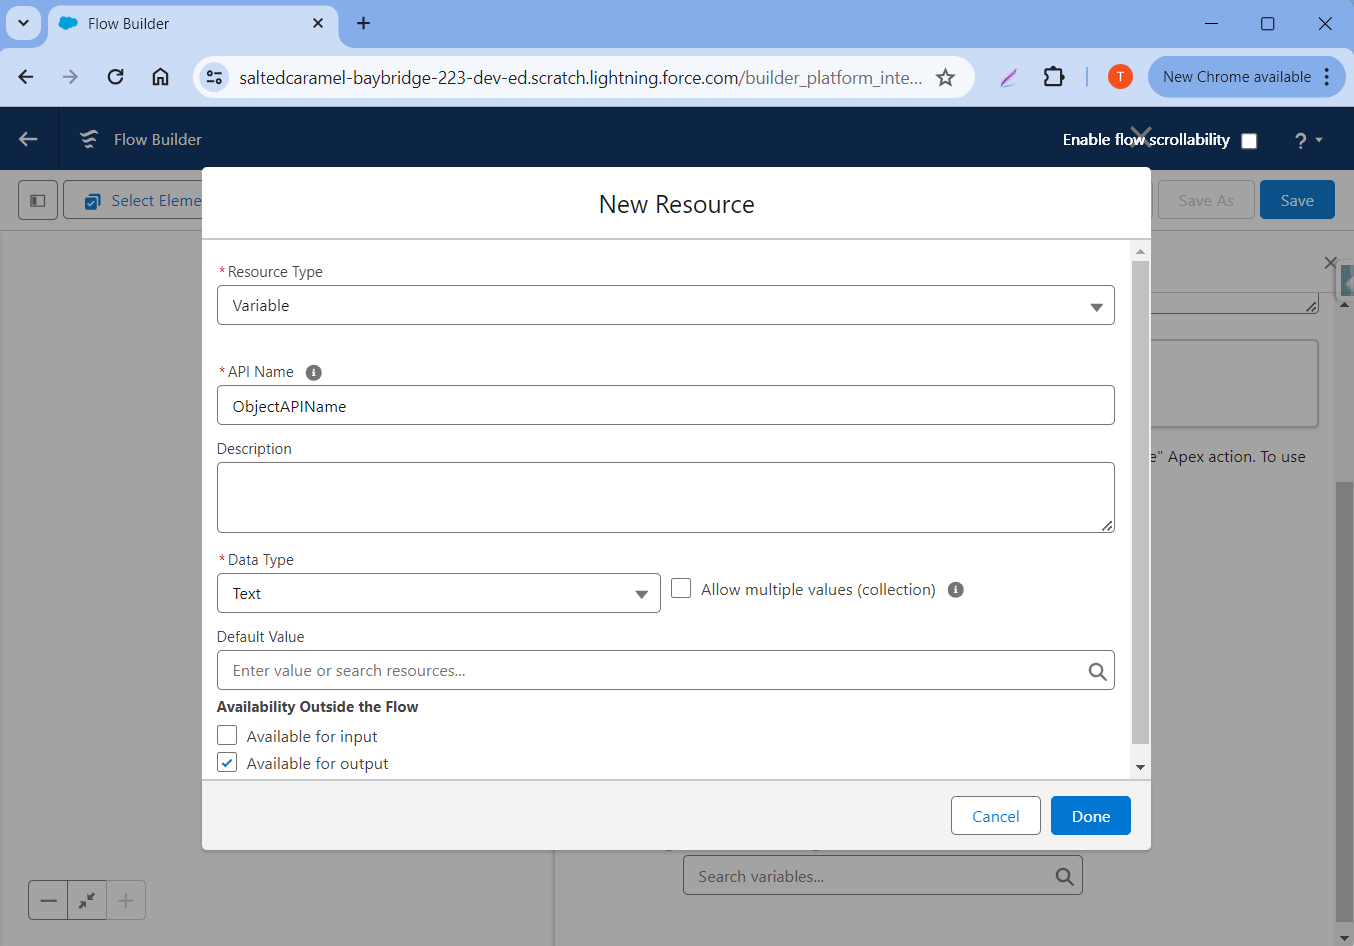
Step 6: Fill in the following details under New Resource:
- Record Type: Variable
- API Name: “ObjectAPIName”
- Data Type: Text
- Availability Outside the Flow: Available for output
Then click Done.
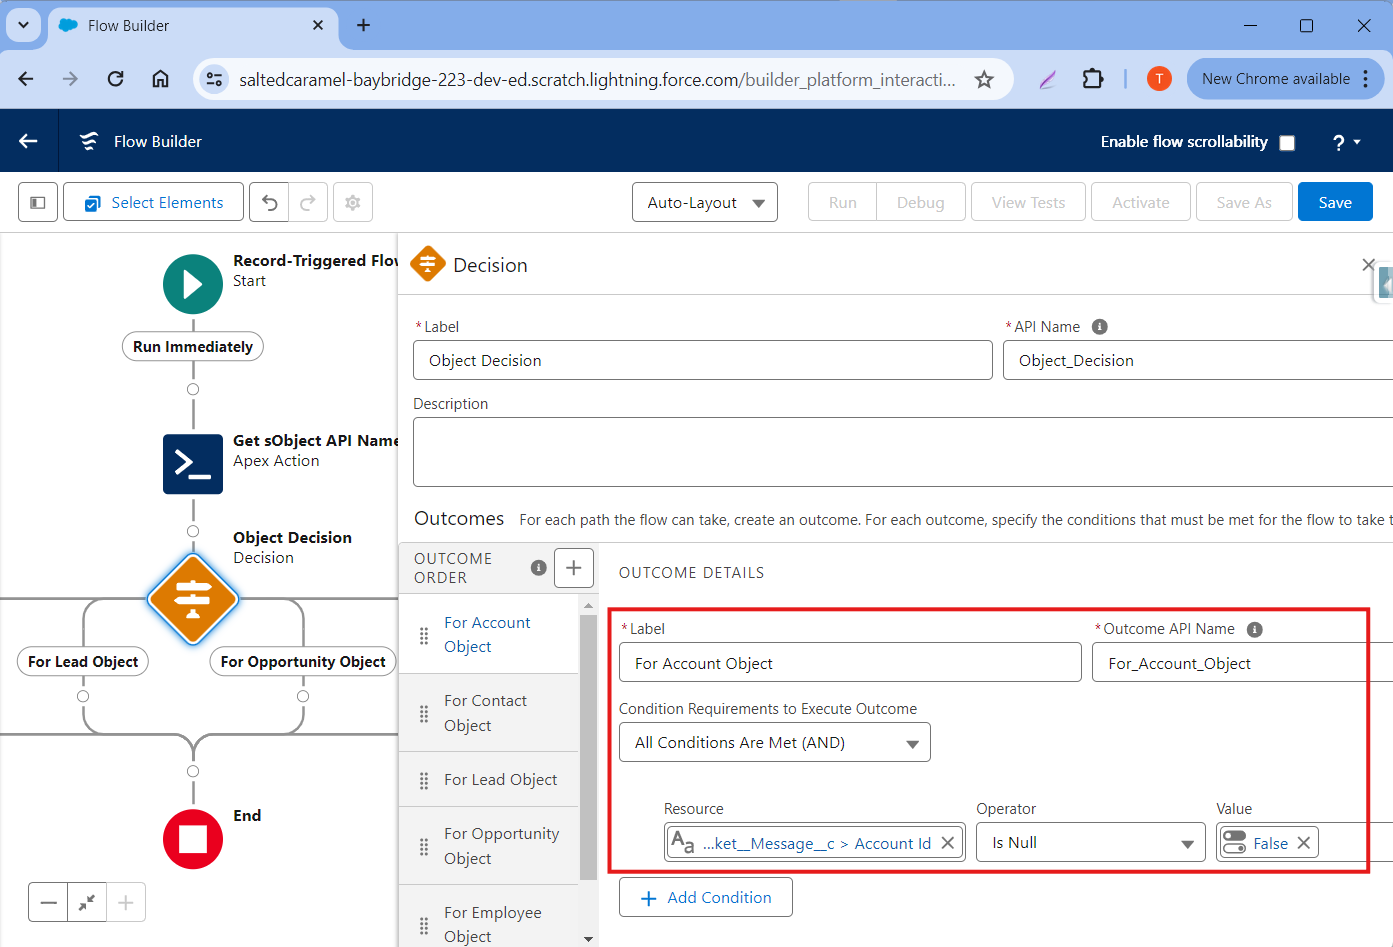
Step 7: Add a new Decision element and create outcomes with the following conditions.
- For Account Object
- Label: For Account Object
- API Name: For_Account_Object
- Condition
- {!$Record.heymarket__Account__c} Is Null False
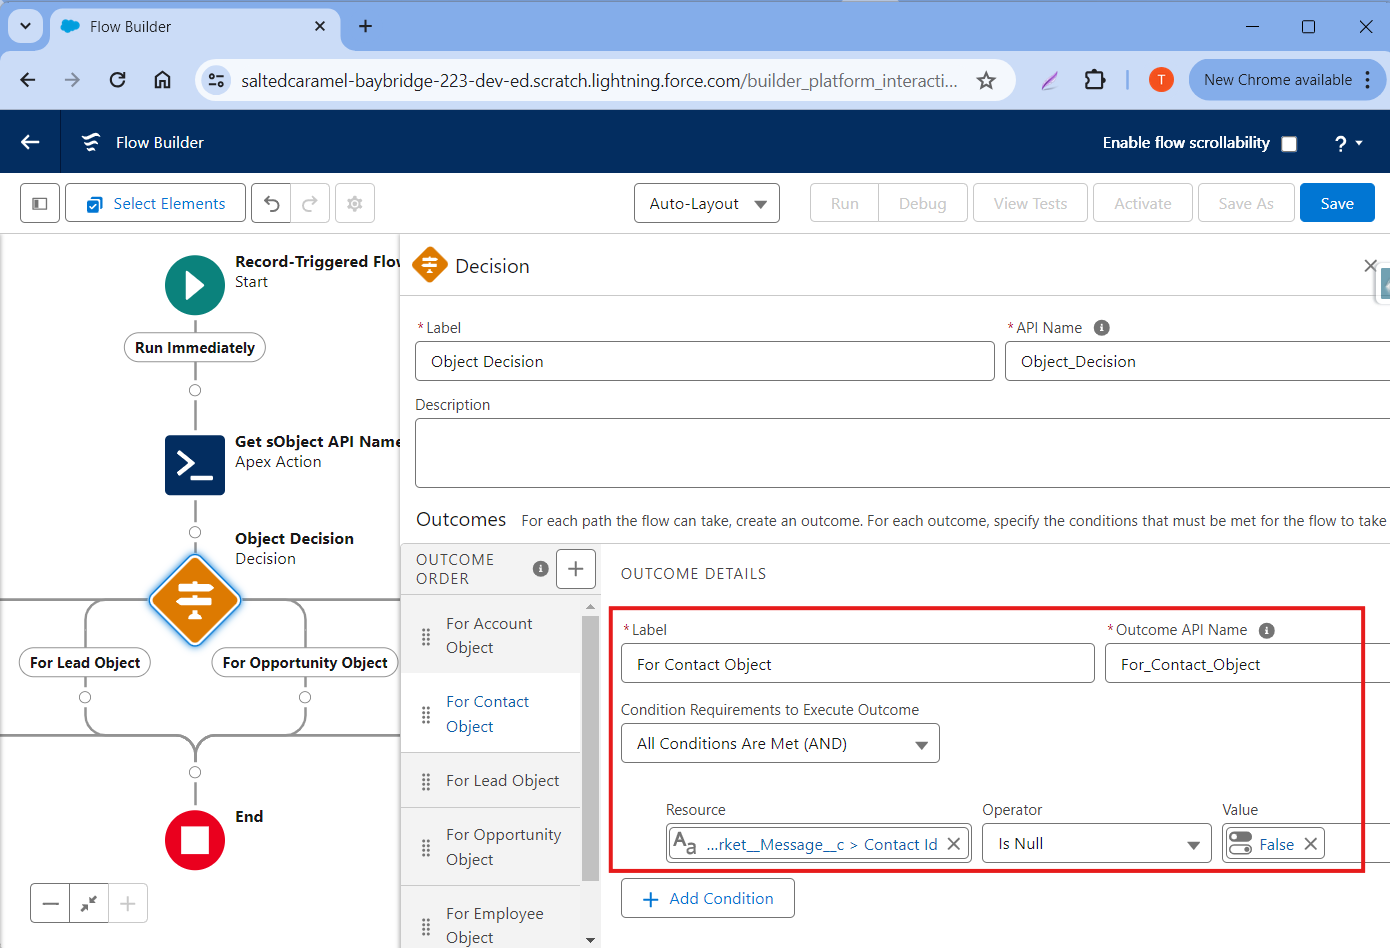
- For Contact Object
- Label: For Account Object
- API Name: For_Contact_Object
- Condition
- {!$Record.heymarket__Contact__c} Is Null False
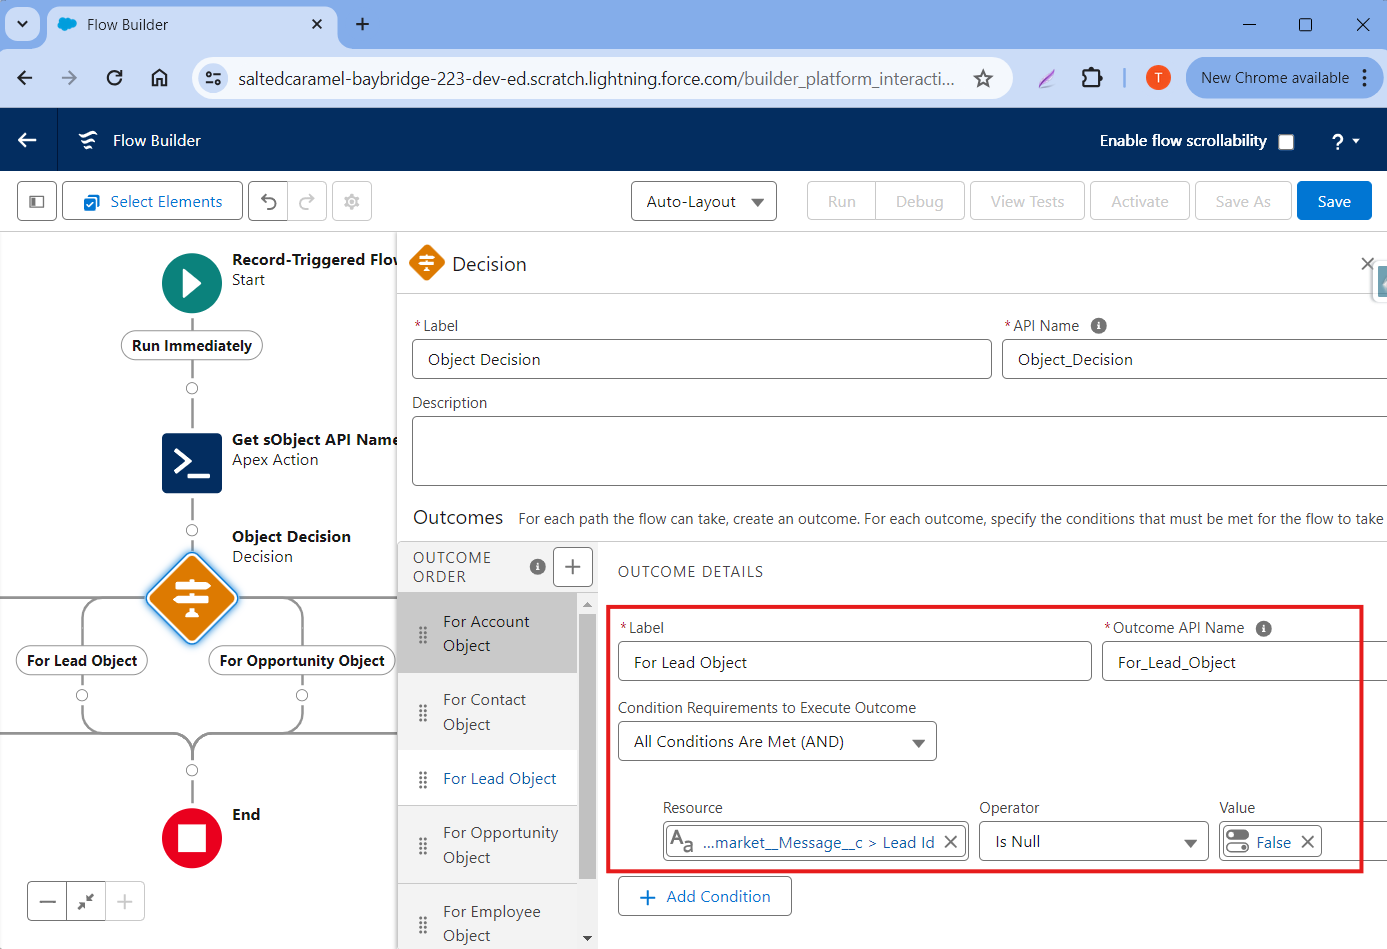
- For Lead Object
- Label: For Lead Object
- API Name: For_Lead_Object
- Condition
- {!$Record.heymarket__Lead__c} Is Null False
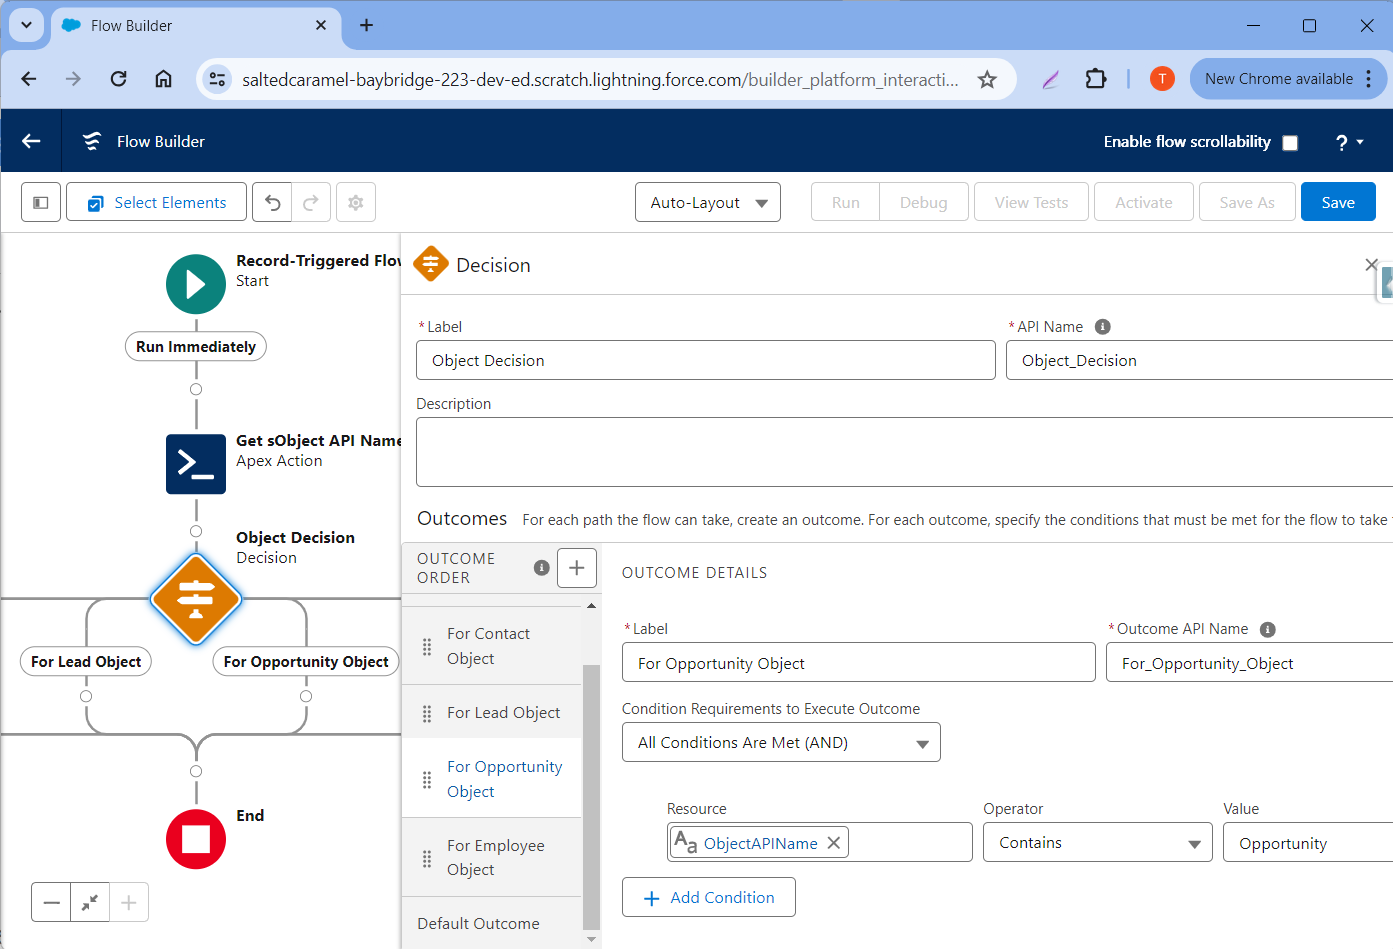
- For Opportunity Object
- Label: For Opportunity Object
- API Name: For_Opportunity_Object
- Condition
- {!ObjectAPIName} Contains Opportunity
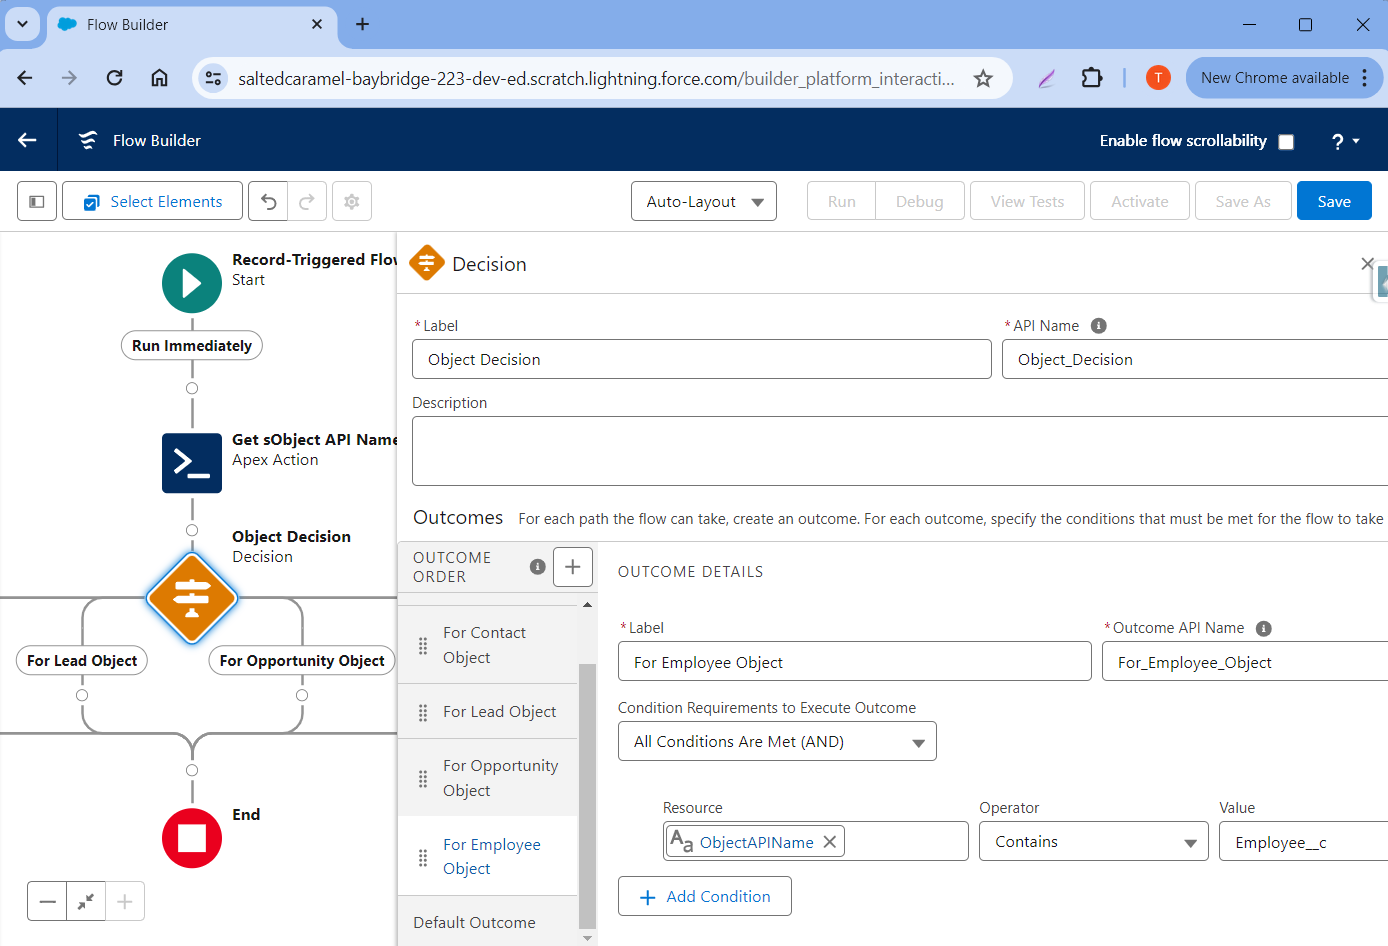
- For Employee Object
- Label: For Employee Object
- API Name: For_Employee_Object
- Condition
- {!ObjectAPIName} Contains Employee__c
Note: Employee__c is the Employee API name. Please find your Custom Object API name and put it as the value in the criteria.
Note: If you want to add more Custom Objects for bell notifications, then you need to create more outcomes according to your Object name.
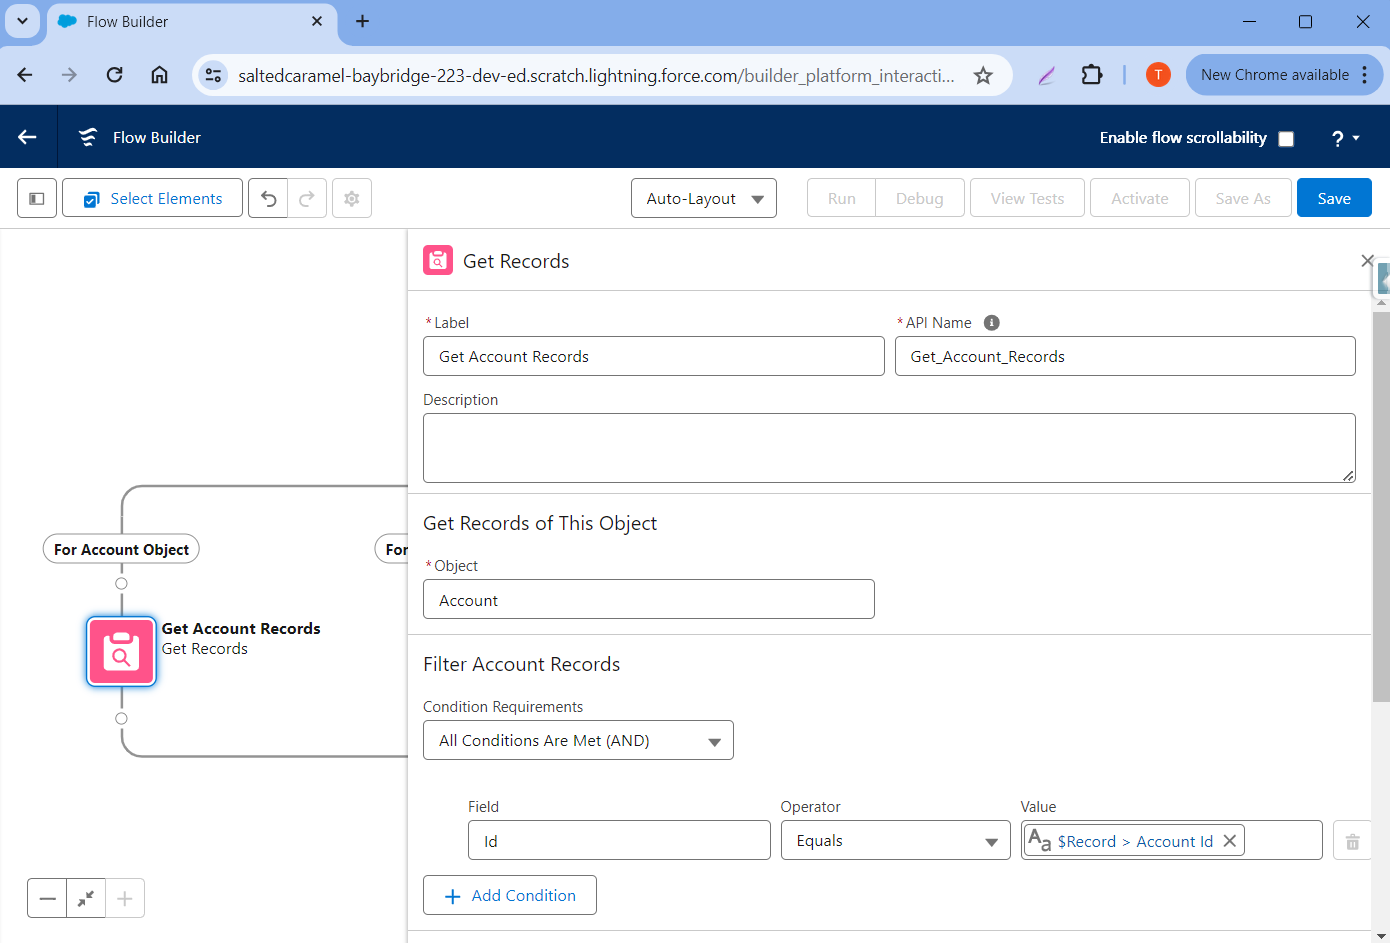
Step 8: Add a new Get Records element.
Field Setup
- Label: Get Account Records
- API Name: Get_Account_Records
- Object: Account
- Conditions:
- Id Equals {!$Record.heymarket__Account__c}
Step 9: Repeat Step 8 for Contact, Lead, Opportunity, and all Custom Objects.
Note: Choose Object as per outcome. If you get records for contact outcome then you need to choose contact Object.
Step 10: Add a new Action element. Search for Send Notification To User and select it.
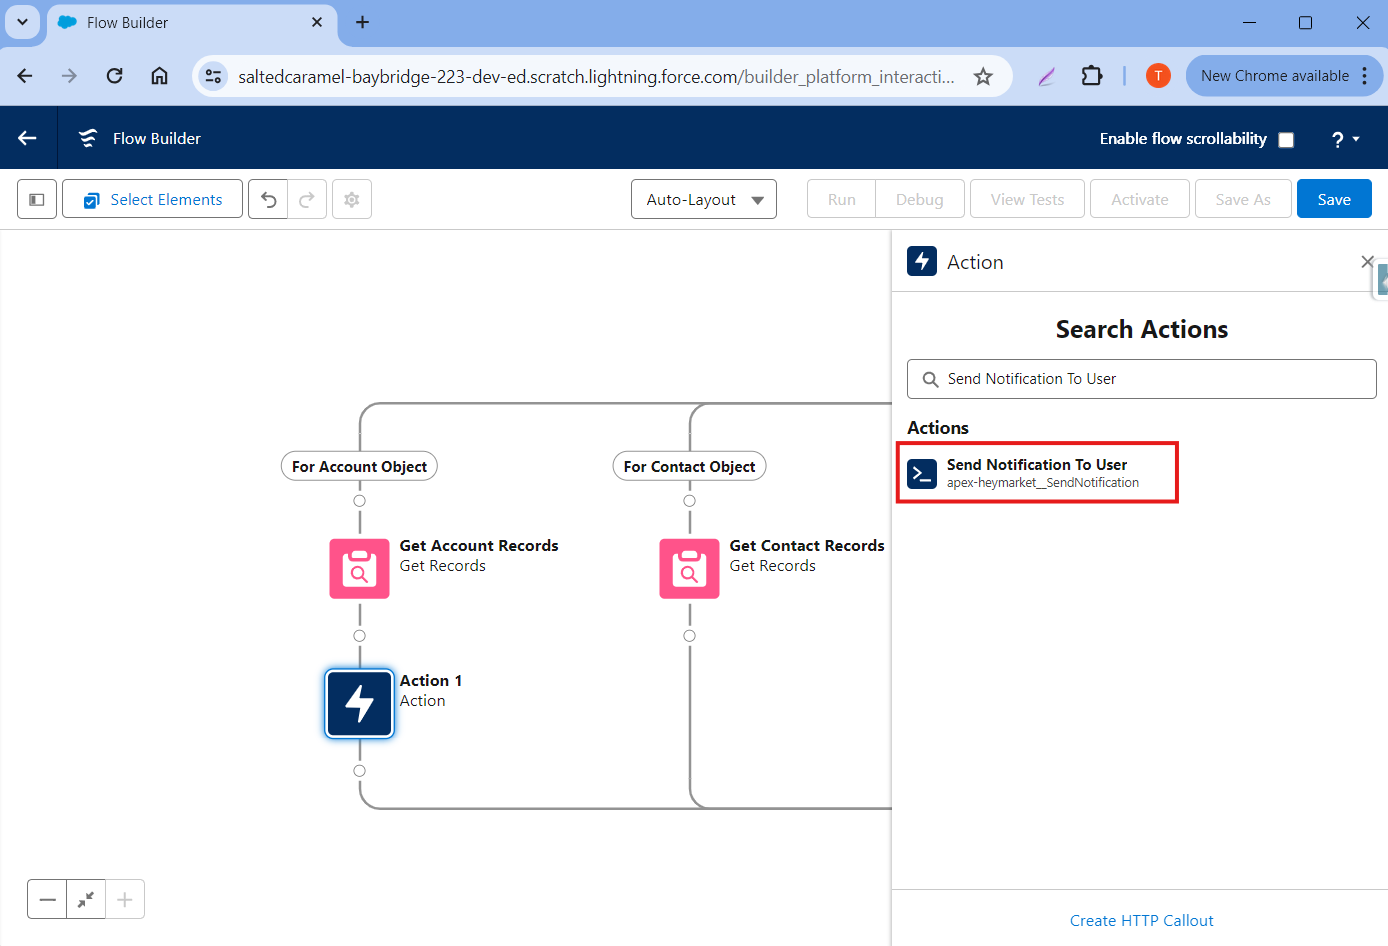
Field Setup
- Label Name: Send Notification To User For Account
- API Name: Send_Notification_To_User_For_Account
- Message Id: {!$Record.Id}
- Name: {!Get_Account_Records.Name}
- Salesforce Record Id: {!$Record.heymarket__Sf_Record_Id__c}
Step 11: Repeat Step 10 for Contact, Lead, Opportunity, and all Custom Objects.
Fill the Name field as per the object. If the send notification action is for contact, then enter {!Get_Contact_Records.Name} in the Name field. See following examples:
- Name: “{!Get_Account_Records.Name}”. For Account.
- Name: “{!Get_Contact_Records.Name}”. For Contact.
- Name: “{!Get_Lead_Records.Name}”. For Lead.
- Name: “{!Get_Opportunity_Records.Account.Name}”. For Opportunity.
- Name: “{!Get_Employee_Records.Name}”. For Employee (Custom Object).
Step 12: Save and Activate the flow.
The final result should like like this:
Send Message Action
Note: The SendMessageAction has been deprecated and replaced by SendUpto5KMessagesAction, which is bulkified and optimized for sending multiple messages. Existing automations that use Send Message Action will continue to work and are not impacted, but for any new automations, use SendUpto5KMessagesAction instead (see "Send upto 5K messages in Action").
In this step, we are going to set up a Flow to send messages based on some criteria.
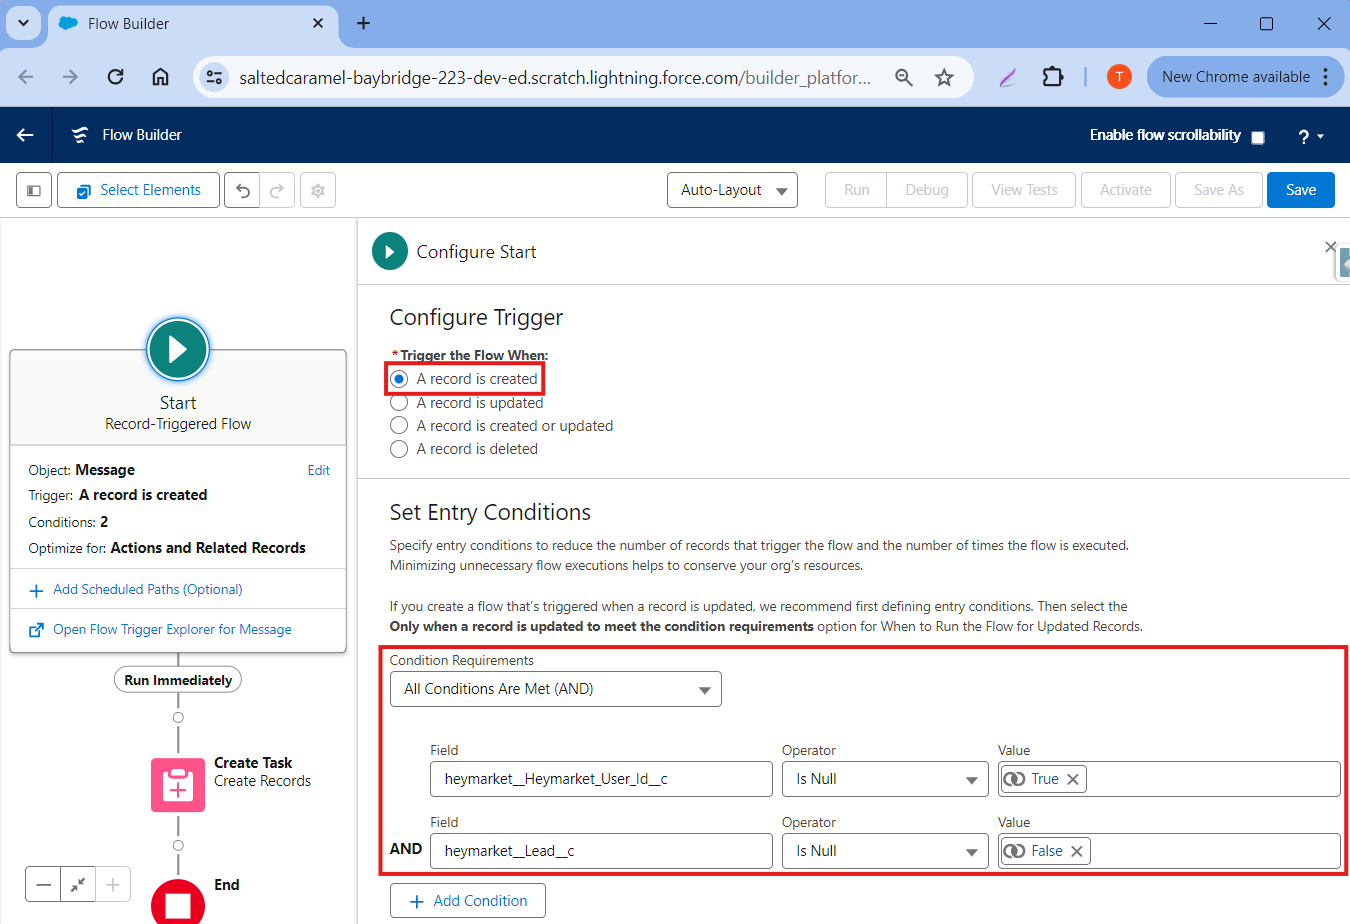
Step 1: Follow all steps mentioned in Flow Configuration Common Step and choose the Lead Object.
Step 2: Choose A record is created or updated in Configure Trigger, choose All Conditions Are Met in Condition Requirement, then in Criteria choose Status equal Working-Contacted, as shown in the picture below.
Step 3: Create Resources
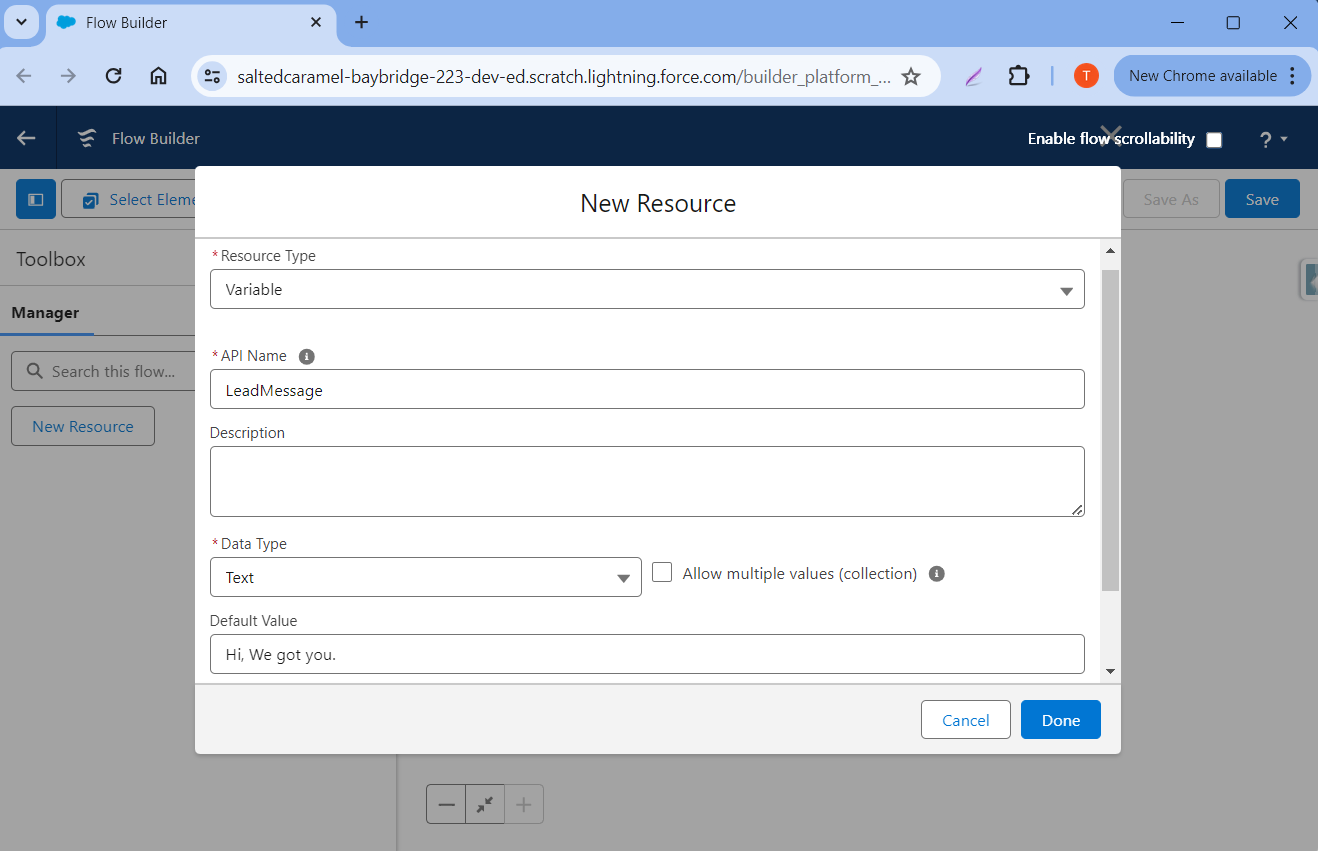
First, click New Resource.
Fill all fields like the below picture:
- Record Type = Variable
- API Name = LeadMessage
- Data Type = Text
- Default Value = “Hi, We got you.”
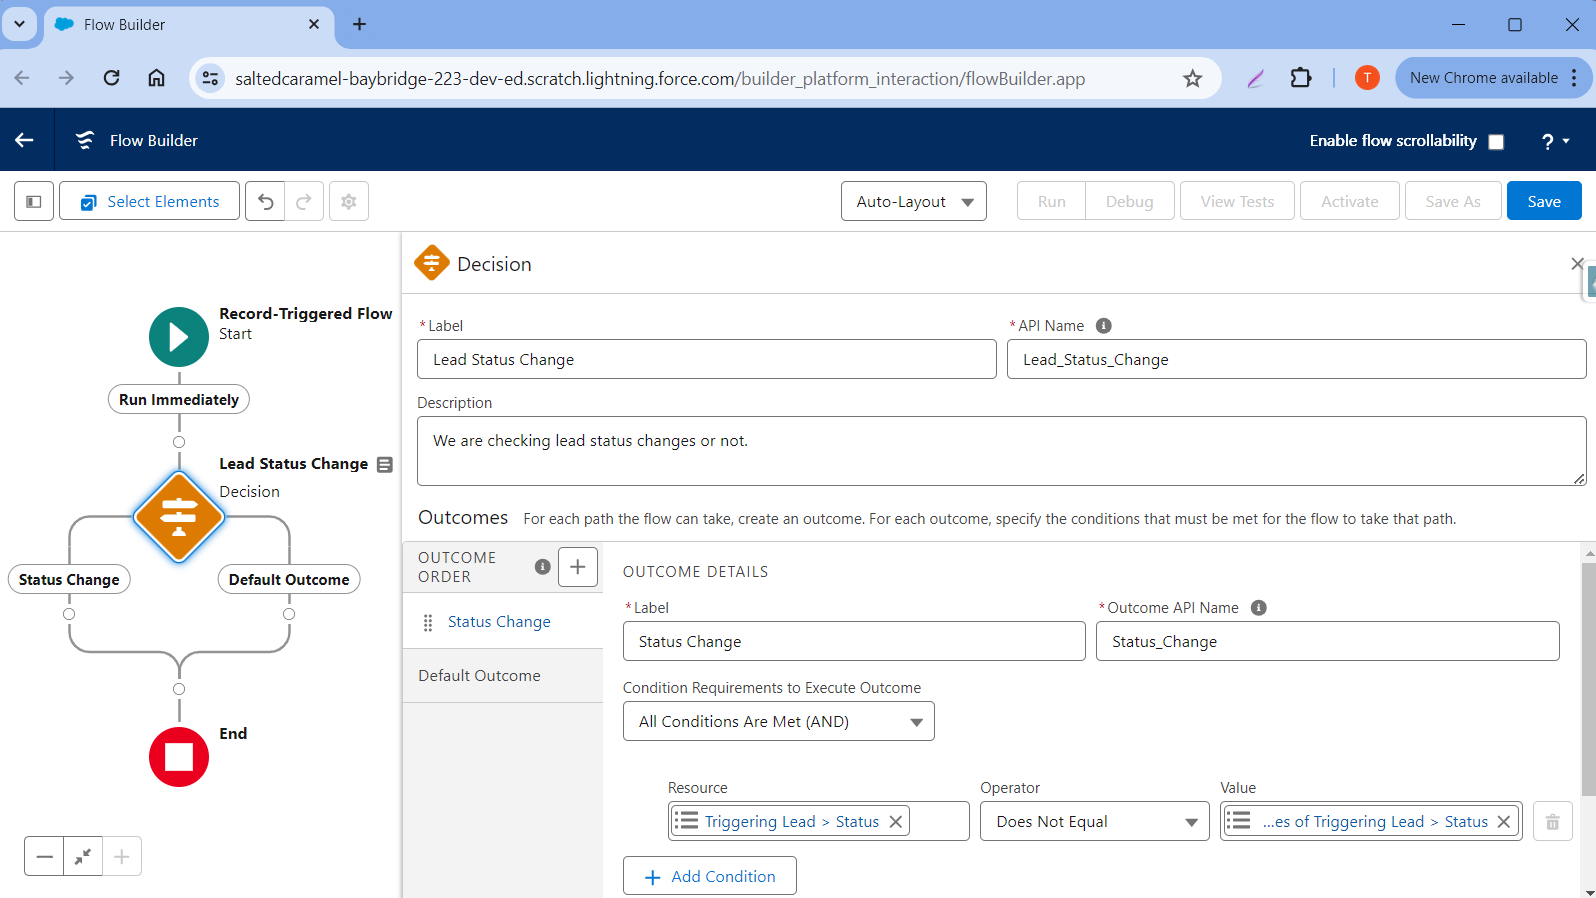
Step 4: Add a new Decision element.
- Label: “Lead Status Change”
- API Name: “Lead_Status_Change”
- Description: “We are checking lead status changes or not.”
Outcome
- Label: “Status Change”
- API: “Status_Change”
- Resource: “{!$Record.Status}”
- Select “Does Not Equal” Operator.
- Value: “{!$Record__Prior.Status}”
Step 5: Add a new Action element and search for Send Message. Select it.
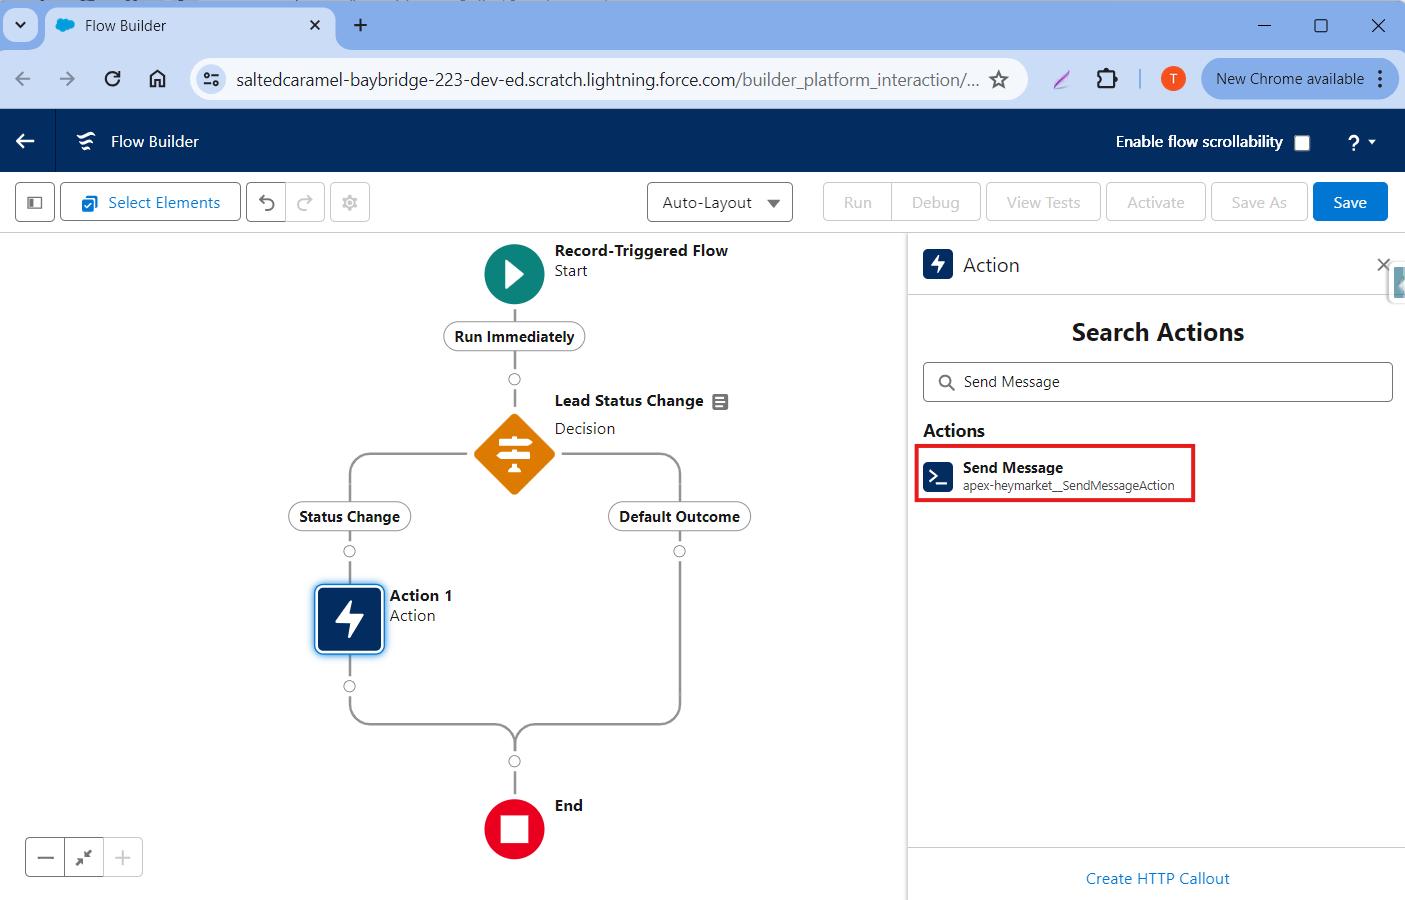
Fill all fields according to the below picture:
- Phone = {!$Record.MobilePhone} (You can use any field where you store the phone number.)
- Message = {!LeadMessage}

Step 8: Save and Activate the flow.
Fields in Send Message Action Fields
- Phone (Required)
This is a mandatory field. You can use the field reference of the phone number to which you want to send the message.
- First Name
Deprecated field (would not recommend using it).
- Inbox Id
In this field, provide the inbox ID (Heymarket Inbox ID), and the message will be sent using thatinbox. If no inbox ID is selected, then the message will be sent using the default inbox.
- Inbox Number
If you don’t have the inbox ID, then you add the Inbox Number in the flow (e.g. “14155484779”) and the message will be sent using that inbox.
- isScheuler
If you want to use this action inside a scheduled flow, then the isScheduler field must be true.
- Last Name
Deprecated field (would not recommend using it).
- Message
Here, you’ll write a message you want to send the user. Don’t use the merge token in this field, because if the contact is not synced with Heymarket, it will not work. If you want to send a message with merge tokens, use the Template Id field.
- Salesforce Record ID
This is the record ID of the object. It is mandatory if you are using a template to send the message. Also, it will help you keep track of all the related messages with the records. This record ID will be populated on the message object record.
- Template ID
You can use a Salesforce template to send Flow messages. Add “record Id” or a “template name” of the template in the Template Id field. You can also use a merge token in the template to send messages. This template record ID will be populated on the message object record.
- User ID
If you want to send a message from a specific user then add the Salesforce user ID of the user in this field. The Flow will pick the Heymarket users from the user mapping and the message will be sent to the mentioned user. If you do not mention it, the message will be sent by the default user. The “Heymarket__User_Id__c'' field will be populated with the Heymarket User ID of the Salesforce User.
Note: If you want to use this Flow action in a Scheduled Flow, then you need to set the isScheduler field as true.
Update records automatically based on chats (i.e Lead’s status)
You can update records based on messages on Accounts, Contacts, and Leads. To get this feature in your org, you have to create a Flow on the Message object. We have lookup fields for Account, Contact, and Lead (for each), and relative lookup will be populated according to the related object (Account, Contact, or Lead).
Step 1: Follow all steps mentioned in Flow Configuration Common Step and choose the Message(heymarket__Message__c) object.
Step 2: Choose A record is created in Configure Trigger and choose All Conditions Are Met in Condition Requirement and then in Criteria choose
- heymarket__Heymarket_User_Id__c Is Null True
- heymarket__Lead__c Is Null False
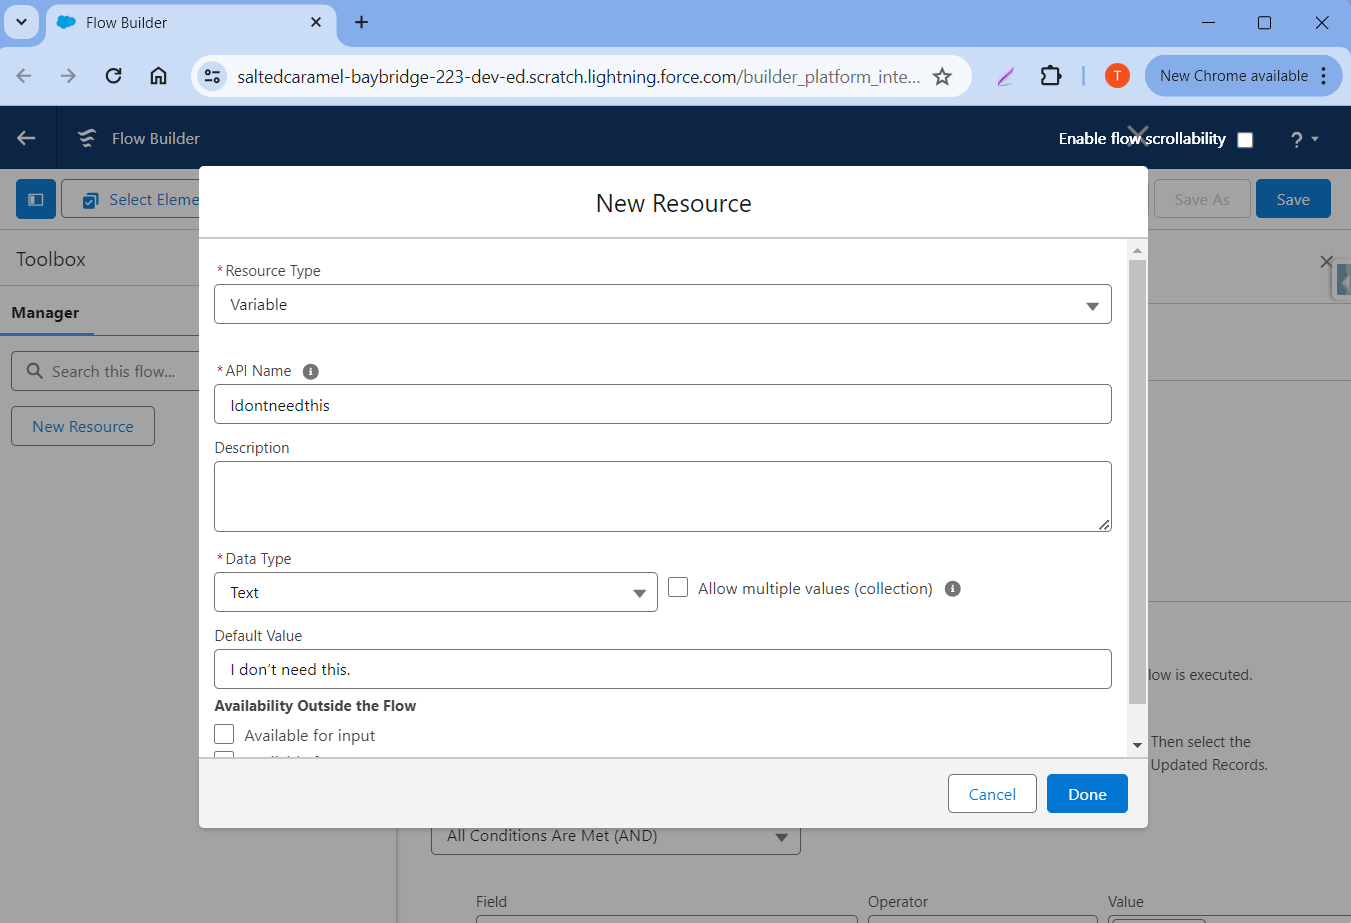
Step 3: Create resources by clicking on New Resource.
Fill all fields like the below picture:
- Record Type = Variable
- API Name = Idontneedthis
- Data Type = Text
- Default Value = I don’t need this.
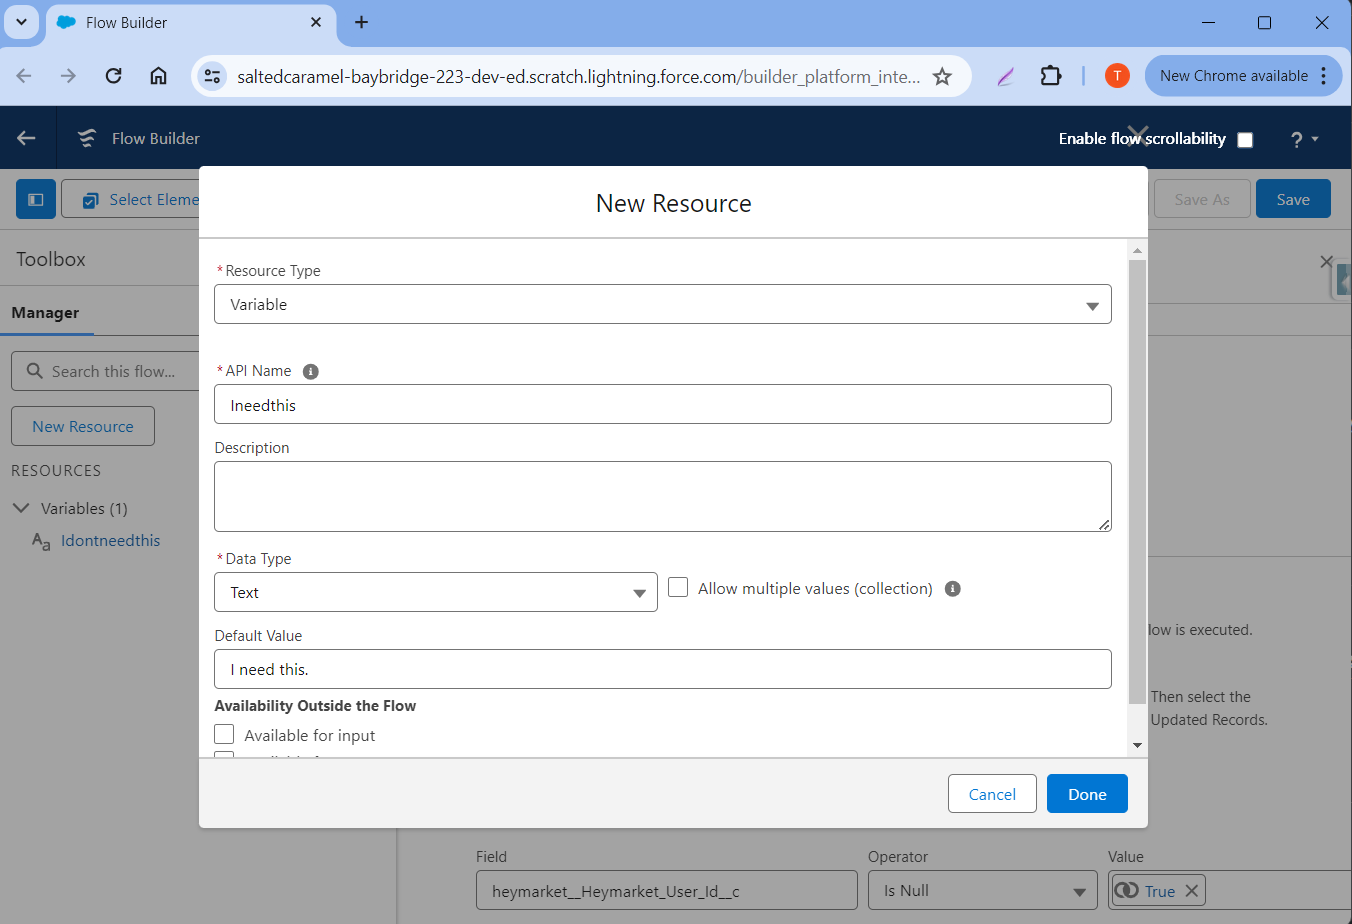
Create one more resource with the following details:
- Record Type = Variable
- API Name = Ineedthis
- Data Type = Text
- Default Value = I need this.
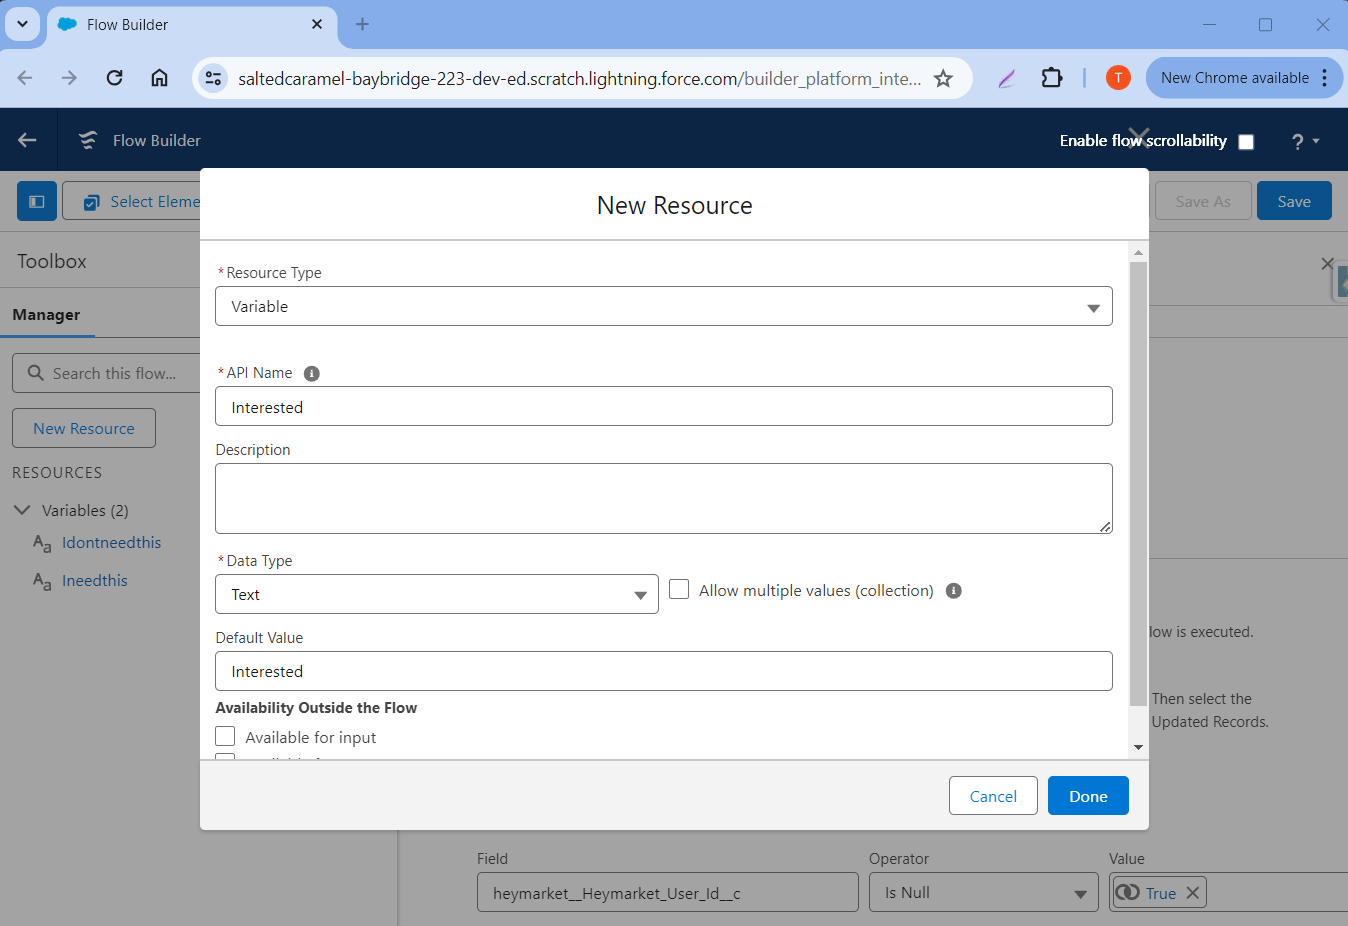
Create one more resource with the following details:
- Record Type = Variable
- API Name = Interested
- Data Type = Text
- Default Value = Interested
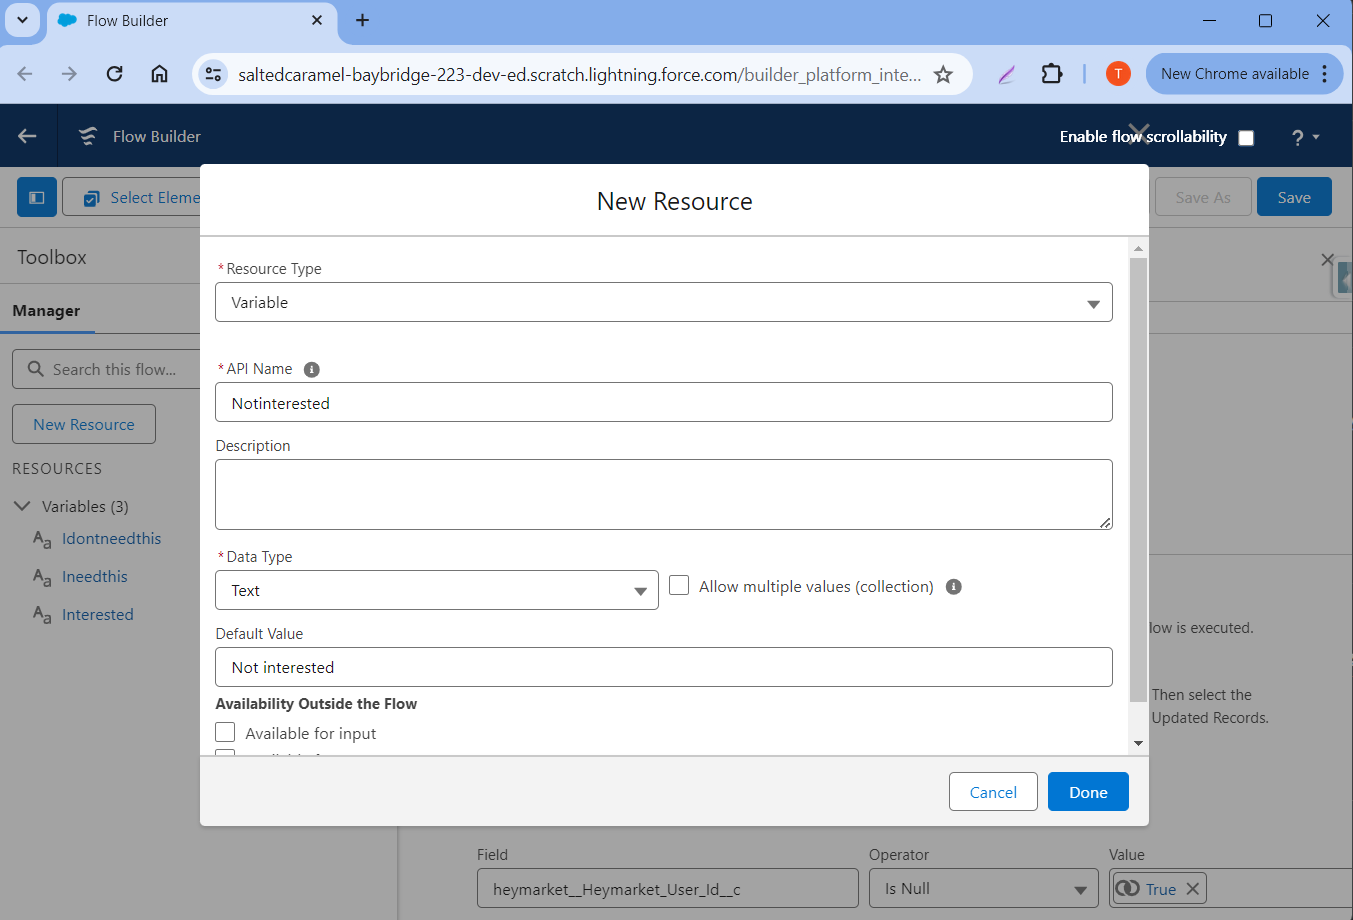
Create one more resource with the following details:
- Record Type = Variable
- API Name = Notinterested
- Data Type = Text
- Default Value = Not interested
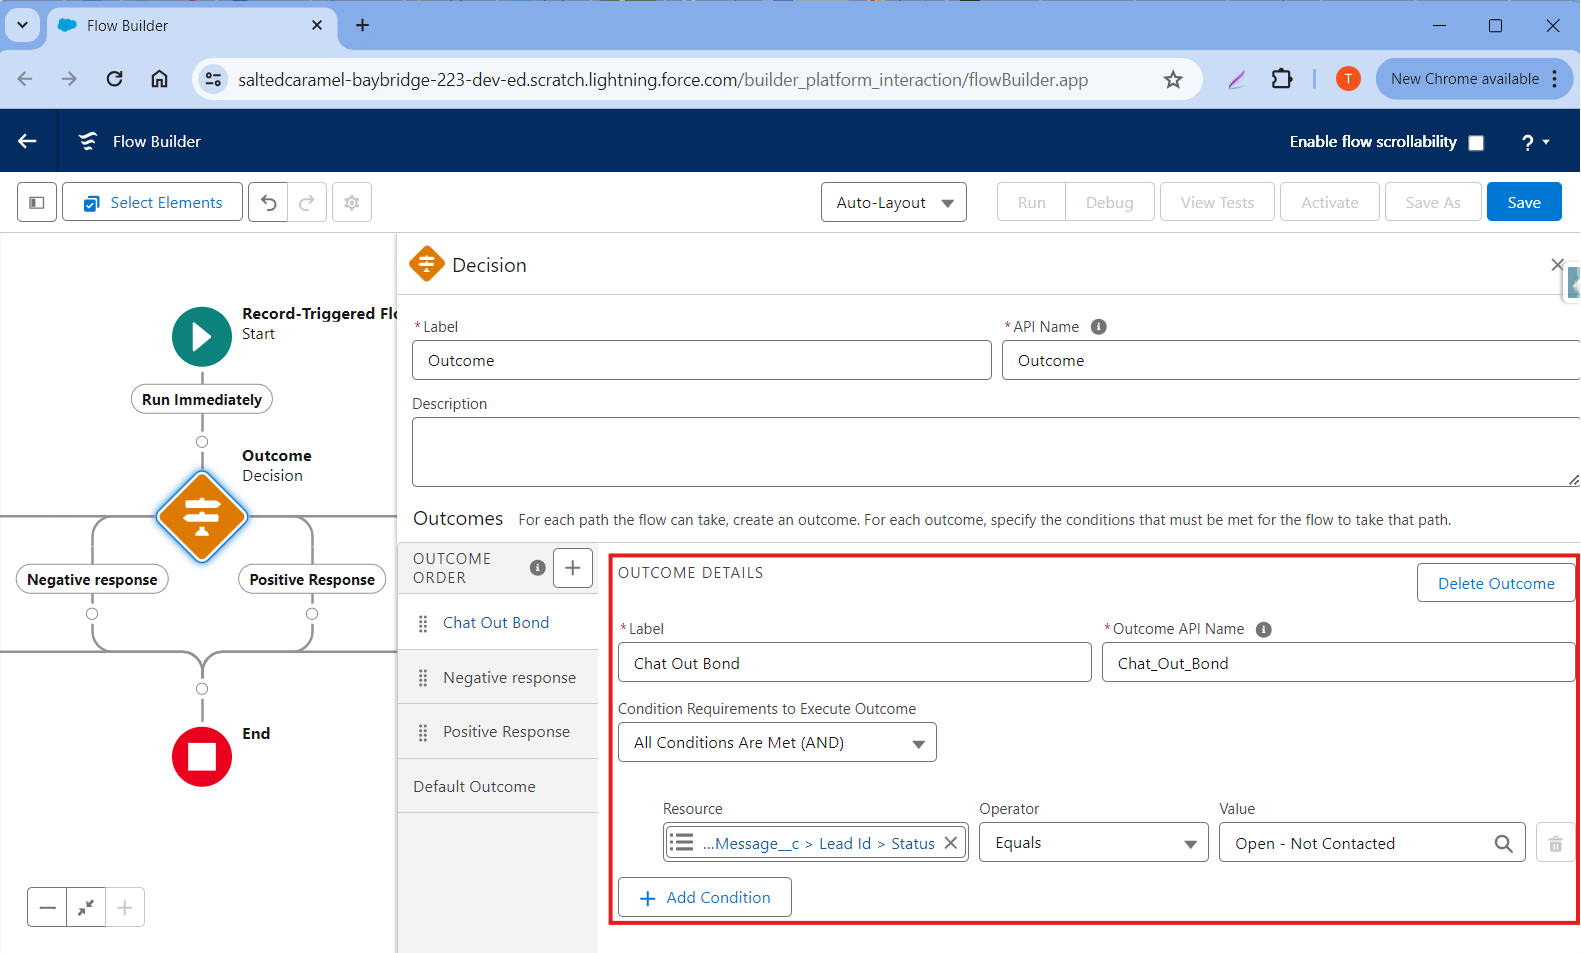
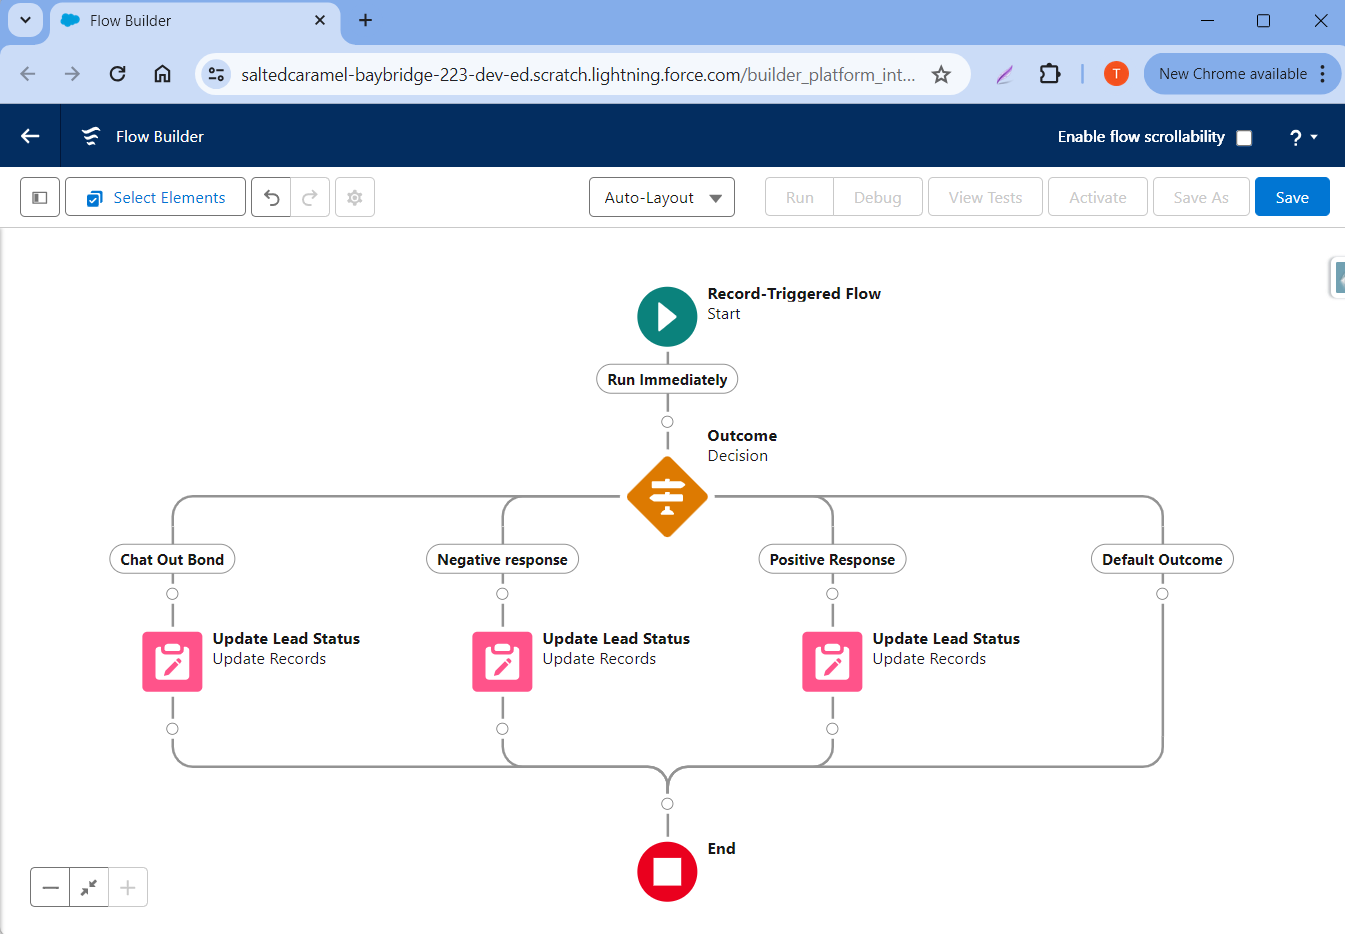
Step 4: Add a new Decision element. Configure three outcome criteria as follows:
- Chat Out Bond
- Label: “Chat Out Bond”
- API Name: “Chat_Out_Bond”
- Condition: {!$Record.heymarket__Lead__r.Status} Equals “Open - Not Contacted”
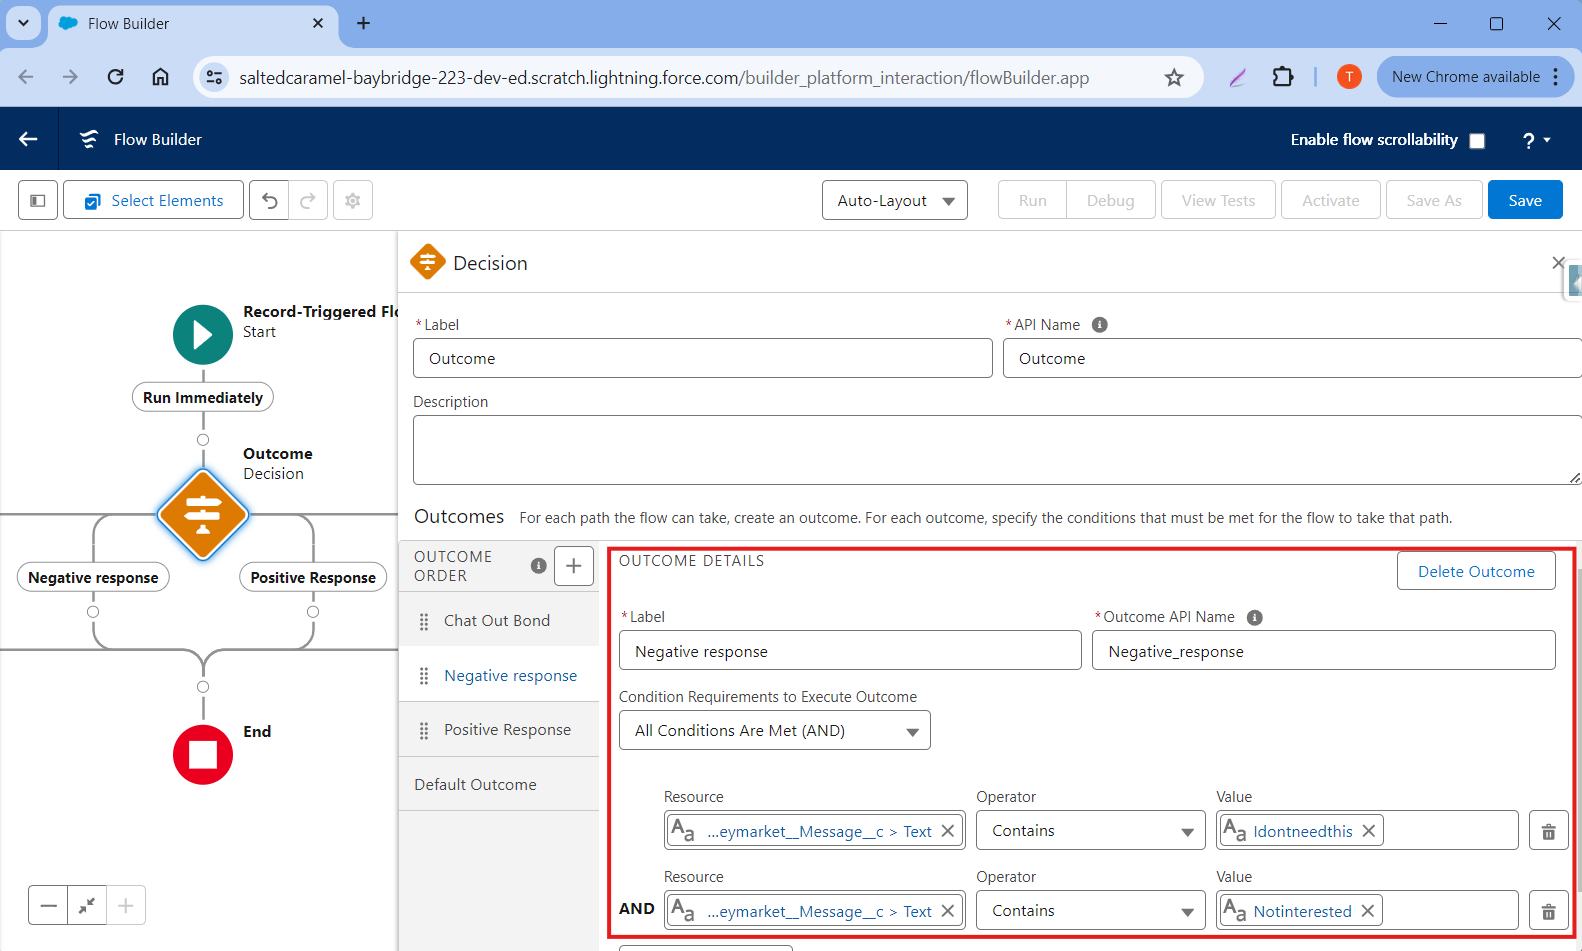
- Negative Response
- Label: “Negative response”
- API Name: “Negative_response”
- Condition Requirements to Execute Outcome (Any Condition Is Met (OR))
- Conditions
- {!$Record.heymarket__Text__c} Contains {!notinterested}
- {!$Record.heymarket__Text__c} Contains {!Idontneedthis}
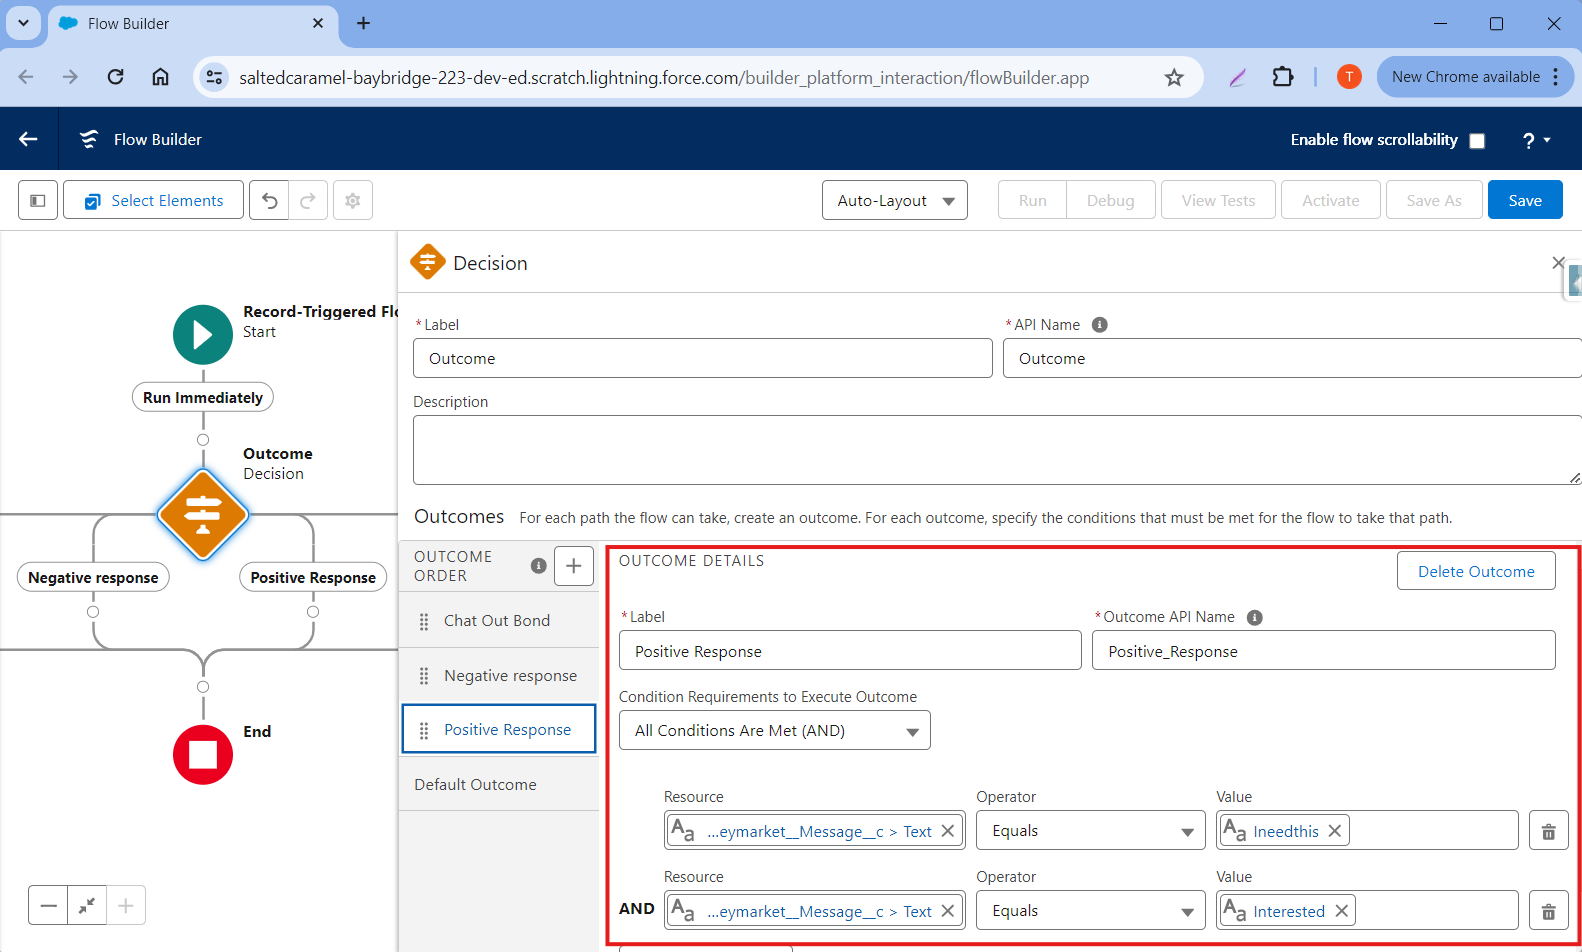
- Positive Response
- Label: “Positive response”
- API Name: “Positive _response”
- Condition Requirements to Execute Outcome (Any Condition Is Met (OR))
- Conditions:
- {!$Record.heymarket__Text__c} Contains {!interested}
- {!$Record.heymarket__Text__c} Contains {!Ineedthis}
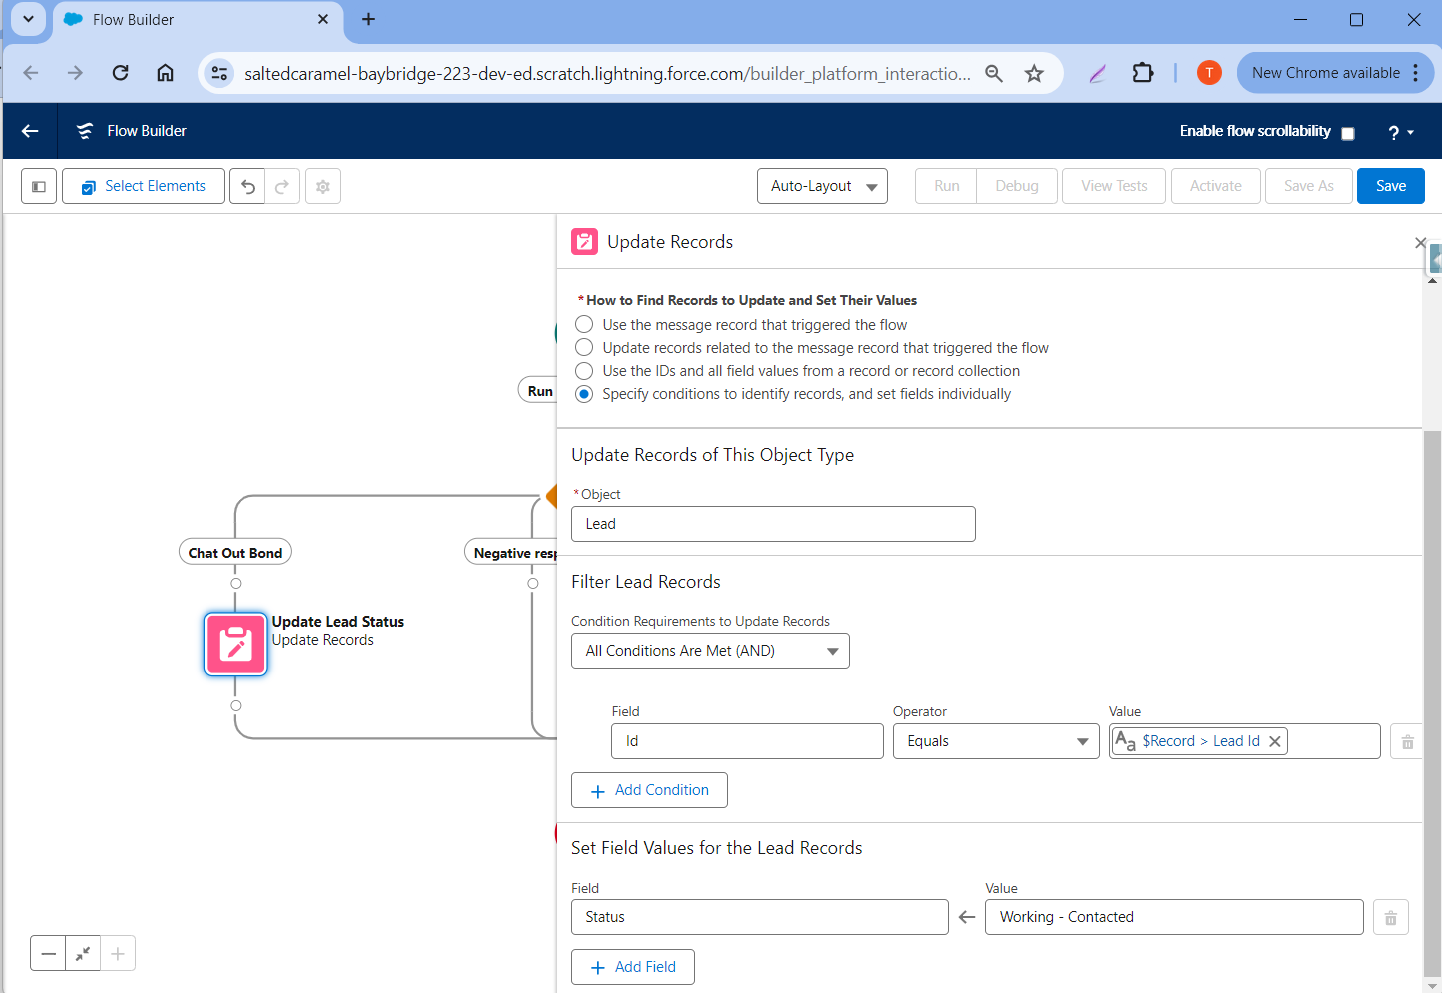
Step 5: Update Records
- For Chat Out Bond Outcome, add an Update Records element.
- Label: “Update Lead Status”
- API Name: “Update_Lead_Status1”
- How to Find Records to Update and Set Their Values: Specify conditions to identify records, and set fields individually
- Object: Lead
- Filter Lead Records
- Condition Requirement: All Conditions Are Met (AND)
- Id Equals {!$Record.heymarket__Lead__c}
- Field Values
- Status = “Working - Contacted”
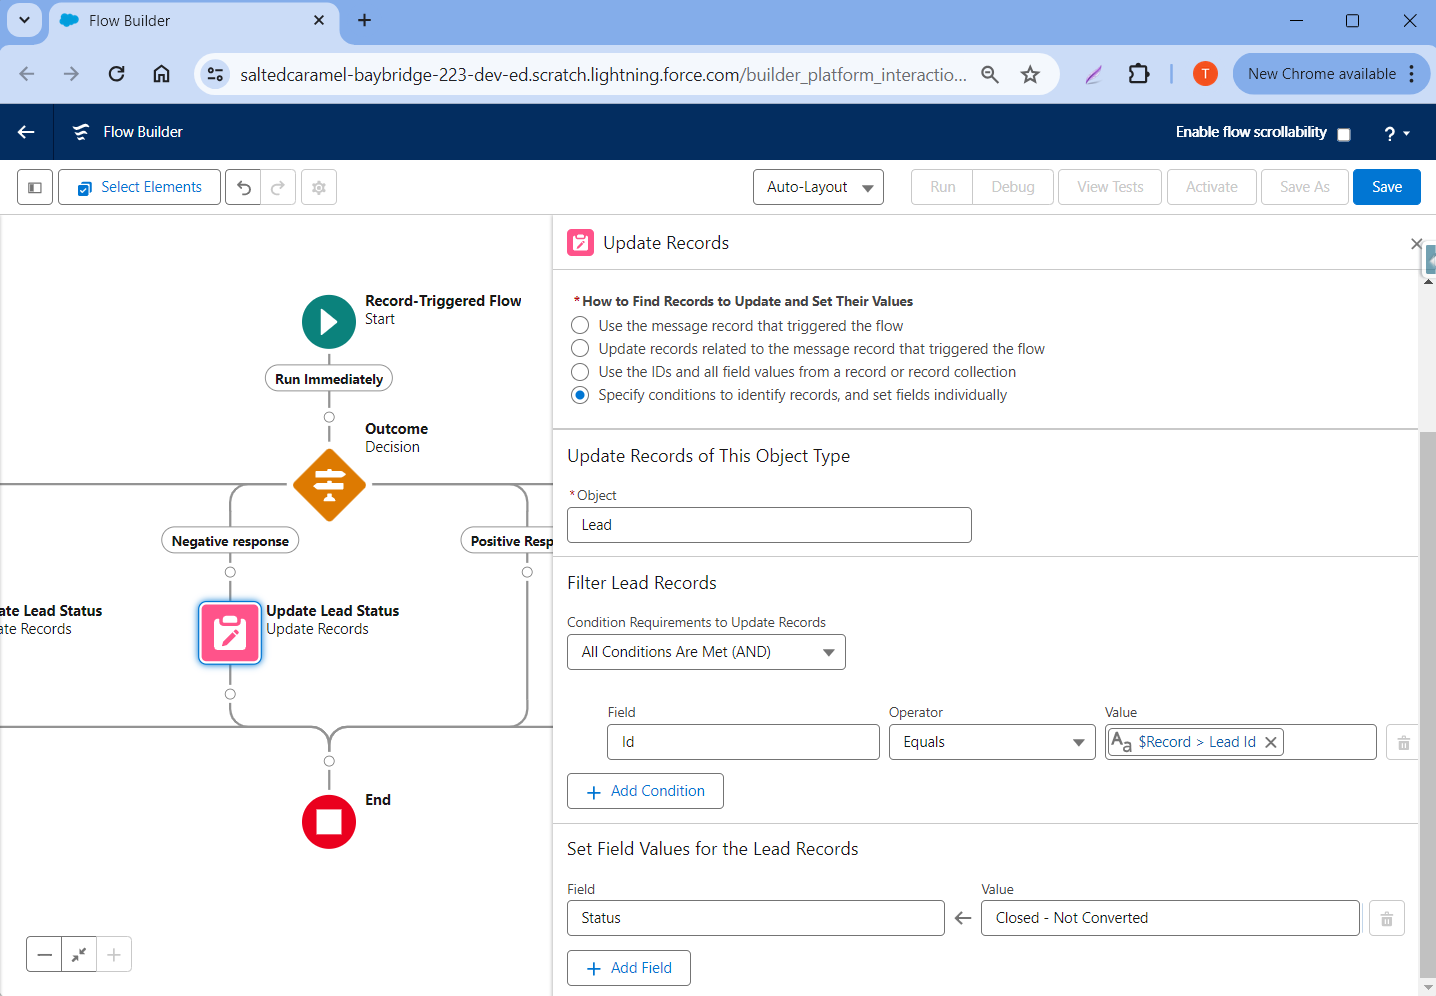
2. For Negative Response Outcome, add an Update Records element.
- Label: “Update Lead Status”
- API Name: “Update_Lead_Status2”
- How to Find Records to Update and Set Their Values: Specify conditions to identify records, and set fields individually
- Object: Lead
- Filter Lead Records
- Condition Requirement: All Conditions Are Met (AND)
- Id Equals {!$Record.heymarket__Lead__c}
- Field Values
- Status = “Closed - Not Converted”
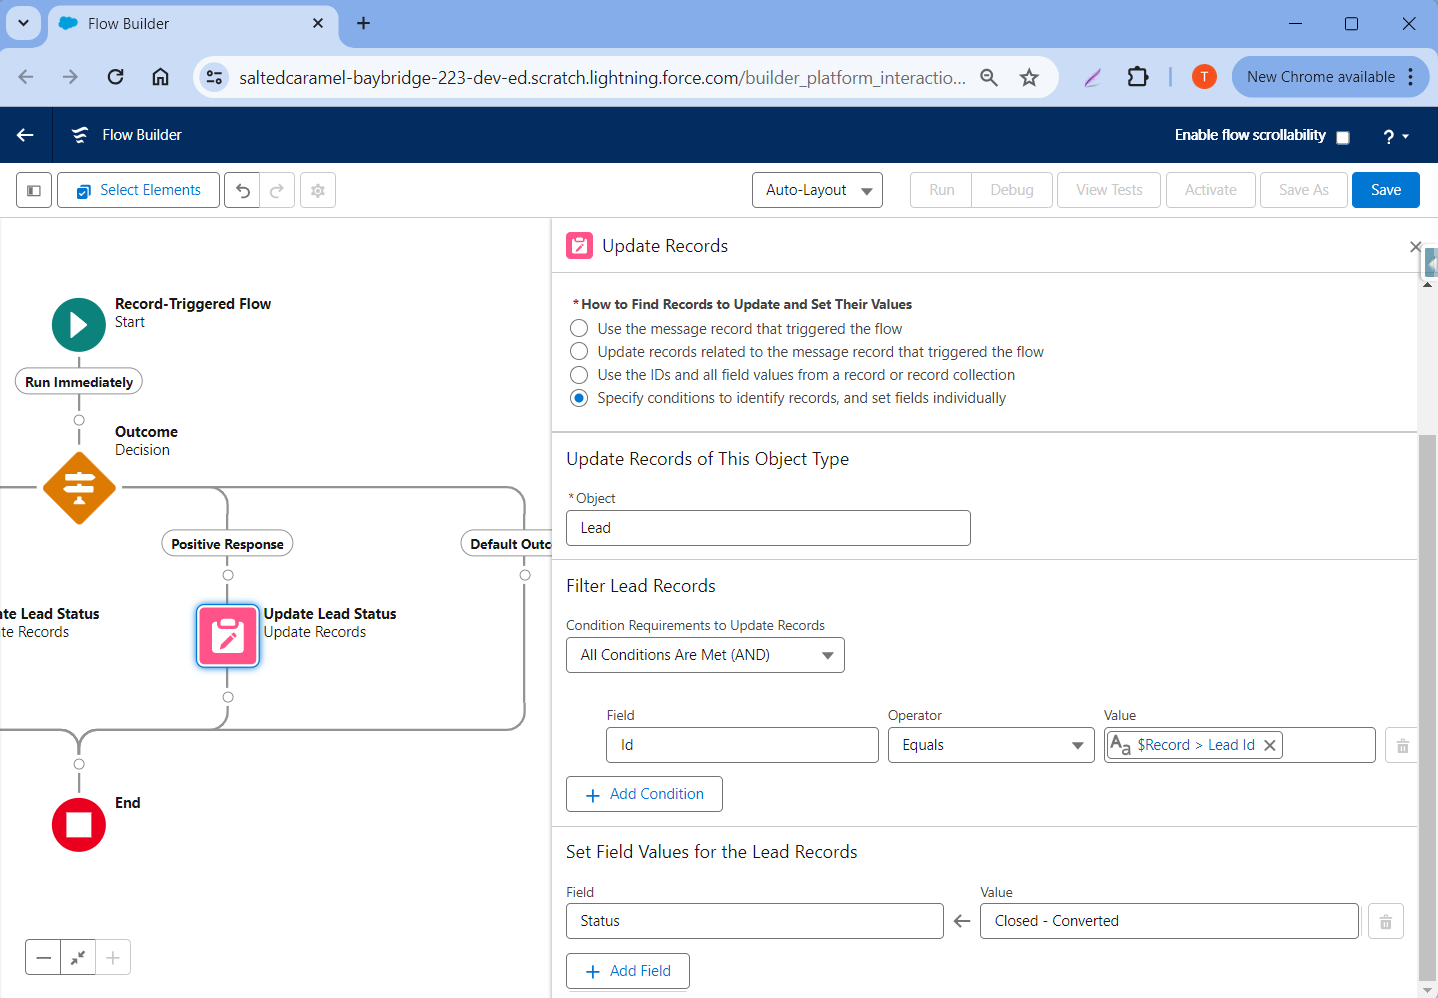
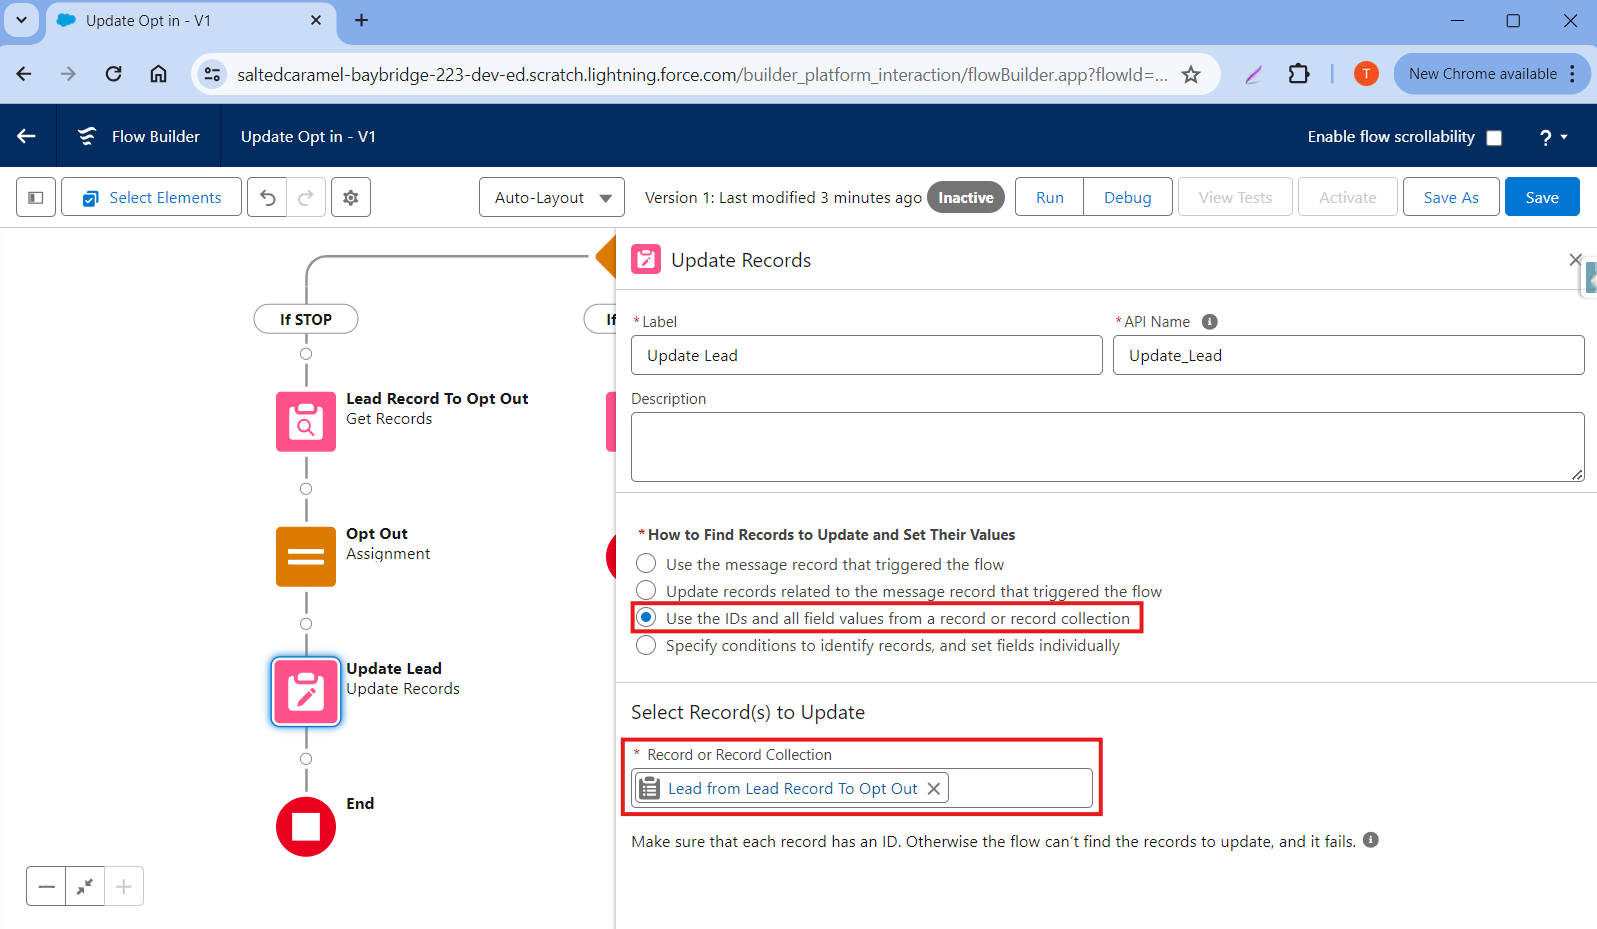
3. For Positive Response Outcome, add an UpdateRecords element.
- Label: “Update Lead Status”
- API Name: “Update_Lead_Status3”
- How to Find Records to Update and Set Their Values: Specify conditions to identify records, and set fields individually
- Object: Lead
- Filter Lead Records
- Condition Requirement: All Conditions Are Met (AND)
- Id Equals {!$Record.heymarket__Lead__c}
- Field Values
- Status = “Closed - Converted”
Step 6: Save and Activate the Flow.
Your completed Flow should look like this:
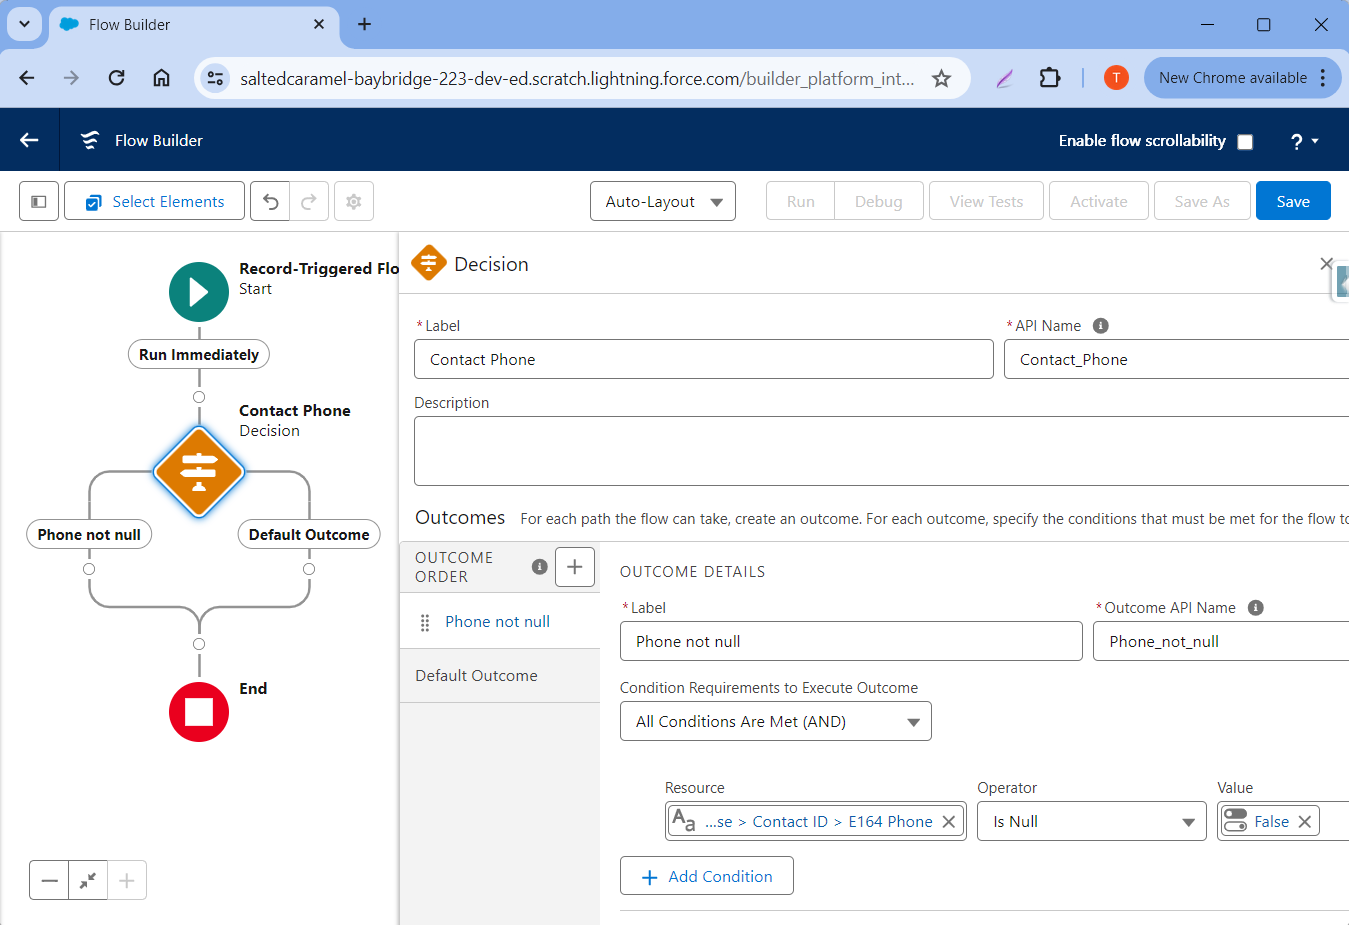
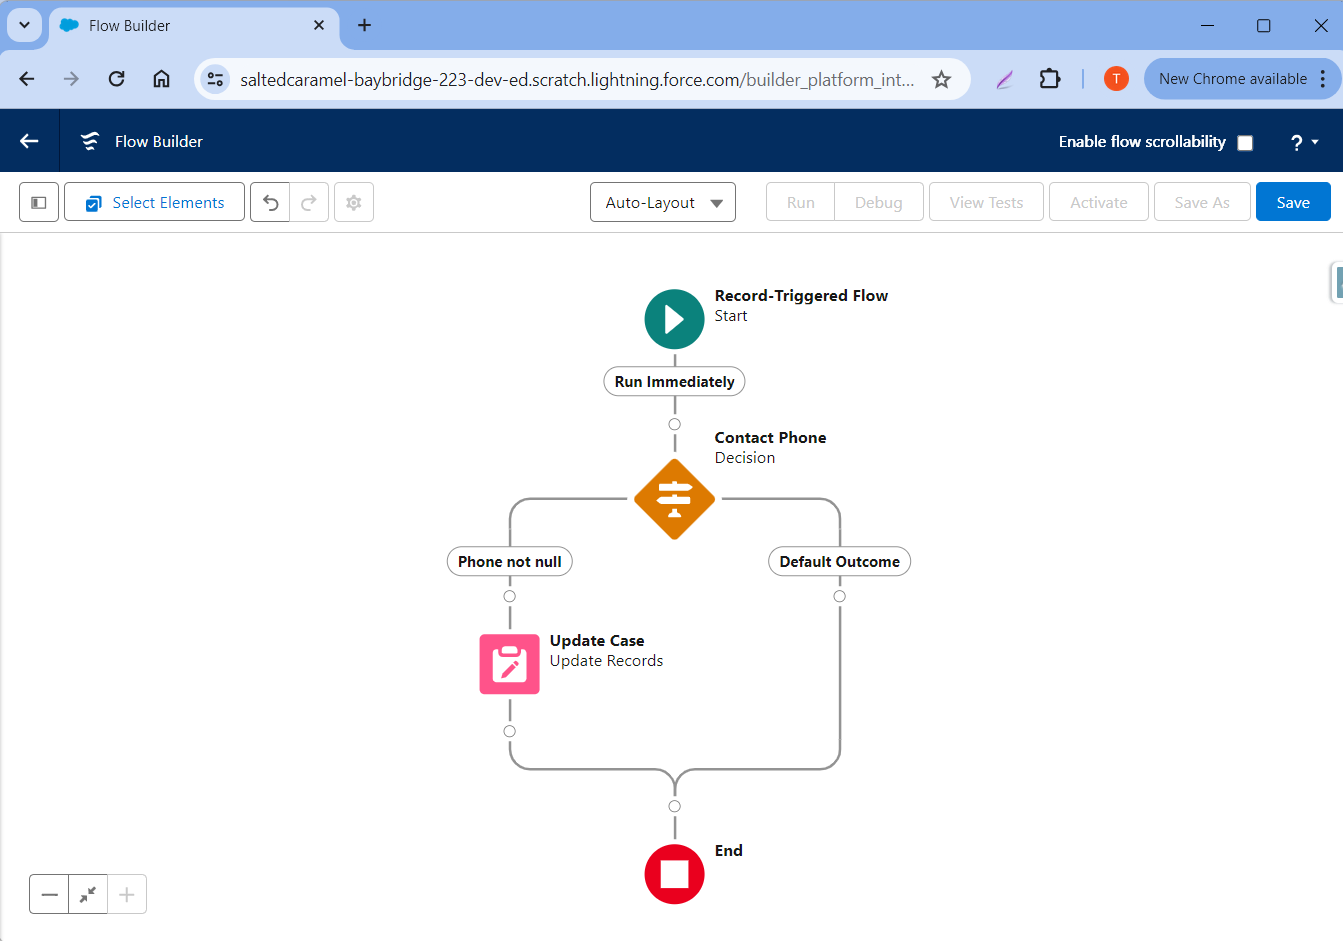
Updating Case Phone
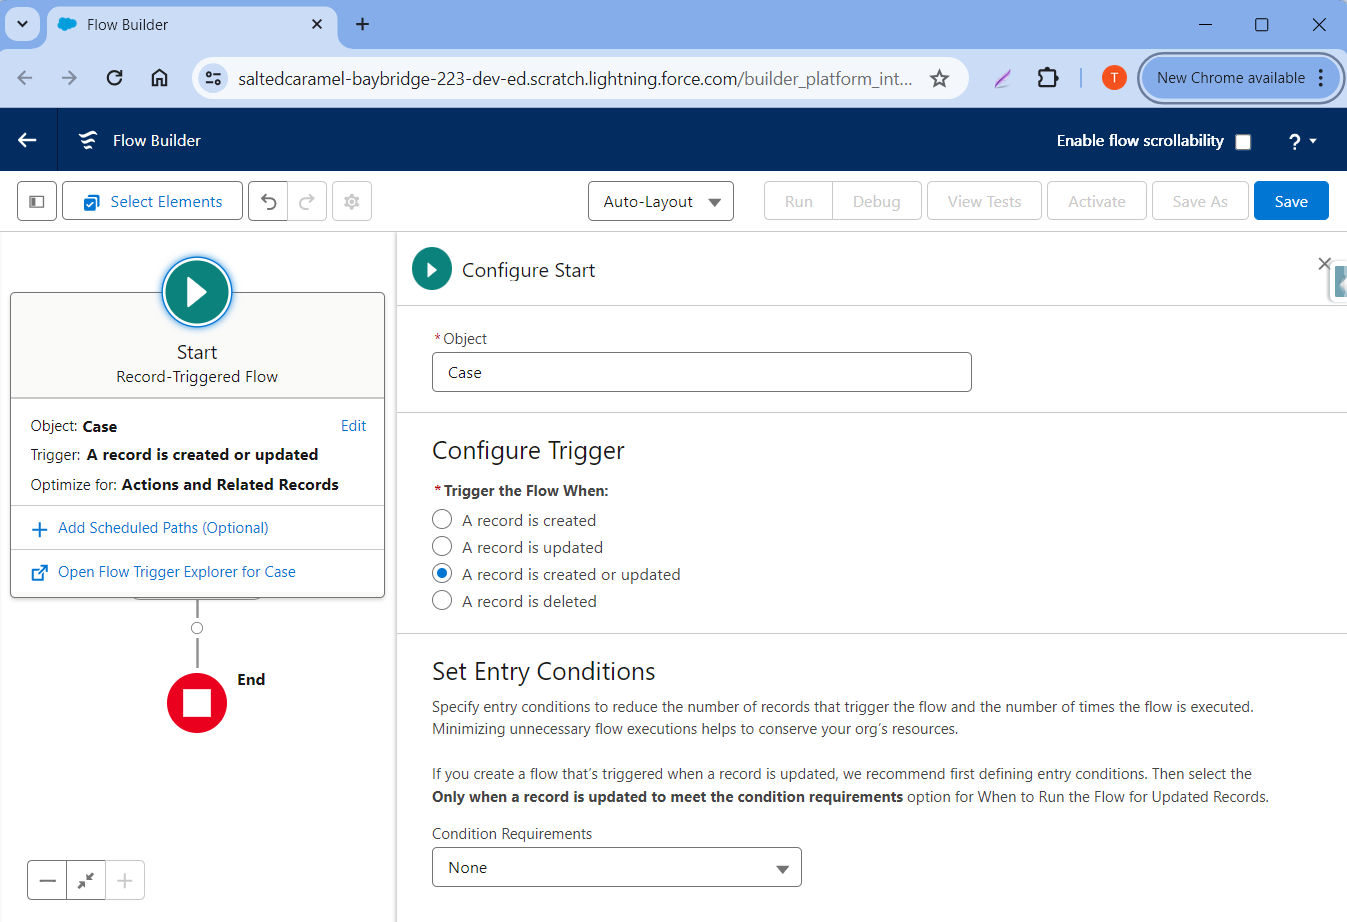
Step 1: Follow all steps mentioned in Flow Configuration Common Step and choose the Case object.
Step 2: Choose A record is created or updated in Configure Trigger, and choose None in Condition Requirement.
Step 3: Add a new Decision element.
Outcome
- Label: Phone not null
- API Name: Phone_Not_Null
- Condition:
- {!$Record.Contact.heymarket__E164_Phone__c} Is Null False
Step 4: Add a new Update Records element under the Phone Not Null outcome. Fill the values as shown below:
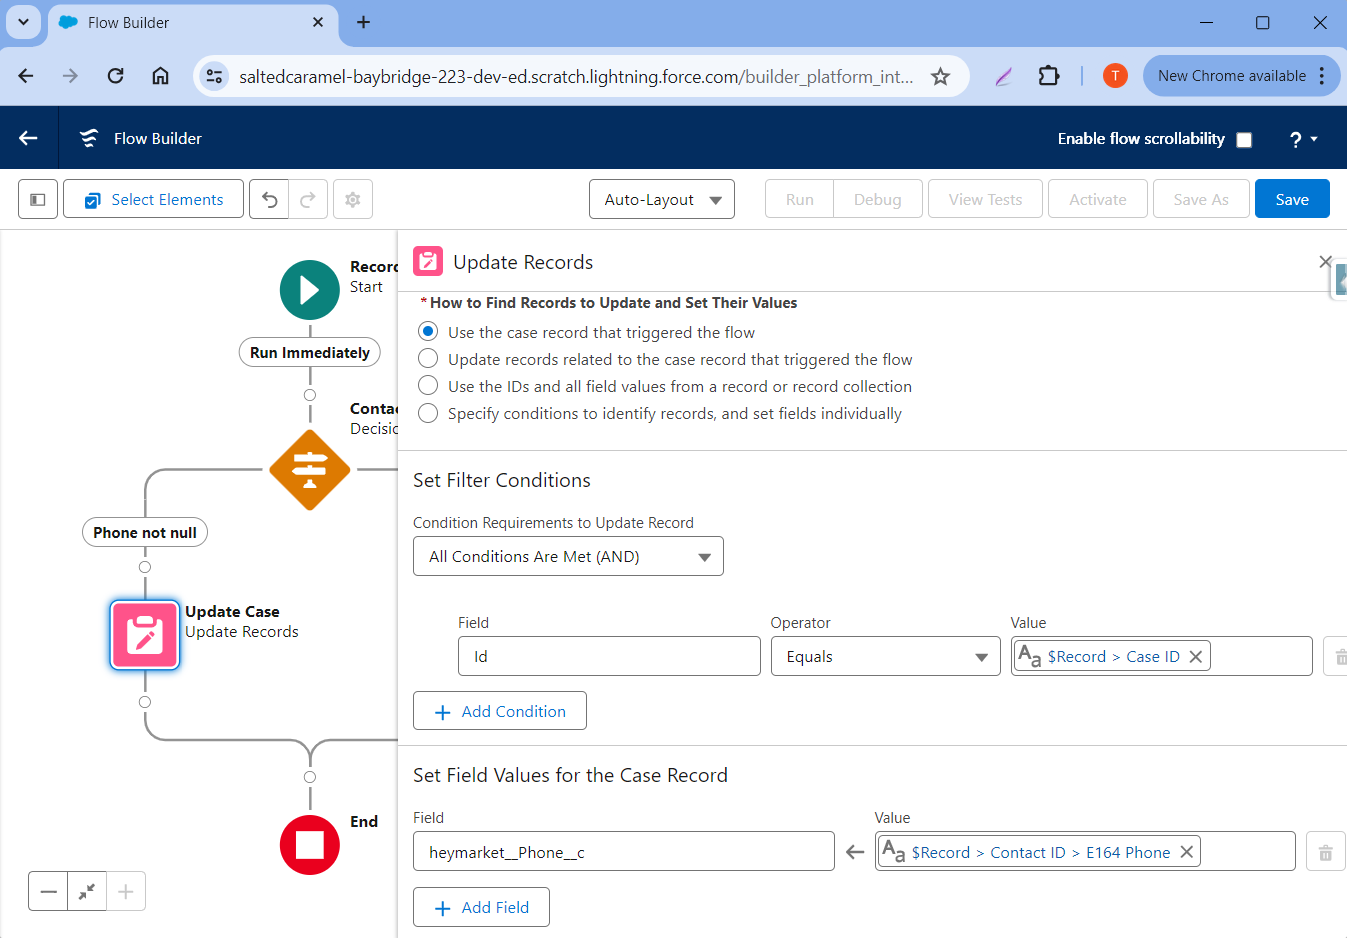
Step 5: Save and Activate the Flow.
Your completed Flow should look like this:
Incoming/Outgoing Activity
In this step, you will learn how to set up a Flow to send messages based on some criteria using the Flow. Please follow the steps carefully.
Step 1: Follow all steps mentioned in Flow Configuration Common Step, and choose the Message(heymarket__Message__c) object.
Step 2: Choose A record is created in Configure Trigger, choose All Conditions Are Met in Condition Requirement, then in Criteria choose
- heymarket__Heymarket_User_Id__c Is Null True
- heymarket__Lead__c Is Null False
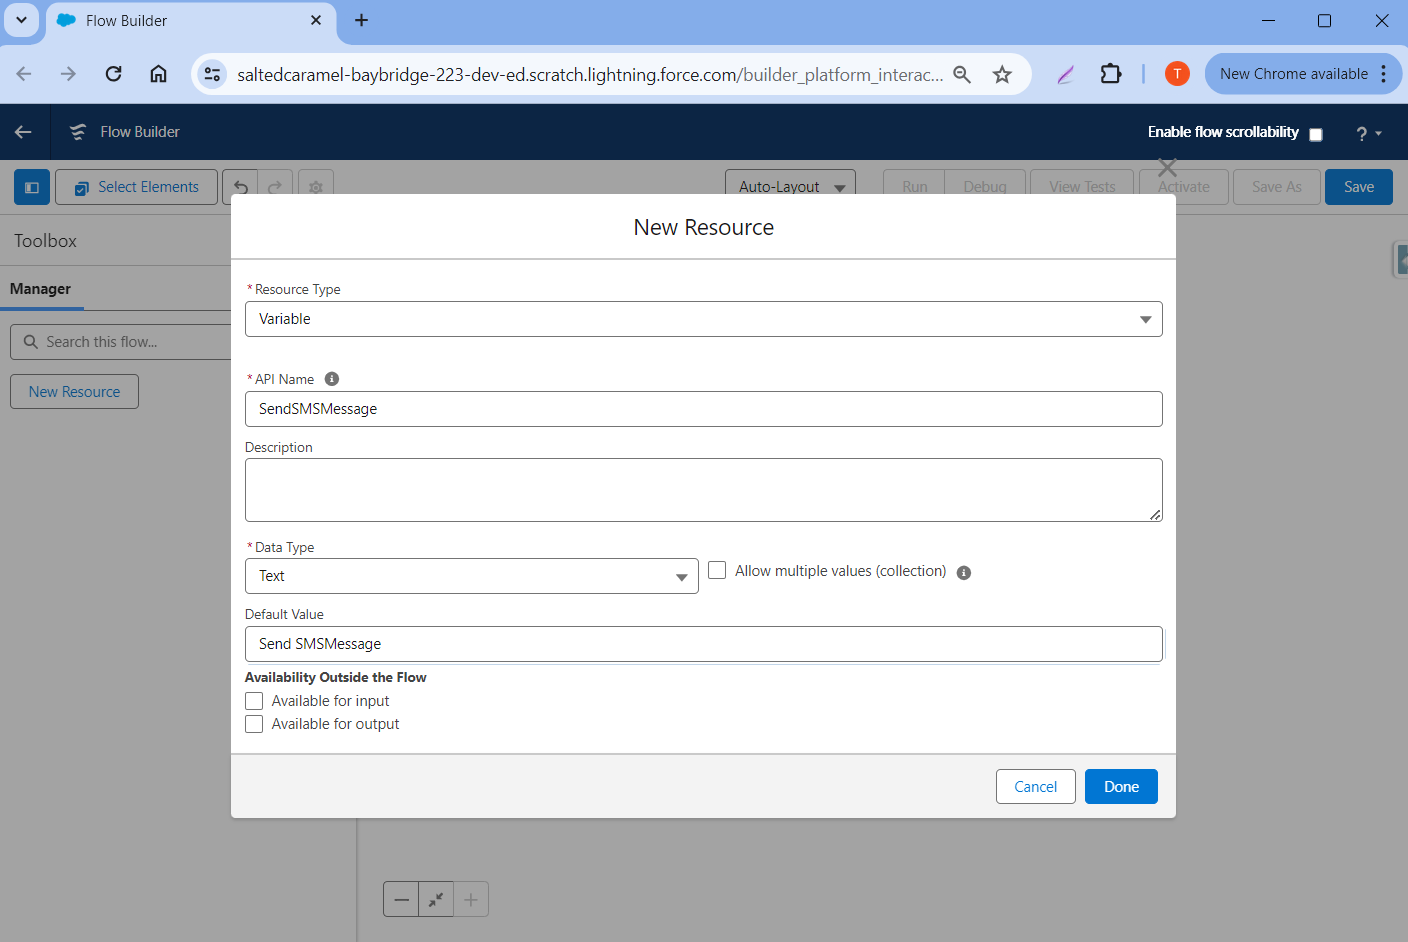
Step 3: Create Resources
First, click New Resource.
Fill all fields like the below picture:
- Record Type = Variable
- API Name = SendSMSMessage
- Data Type = Text
- Default Value = “Send SMS Message”
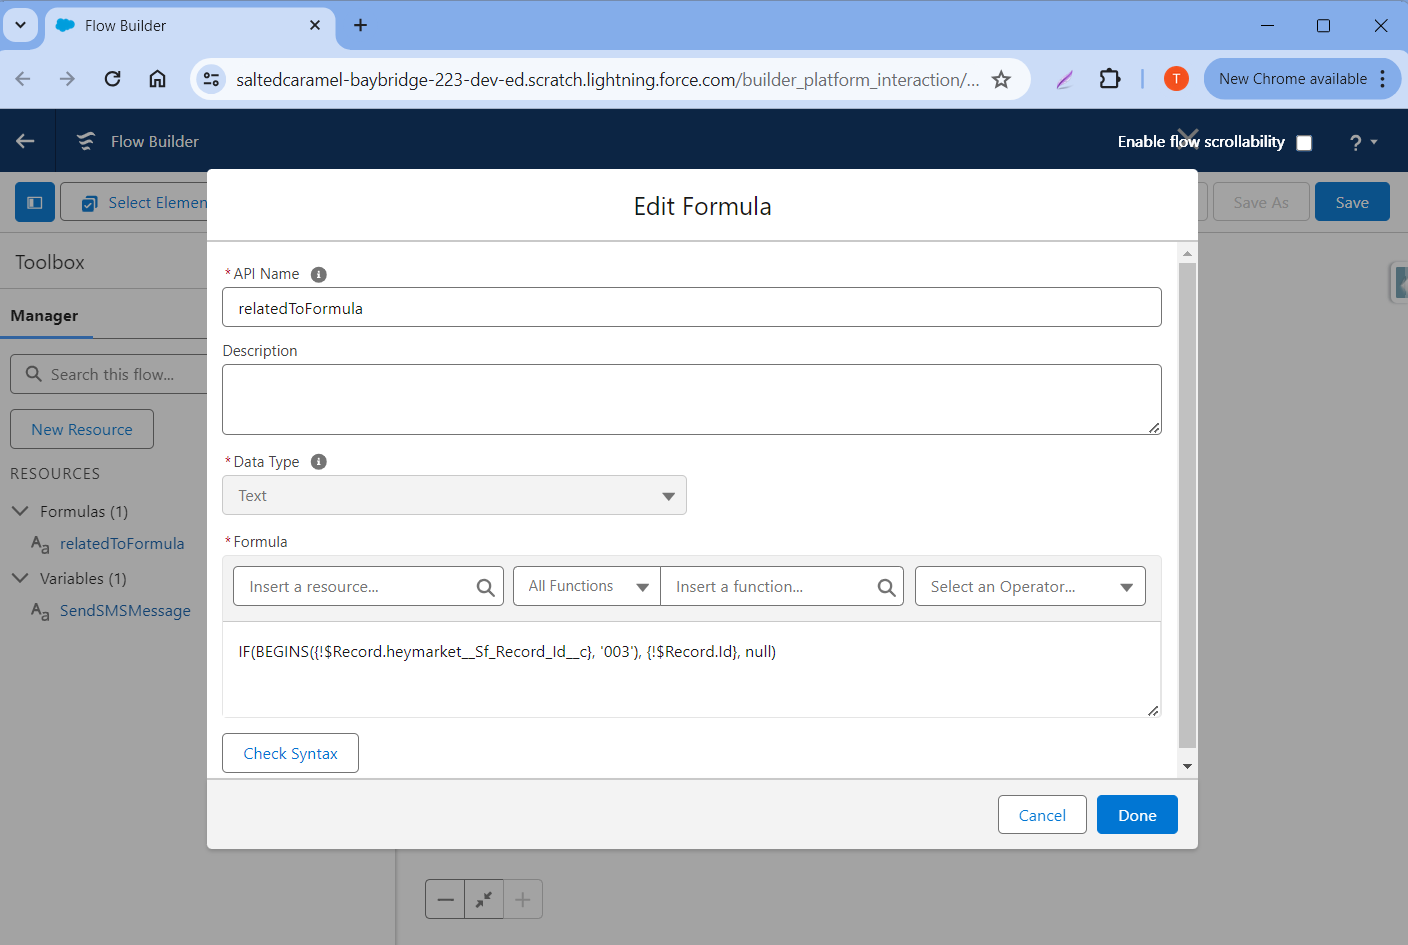
Create one more resource with the following details:
- Record Type = Formula
- API Name = relatedToFormula
- Data Type = Text
- Default Value = IF(BEGINS({!$Record.heymarket__Sf_Record_Id__c}, '003'), {!$Record.Id}, null)
Step 4: Add a new Create Records element.
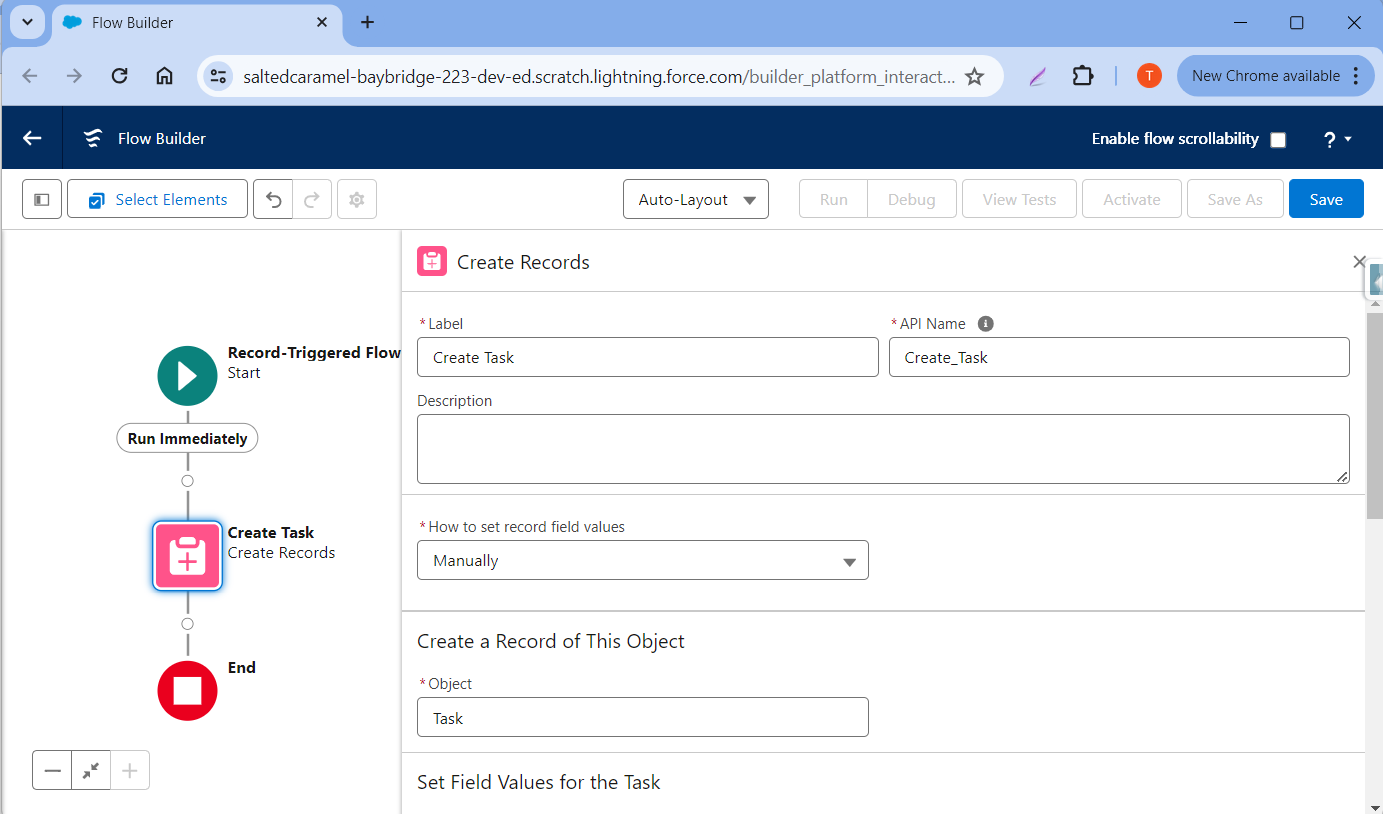
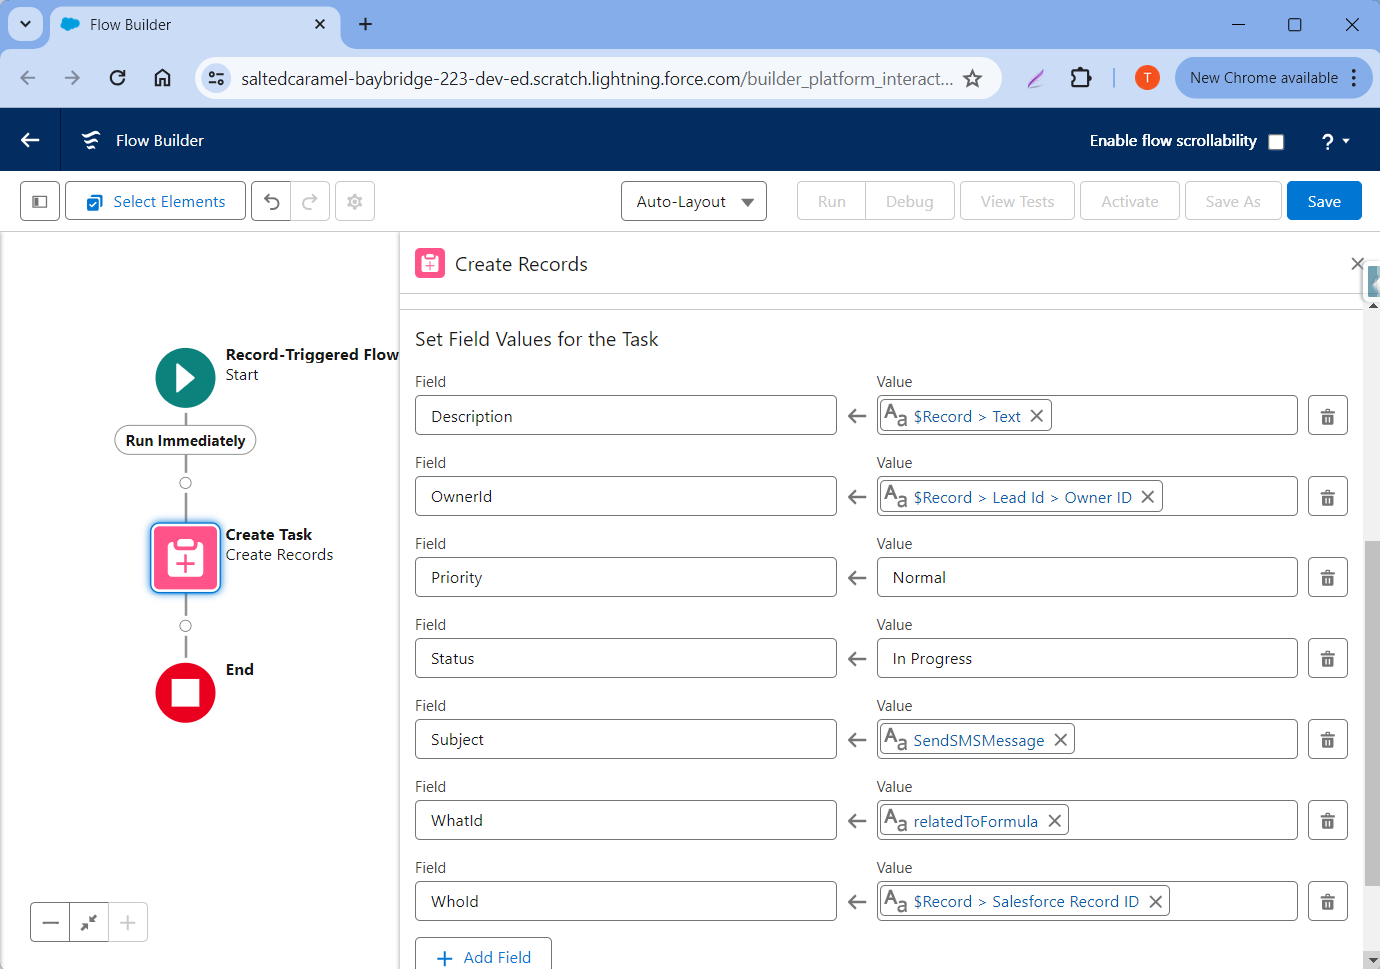
Fill in the following details:
- Label: “Create Task”
- API Name: “Create Task”
- How to set record field values = Manually
- Object = Task
- Description = {!$Record.heymarket__Text__c}
- OwnerId = {!$Record.heymarket__Lead__r.OwnerId}
- Priority = Normal
- Status = “In Progress”
- Subject = {!SendSMSMessage} (Resource)
- WhatId = {!relatedToFormula} (Resource)
- WhoId = {!$Record.heymarket__Sf_Record_Id__c}
Step 5: Save and Activate the flow.
Creating a Flow to delete Message object data
Step 1: Navigate to Setup > Flows > New Flow.
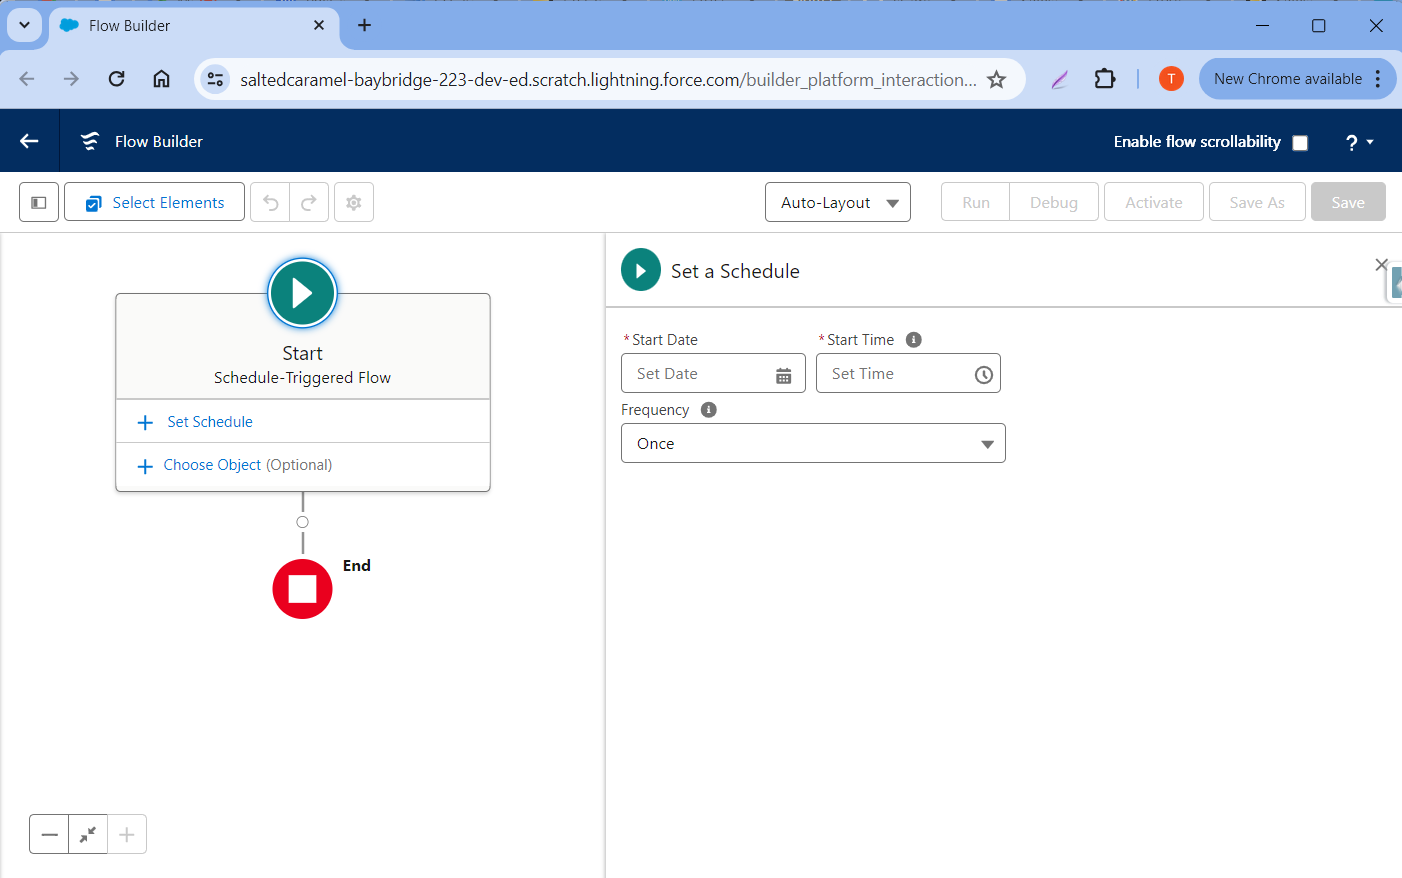
Step 2: Choose Schedule-Triggered Flow and then click Create.
Step 3: Set Start Date, Start Time, and Frequency to schedule the Flow.
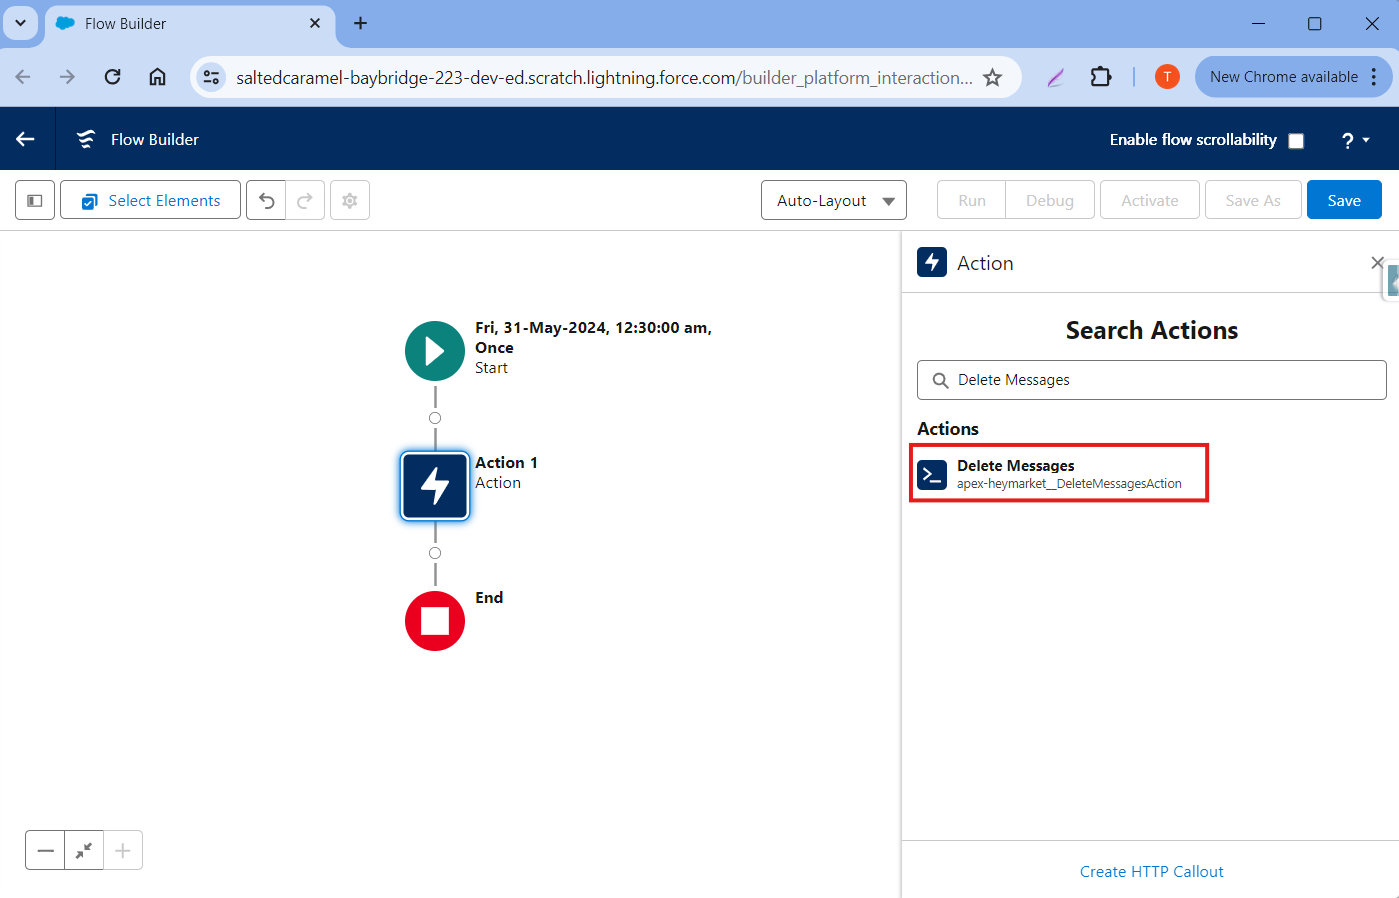
Step 4: Add a new Action element and search for Delete Messages. Select it.
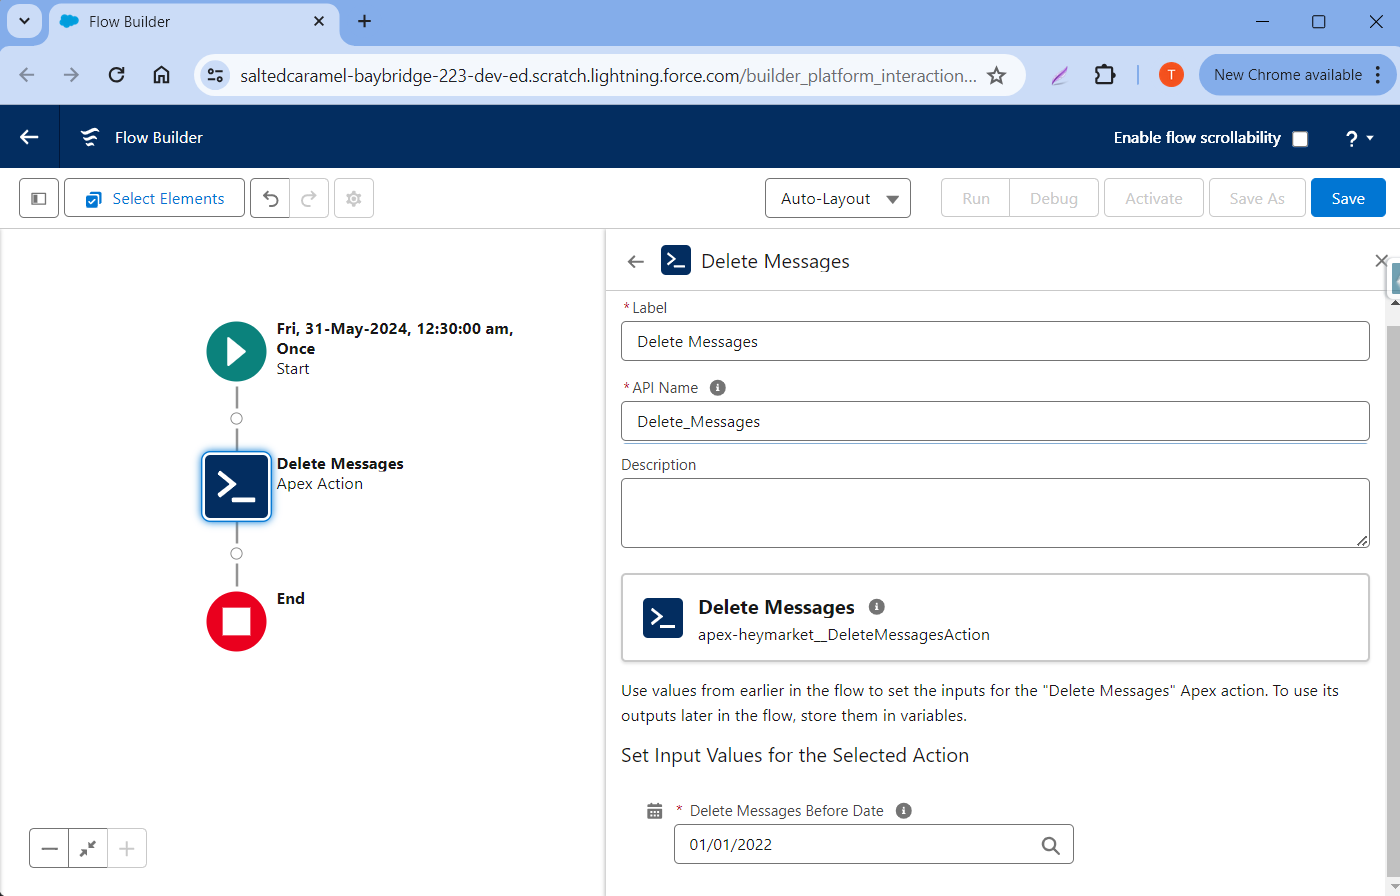
Step 5: After that type Delete Messages in the Label field and then enter the date in the Delete Messages Before Date field such that the messages earlier than that date will be deleted but the date is in the format of “dd/MM/yyyy” like “01/01/2020“.
Step 6: Save and Activate the Flow.
Setting up SMS Opt In
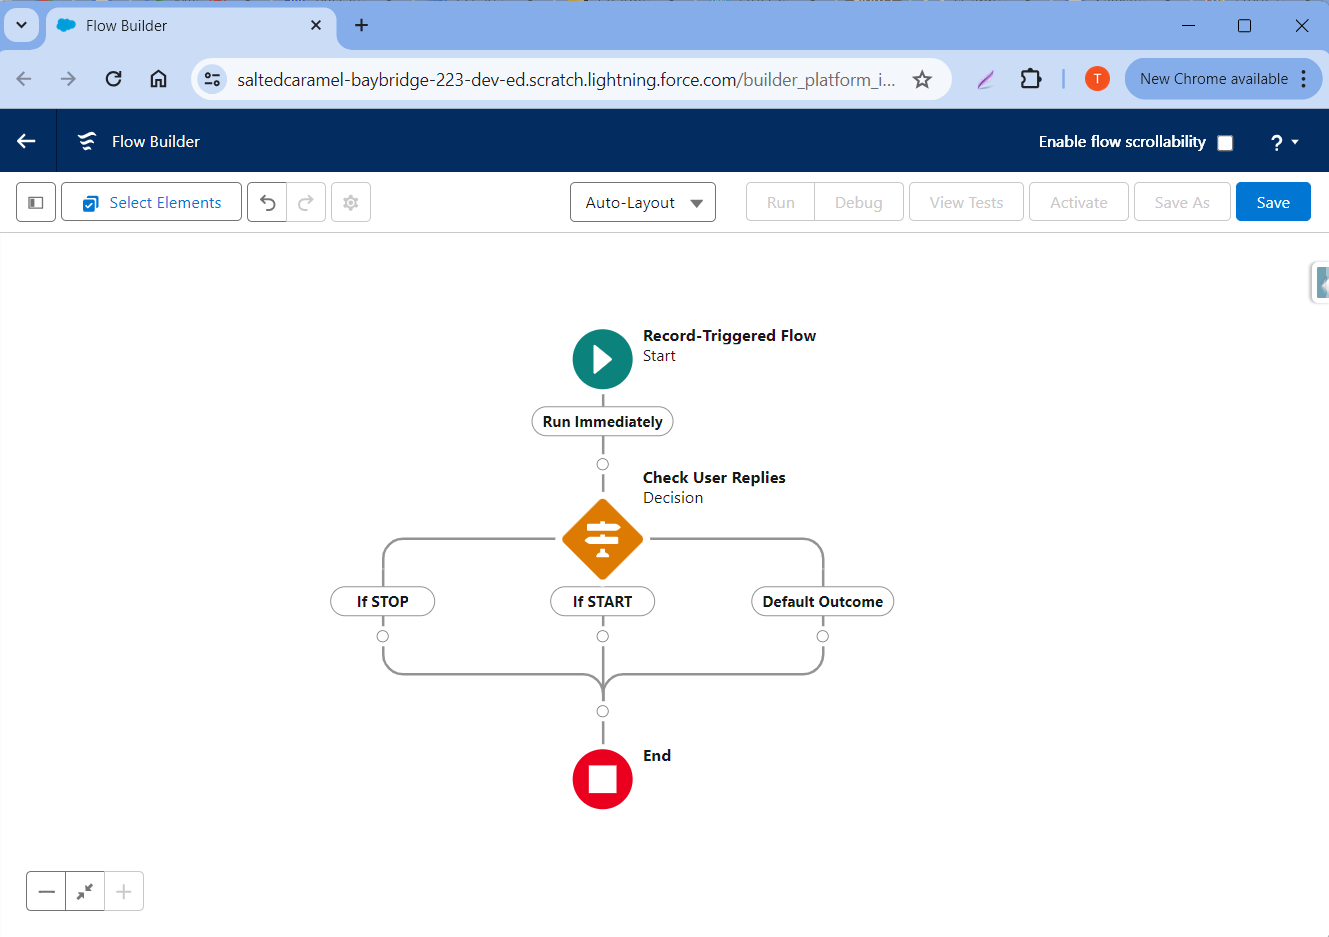
In this step, you are going to set up a Flow to update a custom field value based on customer responses.
A customer can respond with “STOP” and manually opt out from active communications. Similarly, the customer can opt in by replying “START” to the conversation.
Please follow the steps to implement a Flow to update custom fields based on customers’ opt-in or opt-out requests. .
Step 1: Follow all steps mentioned in Flow Configuration Common Step and choose the Message(heymarket__Message__c) object.
Step 2: Choose A record is created in Configure Trigger, choose All Conditions Are Met in Condition Requirement, then in Criteria choose heymarket__Heymarket_User_Id__c is null True, as shown in the picture below.
Step 4: Add a Decision element as shown below.
For handling STOP replies, use the heymarket__Text__c field to compare the text from the message.
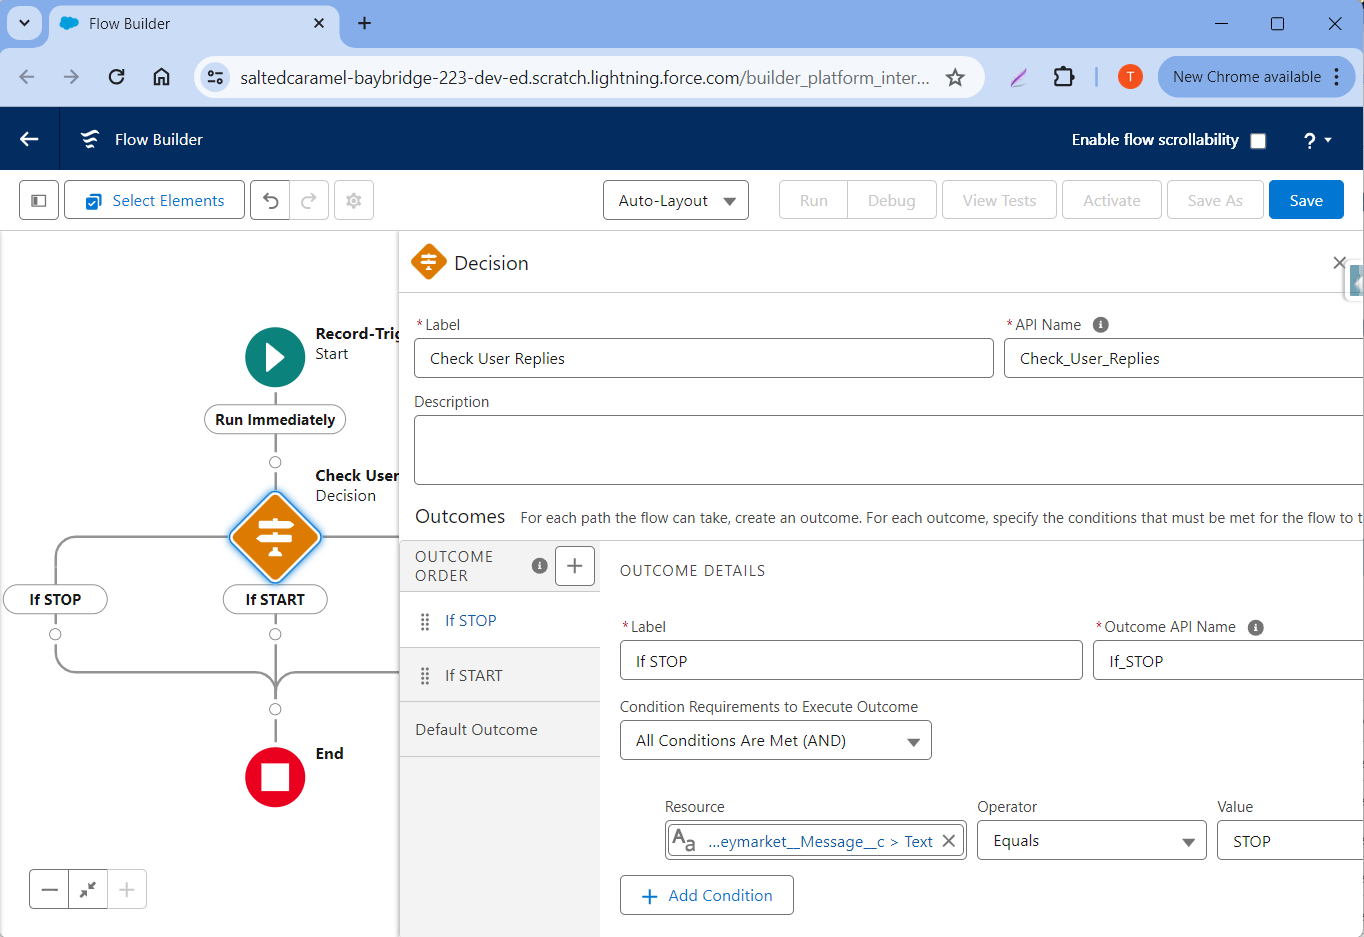
For handling START replies
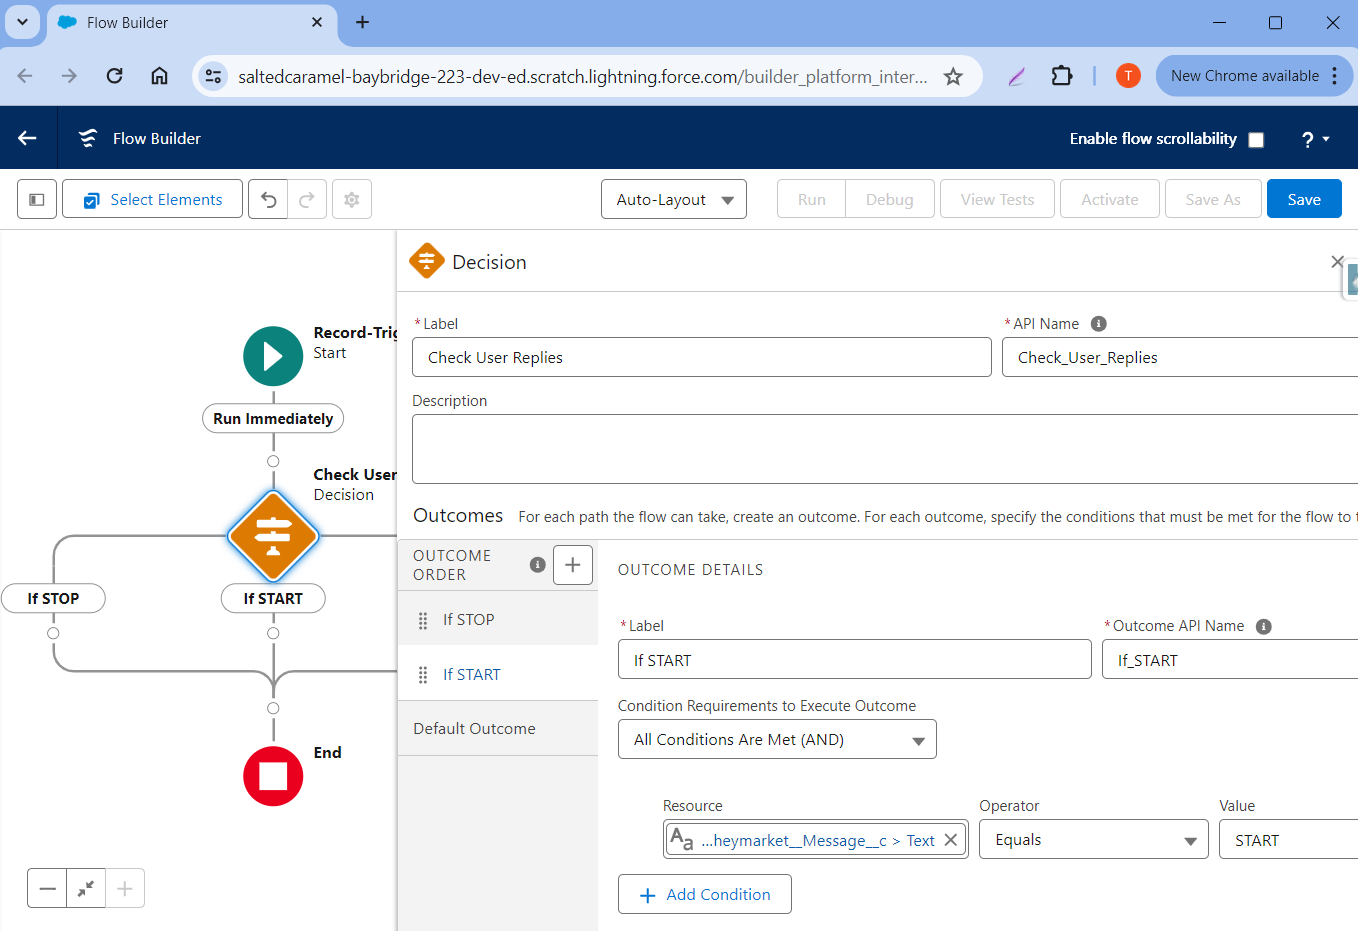
The Default Outcome will be empty.
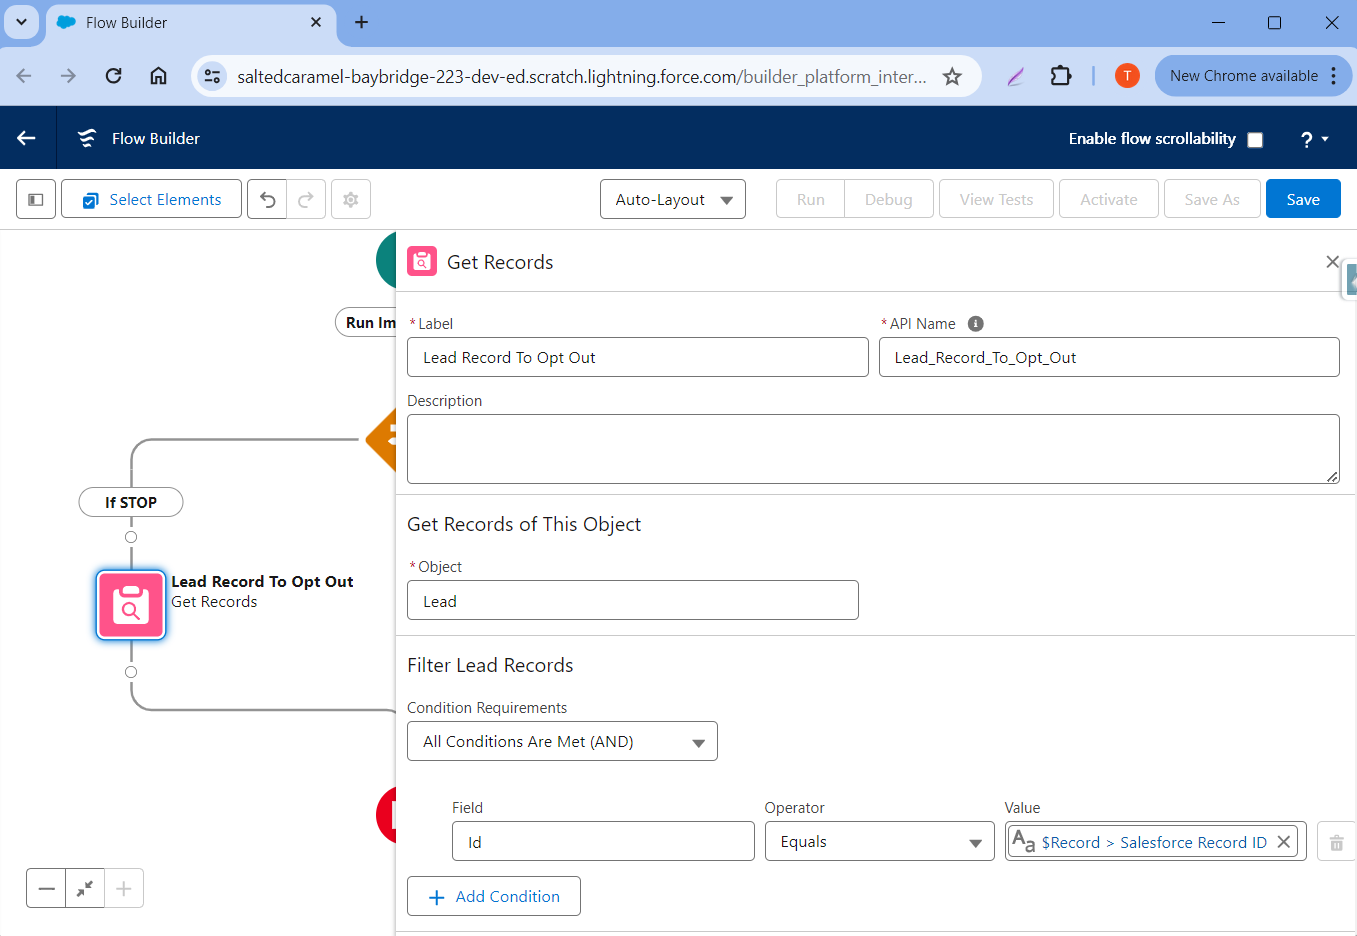
Step 5: Use the Get Record element to get the related record. The related record ID with the Phone number will be populated on the heymarket__Sf_Record_Id__c field in the message object. Use this field to get the related record.
Add the Get Record element to the Flow as shown below.
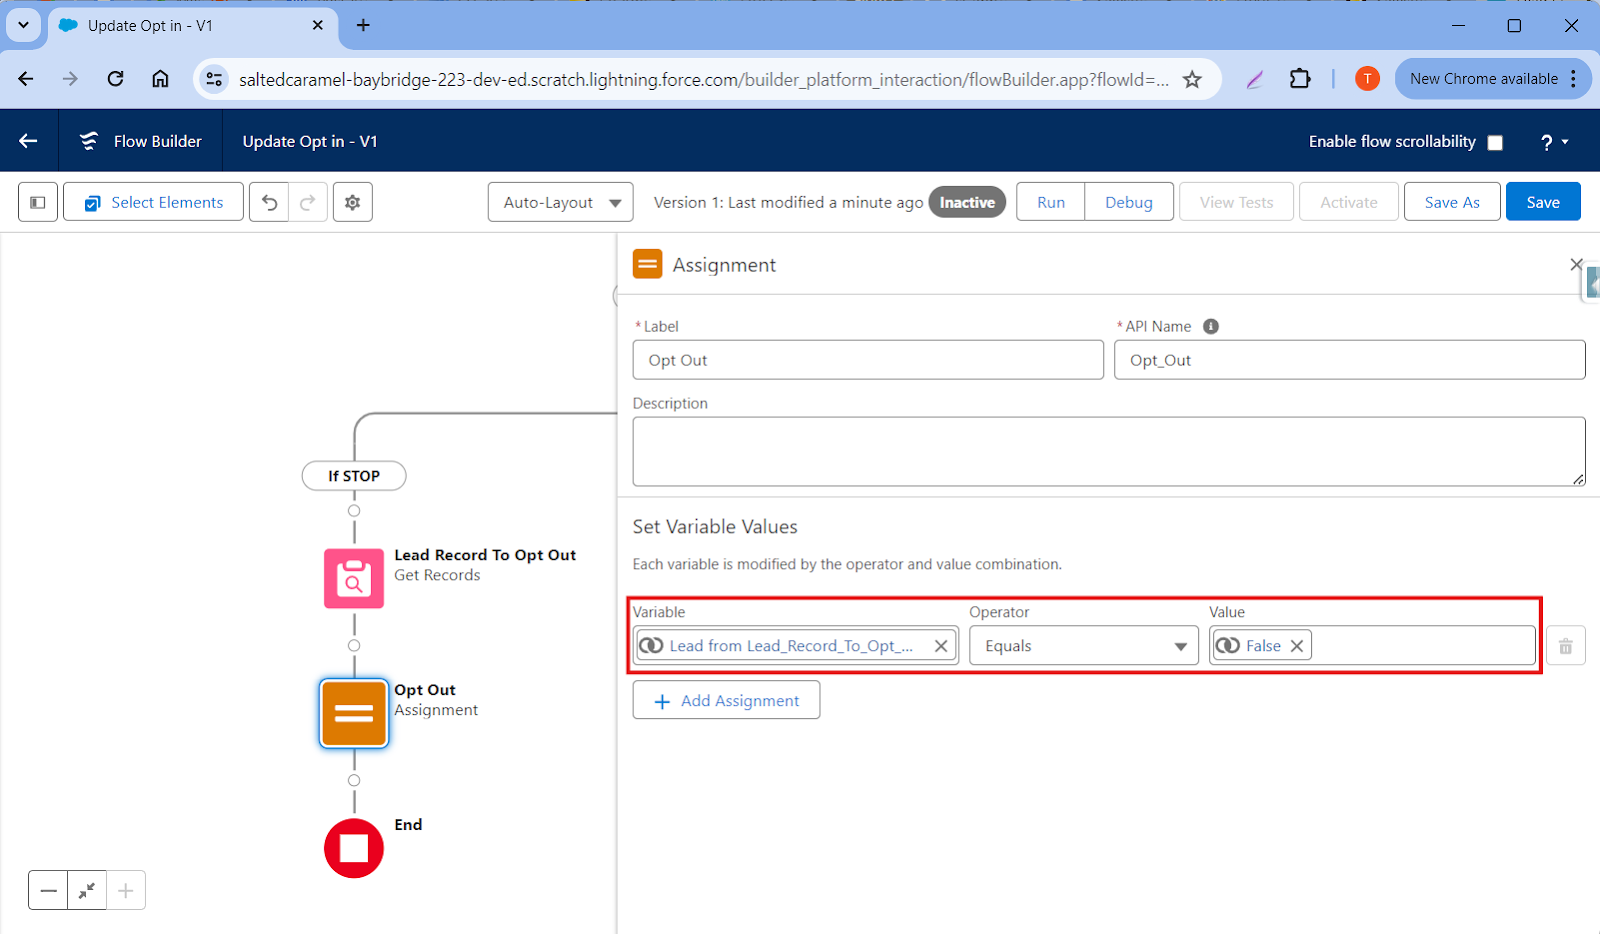
Step 6: To assign value in the Opt In custom field, add the Assignment element as shown below.
Set the assignment for Opt In custom field on Lead. Set it to false to opt out.
Step 7: Update the Lead record by adding the Update Record element as shown below.
Step 8: Follow steps 5 to 7 for Opt In, setting the custom field value to true for Opt In .
Your completed Flow should look like this:

Send upto 5K messages Action
You can send up to 5,000 messages using a Flow with the SendUpto5KMessagesAction.
Step 1: Go to Setup > Flows > New Flow.
Step 2: Choose Schedule-Triggered Flow, then click Create.
Step 3: Set Start Date, Start Time, and Frequency to schedule the Flow.
Step 4: Click Choose Object, and select the object and the conditions according to your requirements.
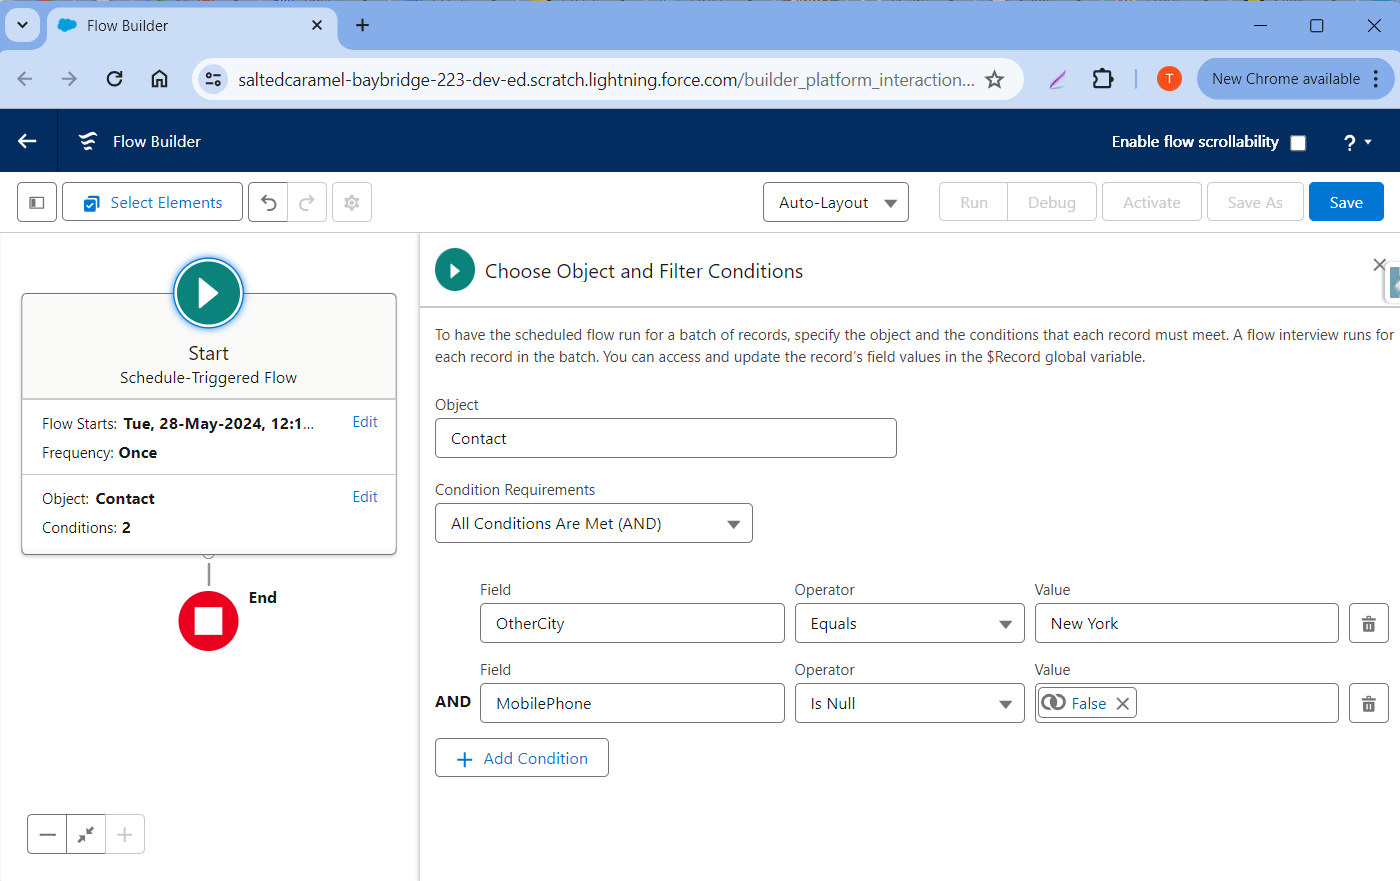
Note: After adding your requirements, add one more condition where the default phone field (which is used for sending messages) is not equal to null. In the case of this example, it’s the Mobile Phone field.
Step 5: Now add a new Action element and search for Send upto 5K messages.
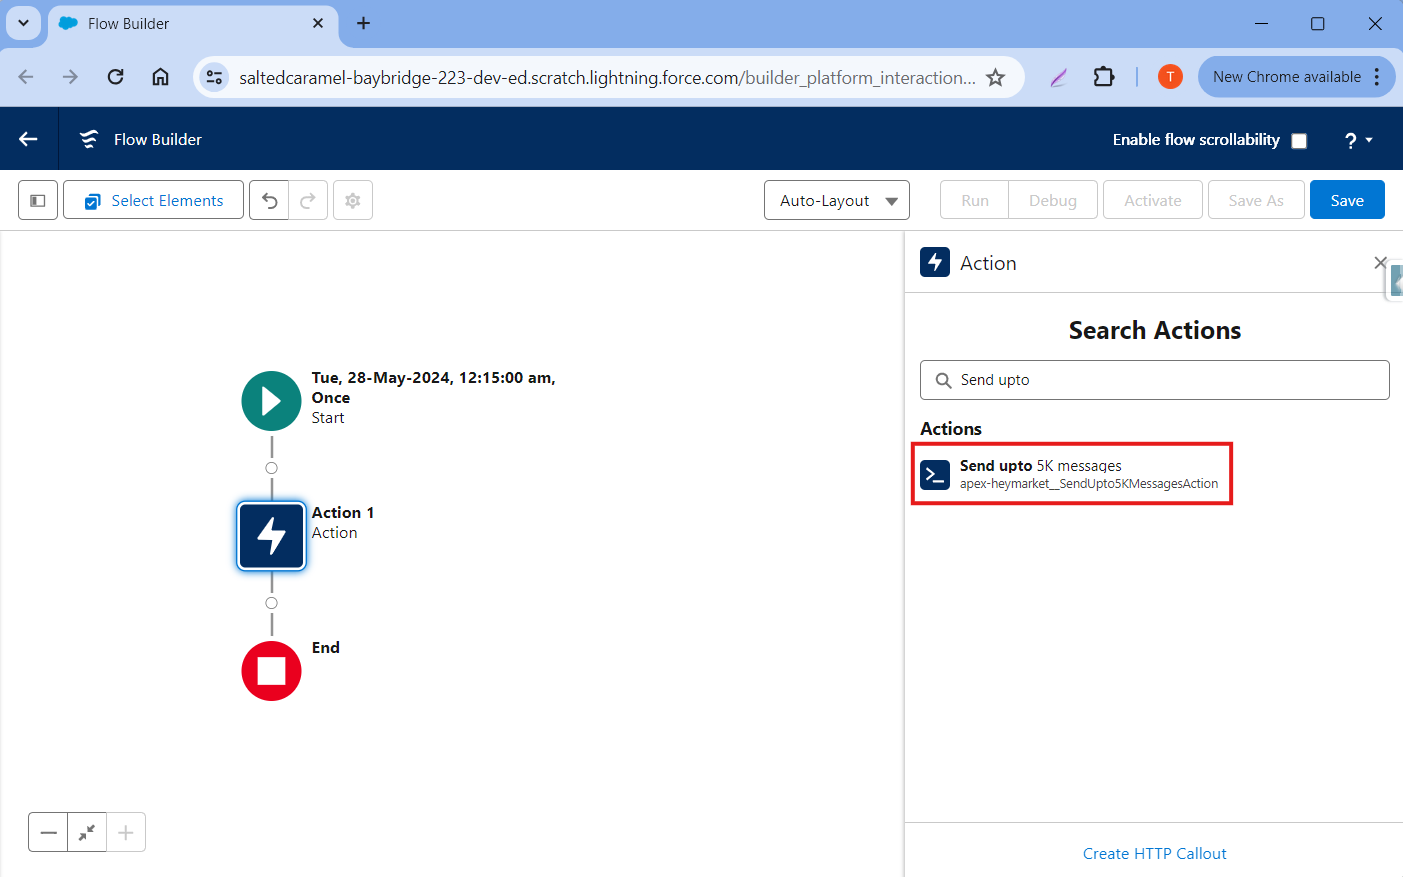
Step 6: Select Send upto 5K messages Action.
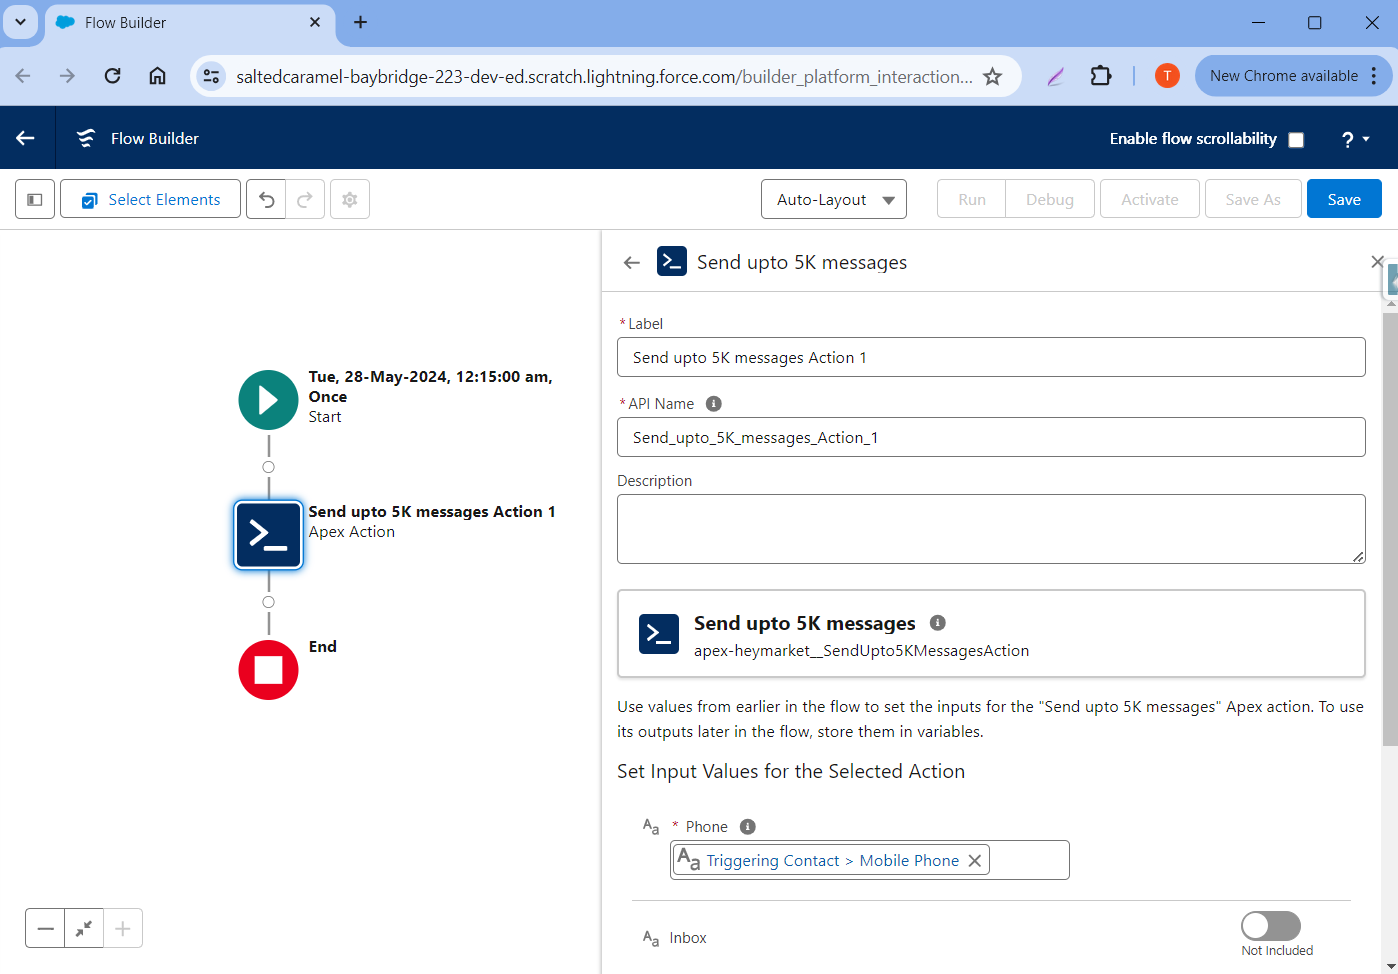
Step 7: Add in the following Apex Action Fields as needed.
- Phone
This is a mandatory field. You can use the field reference of the phone number you want to send the message.
- Inbox Number
If you don’t have the inbox ID, you can add the Inbox Number in the flow (e.g., “14155484779”) and the message will be sent using that inbox.
- Message
In this field, write a message you want to send the user. Don’t use a merge token, because if the contact is not synced with Heymarket, then it will not work. If you want to send a message with a merge token, use the templateId field.
- Salesforce Record ID
This is the record ID of the object. It is mandatory if you are using a template to send a message. It will help you keep track of all related messages. This record ID will be populated on the message object record.
- Template ID
You can also use the Salesforce template to send Flow messages. Add the record Id or template name in the Template Id field. This template record ID will be populated on the message object record.
- User ID
If you want to send a message through a specific user, add the Salesforce user ID of the user in this field. The Flow will pick the Heymarket users from the user mapping and send the message. If you do not mention it, a message will be sent by the default user. The “Heymarket__User_Id__c'' field will be populated with the Heymarket User ID of the Salesforce User.
Step 8: Save and Activate the flow.
Note: You can send up to 10,000 messages using this Flow. After sending the messages, it will take some time to update the message delivery status of all the messages. It can take more than an hour to update the messages in the system. We recommend sending a maximum of 5000 messages at a time.
Community users cannot directly send messages through a flow using the SendUpto5kMessages action. This is because community users cannot be mapped in the Heymarket configuration and therefore do not have the Heymarket permission set assigned. As a result, any attempt to send messages through flows will result in an error.
To work around this limitation, you can use a Platform Event. By creating a platform event and triggering a flow from it, the flow will run under the context of the Default Workflow User (defined in Process Automation Settings in Salesforce Setup). This default workflow user must be mapped to Heymarket to successfully send messages.
Send Bulk Email Action
This action allows you to send automated emails.
Action Name: Send Bulk Email
Input Parameters:
- To / Cc: Comma-separated list of email addresses.
- Subject & Text: Define the subject line and body (supports HTML).
- Template Id or Name: (Optional) Use a Salesforce Lightning Email Template.
- Record Id: (Mandatory if using a Template) The ID of the Salesforce record (Account/Contact/Lead) to associate the message with.
- Inbox Number: Specify which inbox number to send from.
- Conversation Id: (Optional) If provided, threads the email into an existing conversation.
- Salesforce User Id: (Optional) Send on behalf of a specific user. If omitted, the default user is used.
⚠️ Important: This action is designed for transactional 1:1 messaging. It cannot be used for broadcasting promotional or marketing blasts.
Steps to Send Messages Using Community Users
-
Create a Platform Event
- Go to Setup → search for Platform Events → click New Platform Event.
- Enter a Label and Object Name, then click Save.
- Go to Setup → search for Platform Events → click New Platform Event.
-
Add Custom Fields
- Under Custom Fields & Relationships, click New and create the necessary fields for the event (e.g., phone number, message body, etc.).
- Under Custom Fields & Relationships, click New and create the necessary fields for the event (e.g., phone number, message body, etc.).
-
Create a Platform Event–Triggered Flow
- In Setup, search for Flows and click New Flow.
- Select Platform Event–Triggered Flow as the flow type.
- Choose the Send Message Platform Event object you created.
- Click Advanced Settings and ensure the Default Workflow User is selected.
- In Setup, search for Flows and click New Flow.
-
Add the Send Message Action
- Add the Send up to 5K Messages action to the flow.
- Configure the input values as needed (e.g., recipient, message text, etc.).
-
Save and Activate the flow.
- Add the Send up to 5K Messages action to the flow.
-
Trigger the Platform Event from Your Original Flow
- In your original flow (the one where community users initiate the message), instead of using the Send up to 5K Messages action directly:
- Use the Create Records element.
- Create a new Send Message Platform Event record.
- Populate the required fields with the appropriate values.
- Use the Create Records element.
- In your original flow (the one where community users initiate the message), instead of using the Send up to 5K Messages action directly:
-
Assign Permissions
- Grant Create and Read permissions on the new Platform Event to the Community User Profile.
- Grant Create and Read permissions on the new Platform Event to the Community User Profile.
Using Heymarket Actions in Agentforce
Heymarket's Send SMS and Send Email actions can be used inside Agentforce, letting you build messaging directly into your Agentforce agents. You can send messages on demand from an agent, or set up automated replies that route inbound Heymarket messages through an Agentforce agent and reply back through Heymarket.
For the full step-by-step setup, see the dedicated guide:Using Heymarket's Invocable Actions in Agentforce
Appendix
Advanced Settings (Heymarket Configuration Custom Setting)
Some sync settings are managed through the Heymarket Configuration custom setting in Salesforce Setup. To open it: go to Setup, search for Custom Settings, click Manage next to Heymarket Configuration, then click New (or Edit) to open the Edit Heymarket Configuration screen.
-
Configure Record Sync Time You can set how often records sync to your preference (for example, every 5 or 10 minutes). On the Edit Heymarket Configuration screen, enter the number of minutes in the Sync Timing field and click Save. The sync will be scheduled accordingly.
-
Configure Sync Failure Email You can configure an email address to be notified when a sync fails. On the same Edit Heymarket Configuration screen, enter the address in the Failure Alerts Email Address field, enable the Sync Failure Alerts checkbox, and click Save.
-
Disable System Messages Creation You can stop Heymarket from creating system messages in Salesforce (for example, "Chat assigned to…"). On the Edit Heymarket Configuration screen, select the Disable System Messages Creation checkbox and click Save.
-
Create Case From Chat Widget You can allow users to create a Case directly from the chat widget. On the Edit Heymarket Configuration screen, select the Create Case From Chat Widget checkbox and click Save. Once enabled, a Create Case option appears on messages in the Heymarket Chat widget.
- Enable All Inbox View You can allow users to view messages from every inbox they have access to in a single, unified view. On the Edit Heymarket Configuration screen, select the Enable All Inbox View checkbox and click Save.
-
Use Sent Status For Bulk Messages You can display bulk messages (sent from list views or Flows) with a sent status, consistent with how 1:1 chat messages appear. On the Edit Heymarket Configuration screen, select the Use Sent Status For Bulk Messages checkbox and click Save. When this option is off (the default), existing behavior is preserved.
- Show Default Field Only In Msg History You can limit the message history widget to show only the record's configured default phone/email field, hiding the combined "All Messages" tab. On the Edit Heymarket Configuration screen, select the Show Default Field Only In Msg History checkbox and click Save. When this option is off (the default), all message channels continue to appear.
Heymarket Reports
The Heymarket Reports tab lets you view your messaging analytics inside Salesforce, the same as in the Heymarket web app (app.heymarket.com). It includes three reports: Performance, Volume, and Members.
Note: If the report charts do not load, go to Setup → Security → Session Settings and make sure Lightning Web Security is disabled.
Custom Heymarket Reports
The Custom Heymarket Reports tab provides native Salesforce reports and dashboards built on the Heymarket custom objects (such as Message and Job) and standard objects (Case and Lead), giving you insight into the messages sent and received via Heymarket. Open it from the Custom Heymarket Reports tab in the Heymarket app.
The tab is organized into three dashboards, each of which can be viewed as Year To Date, Quarter To Date, or Month To Date. Every report includes a View Report link to open the full underlying Salesforce report.
-
Volume Dashboard — message volume reports:
- Message Type Report
- Messages Record Type
- Record Sync Report
- Most Contacted Object by Type
- Most Frequently Contacted Object
-
Performance Reports — messaging performance and effectiveness reports:
- Messages Status Report
- Template Report
- Most Recently Contacted by Object
- Number of Messages per Object
- Best Performing Templates
- Message Time Hour of Day that Gathers Highest Response
- Opt Out Count per Message
-
Team Members — team activity reports:
- Most Active Agent — messages sent per Salesforce user.
Each report includes a View Report link to open the full underlying Salesforce report.
International Phone Support
The Heymarket app supports international phones. You just have to append the phone number with the country code.
Webhook Event Listener for Opt-In/Opt-Out
The Webhook Event Listener lets Salesforce receive opt-in/opt-out events directly from Heymarket, so opt-in/opt-out statuses stay accurate even when the chat widget is closed or a contact opts out after business hours.
To use this feature, the Process Automation User must be assigned the Heymarket_Admin permission set and be mapped under User Mappings in the Heymarket Salesforce App.
Note: Enabling this feature triggers record updates in Salesforce, which may invoke triggers, flows, or field updates depending on your org's configuration. Review automation impacts before enabling.
Setup Instructions
- Go to Setup → Sites → click New
- Enter details (per provided screenshot) → Save
-
Open the new Site → click Public Access Settings
- Under Enabled Apex Class Access → click Edit → add heymarket.WebhookEventListner → Save
-
Copy the Site URL
-
In Heymarket, go to:https://app.heymarket.com/admin/integrations/api/
-
Paste your Site URL and append: /services/apexrest/heymarket/message
- Click Add → copy the generated token
-
Paste your Site URL and append: /services/apexrest/heymarket/message
-
In Salesforce, open Custom Settings → Webhook Configuration → Manage
-
Create a default record
-
Enable Opt-In and Opt-Out
- Paste the token from Heymarket → Save
-
Create a default record
-
In the Salesforce Heymarket app → open Opt Out Config
- Select the objects you want to enable for opt-out updates and click on Save
Heymarket Sync button on Contact/Lead
Using this button, you can sync single or multiple Contact/Lead records with Heymarket.
Adding a button on List View
Step 1: Go to Setup > Object Manager > Contact/Lead > List View Button Layout. Then click Edit.
Step 2: Add the Heymarket Sync button in the Selected Buttons as shown below and hit Save.
Once you finish the above configuration, this button will appear on any Contact/Lead list view as shown below:
Adding button Page Layout
Step 1: Go to Setup > Object Manager > Contact/Lead > Page Layouts. Pick the correct Page Layout for the required set of Heymarket users.
Step 2: Add the Heymarket Sync button on Page Layout as shown below. Then click Save.
Once you finish the above configuration, this button will appear on any Contact/Lead detail view as shown below:
Primary Record For Sync
You can prioritize and set a primary record when dealing with duplicate records with the same phone number. This feature enhances data accuracy and ensures the correct information syncs with Heymarket.
Setting Up Primary Record for Sync Functionality:
Step 1: Go to Setup > Object Manager, then locate the relevant object (Account, Contact, or Lead) where you want to enable this functionality.
Step 2: Click on Buttons, Links, and Actions, then click New Action.
Step 3: Fill in the details as shown below, and click Save
Step 4: Click on Page Layouts present on the left sidebar, then click the layout where you want to show the button.
Step 5: Add the Mark Primary For Sync button on the layout, as shown below, and click Save
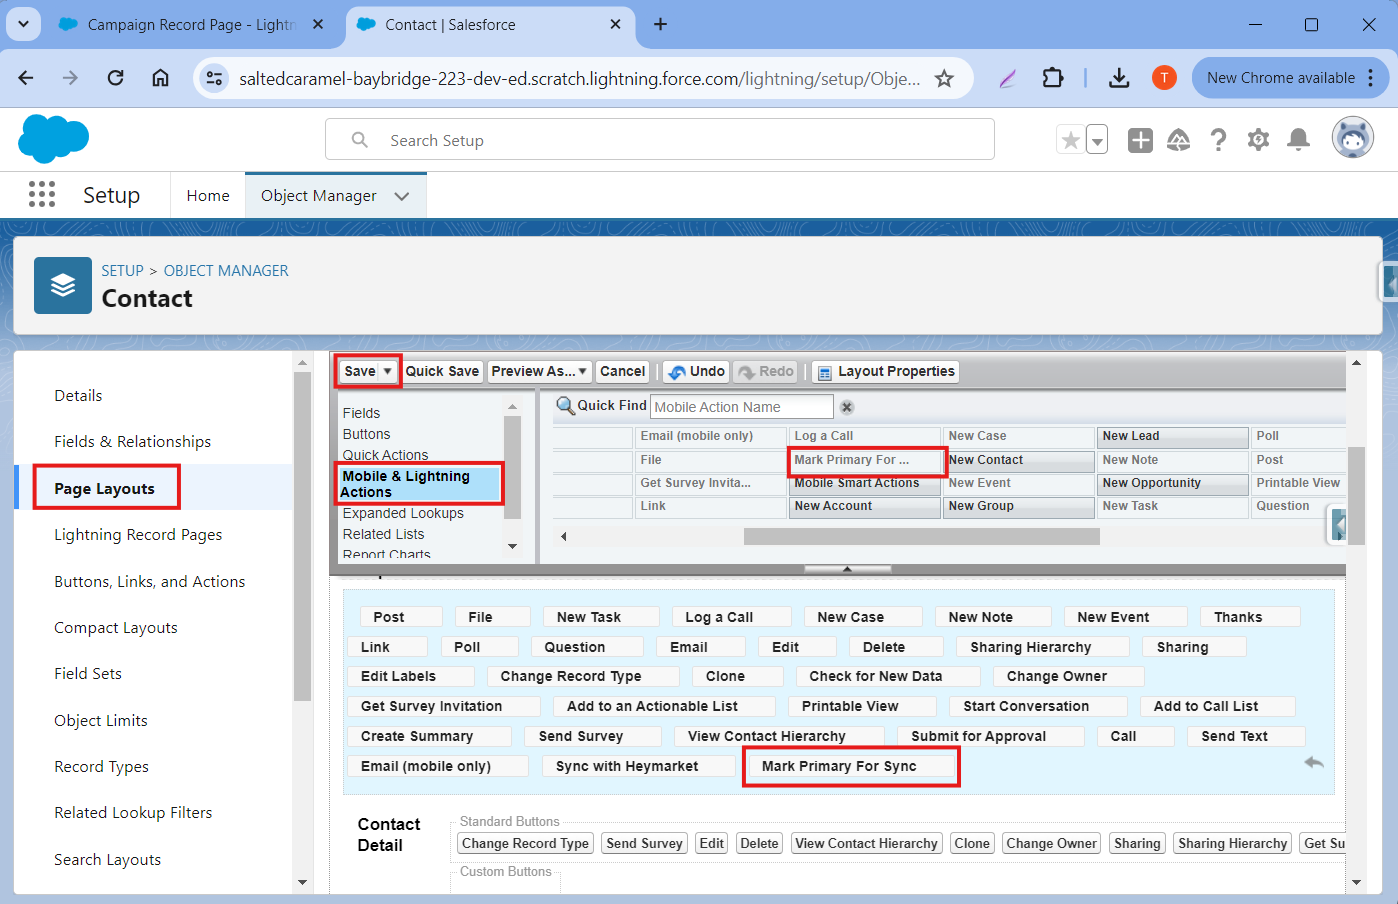
The Mark Primary For Sync button will now be visible on the record page for the selected object, allowing users to easily designate primary records for sync.
Apex Classes Info
- S2HSync_Btch: This batch class syncs records from Saelsforce to Heymarket, and it runs every 30 minutes.
- H2SSync_Btch: This batch class syncs contacts from Heymarket to Saelsforce, and it also runs every 30 minutes.
- Message_Btch: This batch class syncs messages from Heymarket to Salesforce, and it runs every minute.
- BulkMessageSync_Batch: This batch class sync messages status from Heymarket to Salesforce which is sent via flows, lists or any other automations, and it also runs every minute.
- DeleteJobBatch: This batch class deletes heymarket__Job__c records that are older than 30 days. These records store information related to the sync of records and messages, such as when a job was executed and how many records were created, updated, or deleted during the sync.
- DeleteSyncResultBatch: This batch class deletes heymarket__Sync_Result__c records that are older than 30 days. These records store information related to sync failures, such as the record ID that failed, the reason for the failure, and the related heymarket__Job__c record, which is the parent of the sync result.
- DuplicateRecordUpdate_Batch: This batch class is responsible for updating duplicate records marked during the sync process. It verifies whether records marked as duplicates are actually duplicates. For example, if a contact record is flagged as a duplicate based on the phone number, but there is no other contact with the same number exists in Salesforce, this batch will update the heymarket__Is_duplicate__c field to false and populate the heymarket__External_Id__c field with the Heymarket contact ID.
Salesforce Omni Channel Setup
- Setup Guide: Omni Channel Setup Guide
- Skilled Based Omni Channel Setup: Skill Based Omni Channel In Heymarket
FAQs
Q. Can’t find a field in Heymarket for a required Salesforce Contact field?
Ans: The system allows you to map any Heymarket Contact’s custom field to one in Salesforce Contact (both standard and custom). In case you don’t see the required custom field on the Heymarket side, please create a new one by visiting here: https://app.heymarket.com/admin/fields.
After that, check out the “Contact Field Mapping '' section above to map the newly created Heymarket field with one in Salesforce Contact.
You can also create a new Custom field or use an existing one on Salesforce Contact, and map it to any custom field on Heymarket Contact.
Q. Which Salesforce users can use Heymarket App?
Ans: User mapping (described above) in the Heymarket Administration tab is an essential step before any Salesforce user uses the application. Please make sure all Salesforce users planning to use the Heymarket Integration are mapped correctly in the User Mapping screen. Mapping a Salesforce user via our screen assigns required permission sets with access to Heymarket App and other chat-related configurations.
For more detailed control of who can see the Heymarket Chat features, you can configure Contact record pages to be visible only to certain end-user profiles.
Q. Can I use my Heymarket Templates in Salesforce?
Ans: Yes. Hitting the templates icon (shown below) loads all your latest/configured templates from Heymarket.
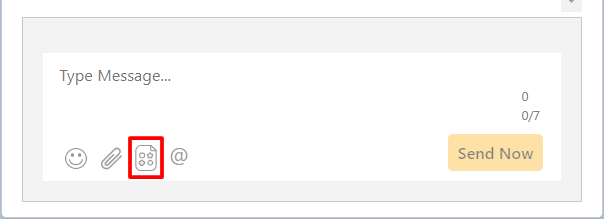
Q. Why am I not getting desktop notifications for chats in Salesforce?
Ans: There could be a few reasons. To fix:
- Disable “Do not disturb” on Mac.
- Enable the Notifications setting from the browser of your Salesforce domain. This is this process will look in Chrome for macOS:
Q. Which Heymarket Inboxes will I see in Salesforce?
Ans: You will be able to see all the inboxes assigned to the current logged-in user in the configured team. The screenshot below of the chat widget on Contact shows the inbox selector.
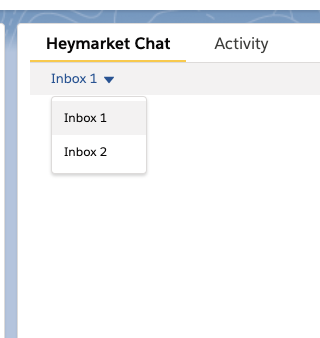
Note: In case some inboxes are not visible to Heymarket User, they will not appear in Salesforce as well. Configure access to inboxes in Heymarket administration.
Q. What gets synced when pushing a Contact from Salesforce to Heymarket?
Ans: The system pushes the Salesforce Contact into Heymaket based on two key factors:
- Default Phone Field: This is configured in Heymarket Administration, and will be the key to decide which Heymarket Contact matches the one in Salesforce. The system will try finding a matching Contact in Heymarket based on the Default phone field only.
- Field mappings: Apart from standard fields First Name, Last Name, Email and Mobile in Heymarket, any other standard/custom fields mapped in “Heymarket Administration” will be pushed out to Heymarket as part of the sync.
Q. How do I fix permission issues on the Contact/Lead/Account page or configuration tab?
Ans: We use the permission set to give all the required permissions to customers, but if you face any issues with permissions like Phone field, Mobile Phone or Other Phone, then you should check their status in your current profile or permission set.
Please make sure that you are using the correct user, and that the user is mapped in the User Mapping section of the Heymarket Administration page.
Q. What does this mean: No Such Column ‘E164_Phone__c’ on entity Account/Lead/Opportunity/Contact/Case Object?
Ans: This issue can occur if an incorrect user is signed in and trying to use Heymarket features. If it’s a correct user, then please make sure that the user is mapped in the User mapping section of the Heymarket Administration page.
If the issue persists, check your profile settings and permissions to ensure that the E164_Phone__c field is included in your field permissions.
Q. How do I fix the error ‘Please Check configuration settings OR try to re-authorise.’?
Ans: Your user doesn’t seem to be mapped with a particular Heymarket user. Just go into the User Mapping tab and check your user in it.
Q. How do I find a field in field mapping for Contact/Account/Lead?
Ans: Please check the field type you are trying to map. Currently, we do not support any non-writable fields from Salesforce e.g.,( LastModifiedTime, Owner, CreatedTime).
We also do not support any Date type field in Salesforce field mapping.
Q. Can I use a different Inbox for another user or my colleague?
Ans: Yes, you can use the User mapping feature and assign a separate inbox for a particular user from the inbox column.
Q. How do I get the Bell Notifications in Salesforce?
Ans: To get bell notifications, you need to create the flow and follow the steps mentioned here.
Q. Why isn’t the chat list in the utility bar visible in other applications?
Ans: You need to add this functionality into the app manually. Here are the steps you can follow.
Q. How can I uninstall the Heymarket app?
Ans: Please check this video for details: https://www.screencast.com/t/GbiOJqvir6
Q. What if an org has multiple records (on the same or different object) with the same name and phone number?
Ans: This is nothing to worry about. Your chats will work accordingly. However, Heymarket allows only one contact with one primary phone number. In sync, you will see the number of synced Salesforce records. It will never be a problem to chat with the phone number.
If you have multiple records on the same object with the same phone number, we will skip duplicates because the same HeymarketID (External Id) can not be populated on more than one record. External ID type fields are unique. We will track duplicate records by setting the field heymarket__Is_Duplicate__c to true. This field can be used to create a listview of duplicates.
Q. I can’t see the Heymarket Administration tab in the Salesforce App?
Ans: In order to enable the custom, Lightning-ready application to work in your Salesforce org, you need to enable a custom domain.
Please follow this URL to enable the custom domain. It’s a five minute process that will help you use the Lightning-ready application.
Q. Why is my sync stuck or not working?
Ans: You need to check if you have a new Flow/trigger created in the org that has impacted the sync.
Q. How can I update the Heymarket App?
Ans: To update the Heymarket app, go to the app launcher and click View All.
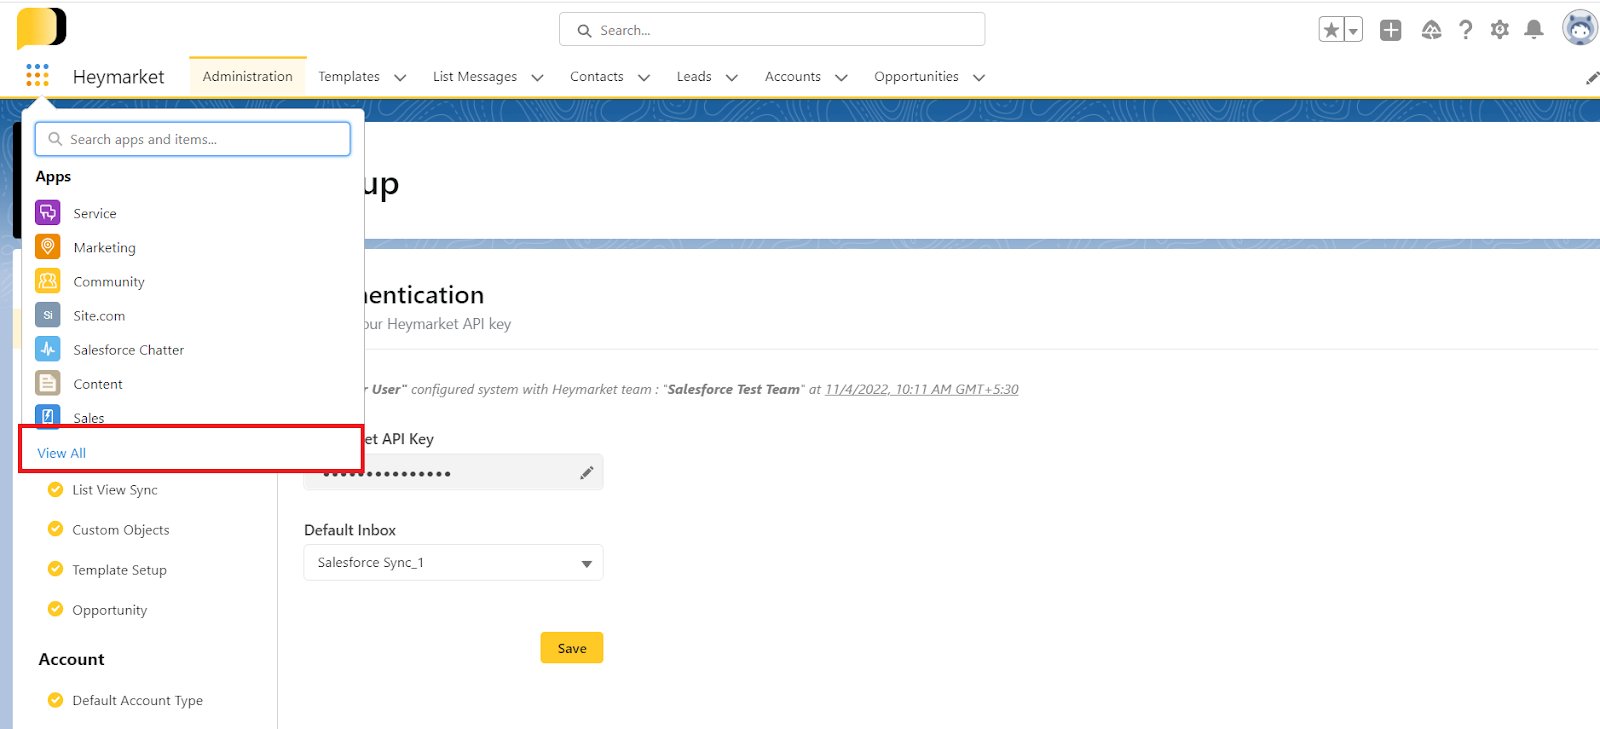
After that you will see the screen like below. There, click Visit AppExchange.
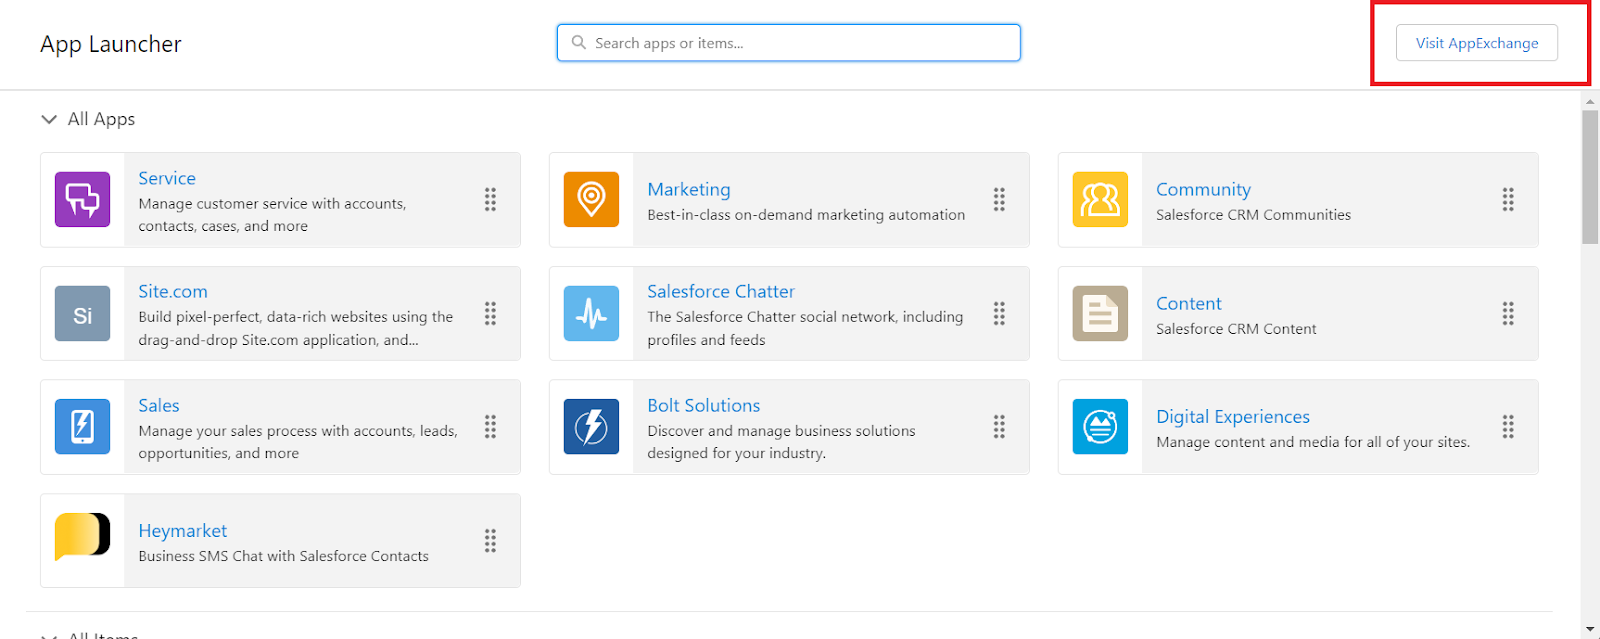
In the app exchange page, search for Heymarket and click on that
You will see Get It Now on the screen above. Click on it, and you will be redirected to the app update screen.
Q. Does the Heymarket app support PROFESSIONAL EDITION?
Ans: Yes, we support it. However, you can’t implement Process Builder and Flows in Professional Edition.
Q Duplicate handling: When multiple contacts or leads share the same phone number, how does Heymarket decide which record to sync?
Ans: If duplicate phone numbers exist, we consider the record that was last modified as the one to sync.
Q. Duplicate handling: Which record does a message get linked to?
Ans: Each message record is linked to the record from which the last message was sent by the user.
Q. Why does the Utility Bar widget show the wrong contact, even when the message record is linked correctly and doesn't match what's displayed in app.heymarket.com?
Ans: In the Utility Bar, the displayed record is determined based on the last modified record that matches the phone number.
Q. When using List View Sync, are contacts or leads removed from Heymarket once they no longer match the list criteria?
Ans: When using List View Sync, records are not deleted from Heymarket. They are simply removed from the sync, meaning their values in Heymarket will no longer update if they no longer meet the list criteria.
Q. Does message history stay visible across old and new contacts that share the same phone number?
Ans: Yes, message history remains visible across both old and new records sharing the same phone number, since it’s associated with the phone number rather than the individual record.
Feedback
Please share any queries or issues here: salesforce@heymarket.com