
Overview
To send and receive emails via Heymarket, certain configuration steps are required to authenticate your domain, validate email addresses, and set up email forwarding. This ensures reliable deliverability and full functionality of your inbox.
Domain Validation
Purpose: Authenticate your domain to improve deliverability and prevent spoofing.
Steps:
- Navigate to Email section of Heymarket Administration
-
Click Connect Domain
- Enter the Root Domain
-
Enter the Sending Domain: Root or Sub-domain: Heymarket supports both root domains and sub-domains. We recommend using a sub-domain (for example,
mail.yourcompany.com) for improved deliverability and to isolate sending reputation
-
- Authenticate Sending Domain
- Go to your domain host’s DNS management panel
- Add the following records exactly as shown on your page
- Navigate to your DNS provider and add the records listed in Heymarket. Below are instructions for common providers:
- Once added, return to Heymarket and check the box “I’ve added these records and click Next.
Sender Preferences
- Navigate to Email Sender
-
Click Add New
- Fill out the Sender Preferences form
- Email Address: The address that will appear in the “From” field of outbound emails. Please note that an email can only be associated with one team.
- Inbox: The Heymarket inbox associated with this sender. Determines where replies are routed.
- Default sender name: This is the name shown in the recipient’s inbox, alongside the email address.
- Additional Senders: These are additional senders that can be used with the inbox. Allows you to send 1v1 and broadcasts from several senders.
- Reply to name: The name that appears in the “Reply-To” field, used when recipients reply.
- Reply to email: The email address used in the “Reply-To” field. Replies will go here instead of the sending address, if set.
- Forwarding email: Once your sender address is verified, this field auto-populates with a unique email (e.g. xyz@acme.com) for forwarding messages into this inbox. No input is needed. You can use this address as described below. This can be left empty.
-
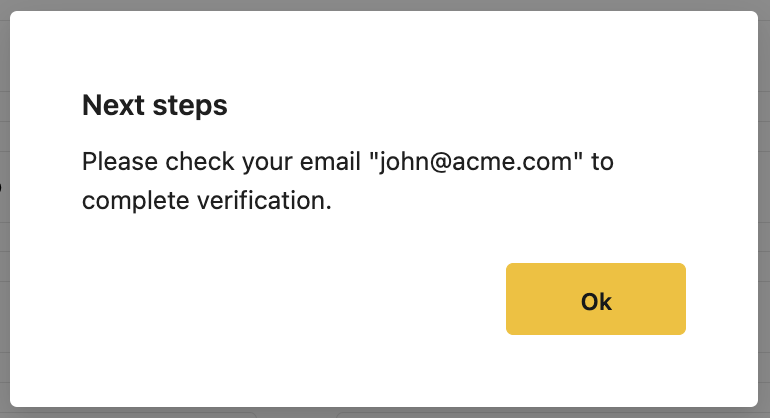
Once saved, you will be presented with this modal:
- Open the email and click the Verify Email link:
- Note: The person who owns the sender email address must be an active Heymarket team member to complete this step, as the verification link requires Heymarket authentication.
Email Forwarding Preferences
To receive emails in Heymarket, you’ll need to set up email forwarding from your existing provider to your Heymarket forwarding address.
Once your sender email is verified, Heymarket will generate a unique forwarding address (e.g.john@customers.heymarket.com). You’ll use this address to route emails into the corresponding Heymarket inbox. This unique forwarding address can be found in Administration > Email > Inbox Configuration. See "Forwarding email":
Important:
Some organizations block external email forwarding by policy. This restriction can prevent forwarded emails from reaching Heymarket and will cause delivery failures with errors like: Access denied, Your organization does not allow external forwarding. Please confirm with your IT team that forwarding to external domains is allowed before proceeding. In Microsoft 365, this is typically controlled via outbound spam policies and remote domain settings.
Below are instructions from popular email providers on how to set up forwarding. Follow the guide for your provider and use your Heymarket forwarding address as the destination:
- Amazon SES
- Amazon WorkMail
- Apple Mail
- Bluehost
- cPanel
- Dreamhost
- FatCow
- GoDaddy
- Gmail: Please note: Gmail may send a verification email to the newly created Heymarket forwarding address. To complete setup, open the email from your Heymarket shared inbox and click the verification link.
- iCloud
- Microsoft Exchange 2007
- Microsoft Exchange 2010
- Microsoft Exchange 2013 or later
- Microsoft Exchange Online
- NameCheap
- OVH
- Rackspace
- Yahoo! Business
- Zoho
Creating Custom Filters
Gmail
Go to Gmail Settings → See all settings.
Navigate to the Filters and Blocked Addresses tab.
Click Create a new filter.
Define your filter criteria (e.g., From: @example.com, Subject: "New Lead").
Click Create filter.
-
Check the box Forward it to and choose your Heymarket forwarding address.
If it's your first time, click Add a forwarding address and verify it through Heymarket.
Save.
Note: You must verify the forwarding address before using it in a filter. Gmail will send a confirmation code to the Heymarket shared inbox.
Outlook / Microsoft 365
Go to Outlook Settings → Mail → Rules.
Click + Add new rule.
Name your rule and set conditions (e.g., From contains @example.com).
Under Add an action, choose Forward to and enter your Heymarket forwarding address.
Save.
Common Examples
Forward only internal emails
Filter: From ends with@yourcompany.com
Use this to route internal communications into a shared inbox for visibility.Forward emails where you're in the "To" field (not CC or BCC)
Filter: To includesyour.name@company.com
Useful to avoid forwarding bulk CCs or alias traffic.Forward emails with a specific subject line
Filter: Subject contains "New Web Lead"
Great for forwarding only contact form submissions or lead notifications.Forward emails from a specific sender
Filter: From isnotifications@partner.com
Use this to ingest messages from a trusted external tool or vendor.
Microsoft 365 Specifics
Warning: Your organization’s Microsoft 365 or Exchange admin must allow forwarding to external email addresses. If external forwarding is restricted, messages will not be delivered to Heymarket.
Your organization’s Microsoft 365 or Exchange admin must allow forwarding to external email addresses. If external forwarding is restricted, messages will not be delivered to Heymarket.
Check with your IT administrator to confirm that external forwarding is permitted and configured correctly.
Learn more: Microsoft’s external forwarding settings
- Admins can configure email forwarding at the organizational level in Microsoft 365, removing the need for each user to manually set up forwarding. Reference: Configure email forwarding - Microsoft 365 admin
- Admins should also review outbound anti-spam policies that may block external forwarding. Reference: Configuring and controlling external email forwarding - Microsoft Defender for Office 365
- Microsoft 365 has a concept of remote domains, which may allow admins to permit forwarding to Heymarket's customers.heymarket.com domain. Reference: Remote domains in Exchange Online
- Some organizations relay outbound mail through external security gateways such as Proofpoint. If the gateway blocks relay to customers.heymarket.com, configure an outbound connector or permit rule that allows mail to that domain so that forwarding works.